Indezine Logo


Inspect Document in PowerPoint 2016 for Windows

Learn how to use the Inspect Document feature in PowerPoint 2016 for Windows. This option lets you find and remove confidential or personal information from your files.


Author:

Product/Version: PowerPoint 2016 for Windows

OS: Microsoft Windows 7 and higher


Learn PowerPoint

Learn how to use output Notes from PowerPoint.


If your presentation is something only you deliver, it rarely matters if you have any content invisible to your audiences, such as your slide notes, comments, and document properties. Typically, none of these are visible to your audience and you are free to add any information in these areas that will enable you to be better prepared to deliver your slides.

However, if you need to share the same PowerPoint presentation with colleagues, or even publish it online, the scenario will be different. Most users don't even think twice about all this information simply due to lack of awareness. Actually they should because most of this content may include hidden data or information that you or your company may not want to share. Even if have no problem with sharing that information, you need to be aware of what exactly you are providing to prying eyes! This information might be stored in the presentation slides or document properties (meta-data). The Inspect Document option in PowerPoint enables you to check your presentation for such hidden properties and personal information, and clean whatever information or data you want to remove.

Work with a Copy

It's recommended to create a copy of your presentation before cleaning up the content using the Inspect Document option. You can then share the new copy of your presentation with others, and retain the original copy with yourself just in case you need the information at a later date.

Your PowerPoint presentations can contain the following types of hidden data and personal information:

Category Details
Comments and ink annotations This information can enable other people to see the names of people who worked on your presentation, comments from reviewers, and changes that were made to your presentation. In addition if you used an ink capable device, all your scribbles, doodles, or handwritten notes may be part of the presentation.
Document properties and personal information Document properties, also known as metadata include details about your presentation such as author, subject, and title. If you used specific features, your document might also contain additional kinds of personally identifiable information (PII) such as e-mail headers, send-for-review information, routing slips, and file path information for publishing web pages.
Custom XML data Presentations can contain custom XML data that is not visible in the document itself. The Inspect Document feature can find and remove this XML data.
Invisible on-slide content Your presentation might contain objects that are not visible because they are formatted as invisible in the Selection and Visibility Task Pane.
Off-slide content PowerPoint presentations can contain objects that are not visible because they were dragged off the slide area into the off-slide area. This off-slide content can include text boxes, clip art, sound files, graphics, and tables.
Presentation notes The Notes section of a presentation can contain text that you might not want to share publicly.
Document server properties If the presentation is saved to a location on a document management server, such as a Document Workspace site or a library based on Microsoft Windows SharePoint Services, the presentation might contain additional document properties or information related to this server location.

Follow these steps to use the Inspect Document option to remove hidden data and personal information from your presentation in PowerPoint 2016 for Windows:
  1. Launch PowerPoint, and open any existing presentation for which you want to run the Inspect Document feature. If you made any changes to your slides, do save your presentation before you proceed further. If you do not want to alter your original presentation, save a new copy of your presentation and then proceed.
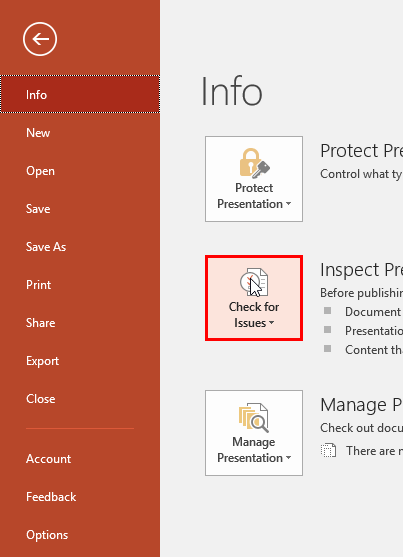
  2. Access the File menu, and choose the Info Pane to get to Backstage view, as shown in Figure 1, below. Thereafter, click the Check for Issues button, as shown highlighted in red within Figure 1.
  3. Info Pane within the Backstage view
    Figure 1: Info Pane within the Backstage view
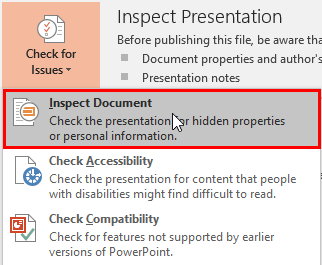
  4. Doing so brings up a small drop-down menu, as shown in Figure 2, below. In this drop-down menu, select the Inspect Document option, as shown highlighted in red within Figure 2.
  5. Inspect Document option selected within the Check for Issues drop-down menu
    Figure 2: Inspect Document option selected within the Check for Issues drop-down menu
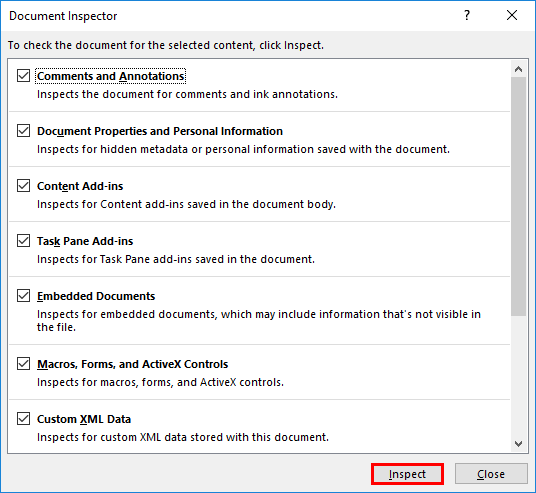
  6. This opens the Document Inspector dialog box, as shown in Figure 3, below. Select the checkboxes to choose the types of hidden content that you want to be inspected. At this point, you can go ahead and select all checkboxes. PowerPoint will just find the hidden content at this time and will not remove that content unless you provide your express permission, as we will explore later in this tutorial. Now, click the Inspect button, as shown highlighted in red within Figure 3, below.
  7. Document Inspector dialog box
    Figure 3: Document Inspector dialog box
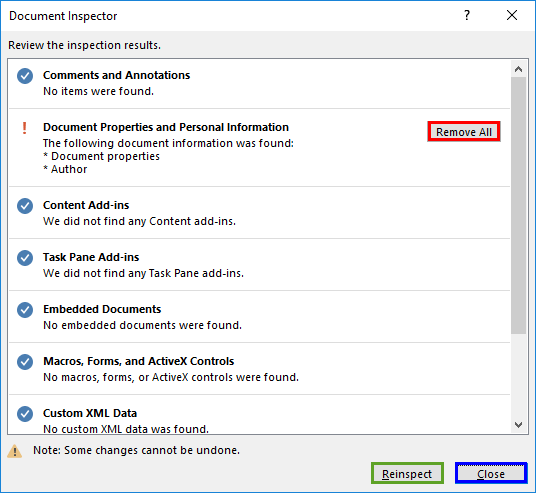
  8. This step will inspect the presentation and display the results within the Document Inspector dialog box, as shown in Figure 4, below. For any hidden information found, PowerPoint will provide you with options on how you may want to deal with the content. Do note that any changes you make at this time cannot be undone, if you save the presentation after making changes.
  9. Document inspection results
    Figure 4: Document inspection results
  10. As you can see in Figure 4 above, there is one inspection result category that has a Remove All button next to it, as shown highlighted in red. You may see more such result categories in your presentation's results. To remove the inspection result of a particular category, just click the Remove All button next to it.
  11. Once done, click the Close button, as shown highlighted in blue within Figure 4, above, to apply the changes. You can optionally click the Reinspect button, as shown highlighted in green within Figure 4, if you want to inspect the document again.
  12. Save your presentation often.

See Also:

16 01 03 - Prepare for Sharing: Inspect Document in PowerPoint (Glossary Page)

Inspect Document in PowerPoint 2013 for Windows
Inspect Document in PowerPoint 2010 for Windows

You May Also Like: To Empower Others: Use the Four Cornerstones of Effective Feedback | Food PowerPoint Templates


Popular Posts

Add Secondary Value Axis to Charts in PowerPoint 2013 for Windows
Learn how to add a Secondary Value axis to charts in PowerPoint 2013 for Windows.

Ten Easy Topics for Pecha Kucha
But what are simple topics, that excite you, and are interesting to your audiences? Of course, if you already have a topic, you need not read further, but if you are still looking for ideas, here are ten easy topics that you can use for your Pecha Kucha presentations.

Drawing Arcs in PowerPoint
Explore how you can draw an Arc shape in PowerPoint.

Set Minimum and Maximum Values on Value Axis in PowerPoint 2013 for Windows
Learn how to set the Minimum and Maximum values on Value Axis of Charts in PowerPoint 2013 for Windows.


Ebook PowerPoint Keyboard Shortcuts

PowerPoint Keyboard Shortcuts and Sequences Ebook

PowerPoint 365, 2019, 2016, 2013, 2011, 2010, 2007 and 2003 for Windows

PowerPoint 365, 2019, 2016 and 2011 for Mac

PowerPoint for the Web on Windows and Mac

Have you ever used keyboard shortcuts and sequences in PowerPoint? Or are you a complete keyboard aficionado? Do you want to learn about some new shortcuts? Or do you want to know if your favorite keyboard shortcuts are documented?

Go and get a copy of our PowerPoint Keyboard Shortcuts and Sequences ebook.


Microsoft and the Office logo are trademarks or registered trademarks of Microsoft Corporation in the United States and/or other countries.

Home | PowerPoint | Photoshop | PowerPoint Templates | PowerPoint Tutorials | Blog | Notes | Ezine | Media Kit | Feedback | Site Map | About Us | Contact Us

Link to Us | Privacy | Testimonials

PowerPoint Backgrounds | Christian PowerPoint Backgrounds | Business PowerPoint Presentation Templates

Plagiarism will be detected by Copyscape

©2000-2023, . All rights reserved.