Indezine Logo


Insert Clip Art in PowerPoint 2003 and 2002 for Windows

Learn how to insert clip art in PowerPoint 2003 and 2002 for Windows. Clip art is available as part of PowerPoint's online resources.


Author:

Product/Version: PowerPoint 2003 and 2002 for Windows

OS: Microsoft Windows XP and higher


Learn PowerPoint

Learn how to start PowerPoint presentation without any clicks.


Clip Art, as per the option of the same name in PowerPoint describes any image, drawing, illustration, graph, picture, etc. These can all be referred to as web-sourced Clip Art. In this tutorial, we'll show you how to insert Clip Art in PowerPoint:

  1. Navigate to the slide where you want to insert Clip Art.
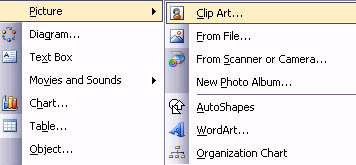
  2. Choose the Insert | Picture | Clip Art option, as shown in Figure 1.
  3. Insert a Clip Art
    Figure 1: Insert a Clip Art
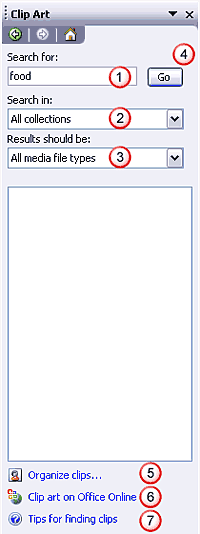
  4. Doing so will summon the Clip Art pane on the right side of the PowerPoint interface, as shown in Figure 2.
  5. Clip Art Pane
    Figure 2: Clip Art Pane
  6. The Clip Art pane has Search options as:
    1. Search for: Type the keywords to search the clips of that category in the text field. Eg. Food.
    2. Search in: Choose the clips in various locations. Eg. Everywhere, My Collection, Office Collection, Web Collection, or Choose all collections is selected.
    3. Results should be:Choose Clip media type. Eg. GIF, WAV, WMF, BMP, default all media files is selected.
    4. Then click on Go Button.
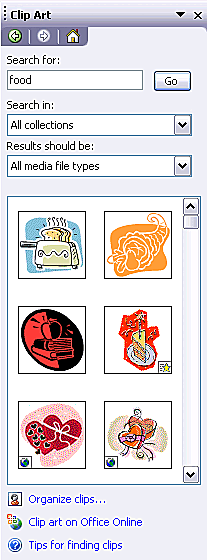
  7. The search results are displayed, as shown in Figure 3.
  8. Searched Clips
    Figure 3: Searched Clips
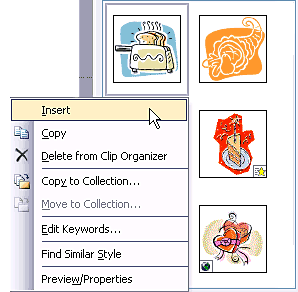
  9. Select any clip from the Clip Art Gallery, as shown in Figure 4. Right-click on it to display a context menu, and then select the Insert option.
  10. Selected Clip from Clip Art Gallery
    Figure 4: Selected Clip from Clip Art Gallery
  11. The selected Clip Art is inserted into the PowerPoint slide as shown in Figure 5.

  12. Inserted Clip
    Figure 5: Inserted Clip
  13. After inserting the Clip Art into the PowerPoint slide, right-click on the picture and choose the Format Picture option as shown in Figure 6.
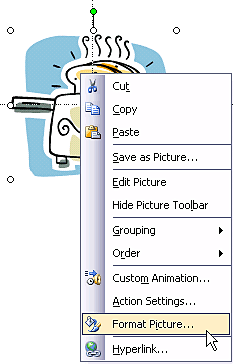
  14. Format Picture
    Figure 6: Format Picture
  15. This opens the Format Picture window as shown in Figure 7. Choose different format tabs and make changes as required. Once done, click the OK button to apply changes.
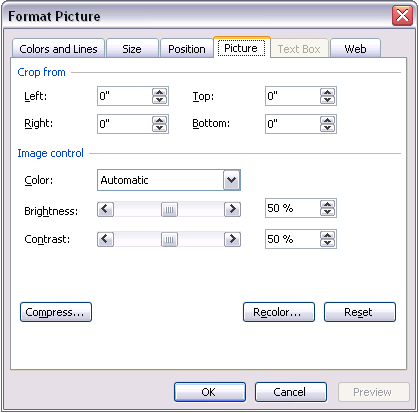
  16. Format Picture Window
    Figure 7: Format Picture Window
  17. Note: To format individual elements of the Clip Art, right-click and choose the Grouping | Ungroup option.
  18. The other three options in the Clip Art pane (refer to Figure 2 above) are explained below:
  19. Organize Clips: When clicked, this option opens the Microsoft Clip Organizer window as shown in Figure 8.
  20. Clip Organizer
    Figure 8: Clip Organizer
  21. Clip Organizer arranges and catalogs Clip Art and other media files stored on your hard disk and quickly finds the clips you need.
  22. Clip Art on Office Online: Opens the Office Online web site for advanced search.
  23. Tips for Finding Clips: When clicked, this link opens a help window.

Clip Art: Insert Clip Art (Glossary Page)

You May Also Like: How to Give People the Level of Detail They Need in Your Presentation | Middle East PowerPoint Templates


Popular Posts

Add Headers and Footers to Slides in PowerPoint 2016 for Windows
Learn how to add Headers and Footers to slides in PowerPoint 2016 for Windows.

Text Box Autofit Options in PowerPoint 2016 for Windows
Learn about Text Box autofit options in PowerPoint 2016.

Paste in Place in PowerPoint
How can you place a copied or duplicated slide object right on top of the original object in PowerPoint?

Formatting Arrows (Arrowheads) in PowerPoint 2013 for Windows
Learn how to format arrowheads for lines in PowerPoint 2013 for Windows.


Handmade Slides: Pushpins for PowerPoint

These “pushpin” graphics are already placed in PowerPoint slides. Just copy them and paste within your slides to create a look that makes a picture, shape, or anything else appear as if it has been pushed onto a surface, board, or wall with a pin! These ready-made pushpins are already within PowerPoint slides, and have been provided in five colors. Just copy them and paste them on your slides.

Download these Pushpins for just $19.99


Microsoft and the Office logo are trademarks or registered trademarks of Microsoft Corporation in the United States and/or other countries.

Home | PowerPoint | Photoshop | PowerPoint Templates | PowerPoint Tutorials | Blog | Notes | Ezine | Media Kit | Feedback | Site Map | About Us | Contact Us

Link to Us | Privacy | Testimonials

PowerPoint Backgrounds | Christian PowerPoint Backgrounds | Business PowerPoint Presentation Templates

Plagiarism will be detected by Copyscape

©2000-2023, . All rights reserved.