Many times, you can manage with a table within PowerPoint instead of an actual Excel spreadsheet. This is especially true when you want your table content to have a consistent look and feel with the rest of your slide. However, tables are static and not really intelligent. They cannot work with formulas or even do the most basic functions that Excel provides. So there may be times when you would want a real Excel spreadsheet within your slides rather than a table.
There are two ways to insert an Excel spreadsheet into your PowerPoint slide, as explained in this tutorial. Both ways provide the same results in PowerPoint 2013 for Windows.
1. Insert an Excel Spreadsheet using the Table drop-down gallery
2. Insert an Excel Spreadsheet using the Insert Object dialog box
1. Insert an Excel Spreadsheet using the Table drop-down gallery
- Navigate to the slide where you want to insert an Excel spreadsheet in your presentation, preferably a slide with the Blank Layout. Then, select the Insert tab of the Ribbon, as shown highlighted in red within Figure 1, below. Within this tab, click the Table button, as shown highlighted in blue within Figure 1, to bring up the Table drop-down gallery, as shown in Figure 1.
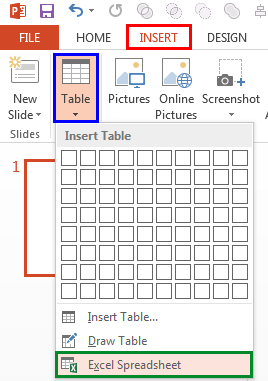
Figure 1: Table drop-down gallery - Within the Table drop-down gallery, select the Excel Spreadsheet option, as shown highlighted in green within Figure 1, above.
- This inserts a typical Excel Spreadsheet with two rows and two columns on your PowerPoint slide, as shown highlighted in red within Figure 2, below. Notice that the PowerPoint interface has changed into the Excel interface. You will clearly see that the Ribbon area where the tab names are completely different, as shown highlighted in blue within Figure 2.
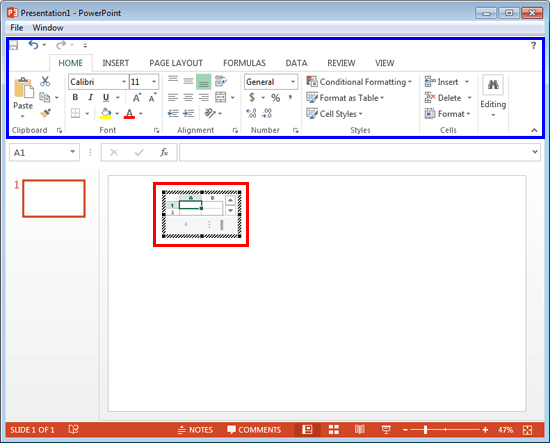
Figure 2: PowerPoint interface changed to the Excel interface - Drag any of the selection handles on the border of this sheet to increase the number of rows and columns, as shown in Figure 3, below.
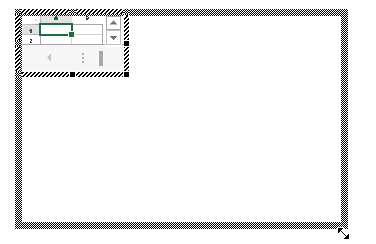
Figure 3: Drag the selection handles to increase the number of rows and columns - The Excel sheet is now active and you can work within the area now. Once you are done working and want to get back to the PowerPoint interface, click on the Slide Area away from the Excel sheet, as shown in Figure 4, below.
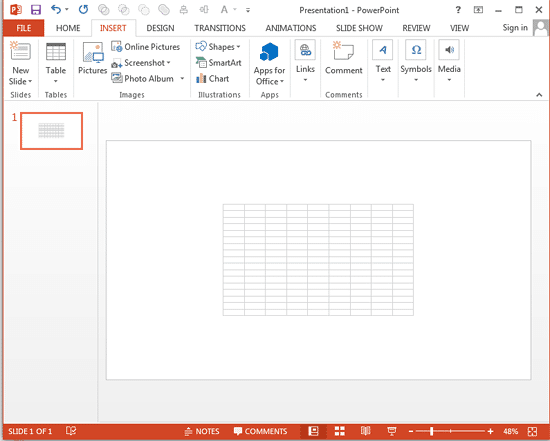
Figure 4: Excel Spreadsheet inserted on the slide
Back
2. Insert an Excel Spreadsheet using the Insert Object dialog box
- Navigate to the slide where you want to insert an Excel Spreadsheet in your presentation. Then, select the Insert tab of the Ribbon, as shown highlighted in red within Figure 5, below. Within this tab, click the Object button, as shown highlighted in blue within Figure 5.
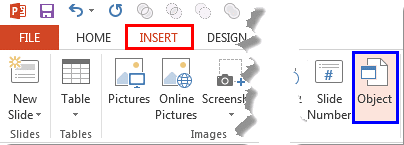
Figure 5: Object button within the Insert tab - Doing so brings up the Insert Object dialog box, as shown in Figure 6, below. Using the scroll bar, as shown highlighted in red within Figure 6, access the Microsoft Excel Worksheet option. Select it and click the OK button.
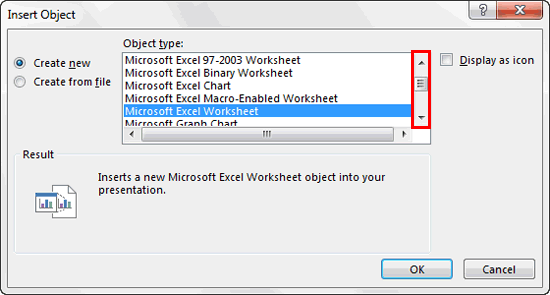
Figure 6: Insert Object dialog box - This inserts a typical Excel sheet on your PowerPoint slide, as shown in Figure 7, below. Notice that the PowerPoint interface has changed into the Excel interface. See the Excel tabs in the Ribbon area, as shown highlighted in red within Figure 7.
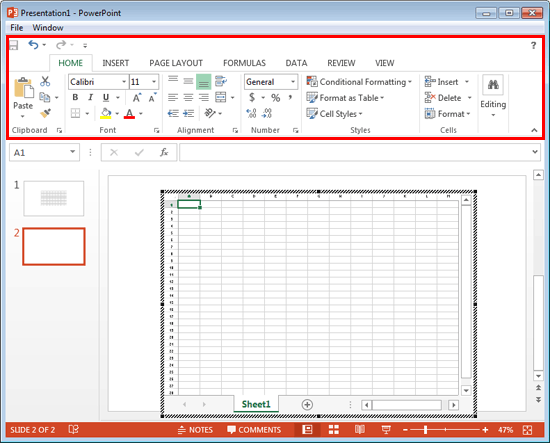
Figure 7: PowerPoint interface changed to Excel interface - Click on the Slide Area away from the Excel sheet to insert it into the slide and also to get back to the PowerPoint interface, as shown in Figure 8, below. Notice the Ribbon area, as shown highlighted in red changes to PowerPoint Ribbon options.
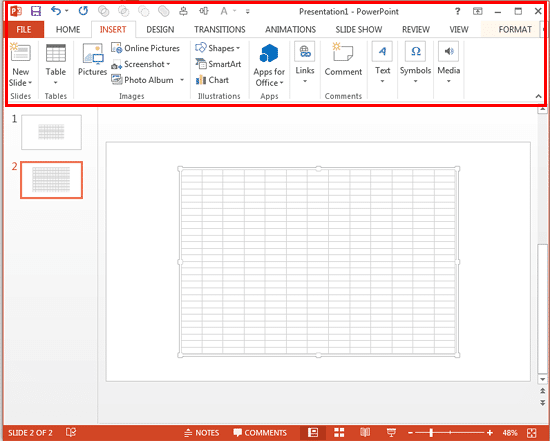
Figure 8: Excel Spreadsheet inserted on the slide
Once you insert an Excel sheet into a PowerPoint slide, just double-click on it to start working. This will change the PowerPoint interface into an Excel interface in which you can edit this sheet as you would do in Excel. Once done, click away from the Excel sheet to get back to PowerPoint.


