It's always a fun exercise adding audio clips to PowerPoint. Some of you may wonder why would you want to add an audio clip? There may be any number of reasons, from adding a voice-over to just inserting some background music. Whatever your reason may be, it helps to know that PowerPoint can insert audio clips of various file types. MP3, WMA, or WAV files are just the common types that you can insert in PowerPoint slides. These audio files automatically embed into your presentation. Even then, it is a good practice to place your audio files in the same folder in which you save your presentation even before you insert them.
Before You Begin with Audio Files
As far as possible, work with a presentation that’s saved at least once. Also, do explore our PowerPoint Friendly Audio Formats page to understand which common and exotic audio file types you can insert in your PowerPoint slides.
Follow these steps to insert an audio clip in PowerPoint 365 for Windows.
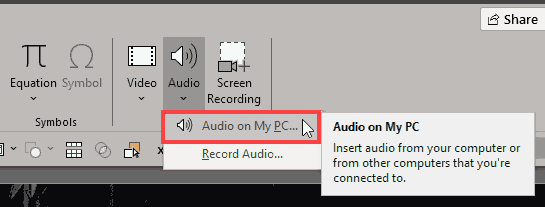
- Navigate to the slide where you want to add an audio clip. From the Insert tab of Ribbon, click the down-arrow below the Audio button to bring up the drop-down menu, as shown in Figure 1, below. Within this menu, choose the Audio on My PC option, as shown highlighted in red within Figure 1.

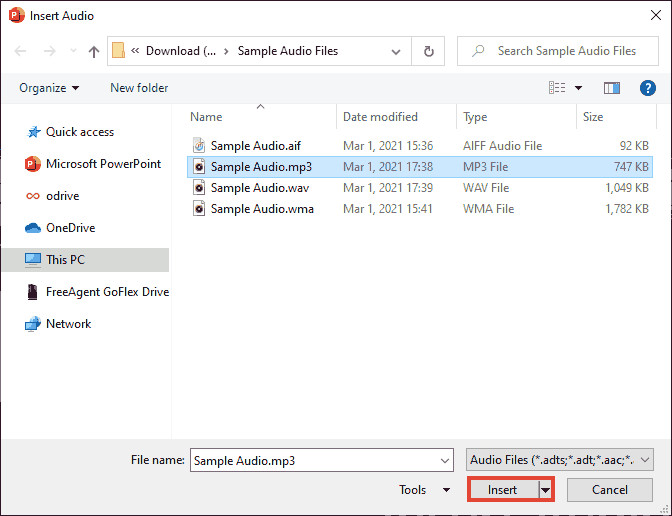
Figure 1: Audio on My PC option - Doing so brings up the Insert Audio dialog box, as shown in Figure 2, below. Navigate to the folder where your audio clips are saved, and click upon any audio file to select.

Figure 2: Insert Audio dialog box
Compatible Audio File Formats
- Look closely, and you will notice that our navigated folder, as shown in Figure 2, above has an audio file with the AIF file extension. AIF or AIFF is an audio file that's more often used on Mac computers. PowerPoint may allow you to insert this audio file format in your slide, but you may have codec issues that could result in you not being able to play this audio file. Similarly, there are some Windows-based file formats that may not work if you need to play them on Mac versions of PowerPoint. To maintain maximum compatibility across operating systems, it's best to use the MP3 file format for audio files.
- Now, click the Insert button, as shown highlighted in red within Figure 2, above. Doing so adds the audio clip to the active slide and embeds it as part of your presentation. This embedding, of course, can balloon the file size of your PowerPoint presentation. If this is a problem, you can still link the audio file rather than embedding it by following the alternative option we explore next.
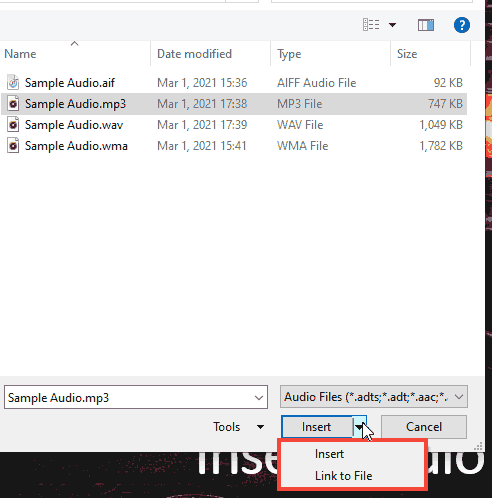
- To link rather than embed, click on the down-arrow next to the Insert button. Doing so brings up a menu with two options, as shown highlighted in red within Figure 3, below.

Figure 3: Choose if you want to link or embed - Insert is the default option that embeds the sound within the presentation. This is the same as discussed in step 3 above.
- Link to File does not store the audio clip as part of your presentation but links to it. If you do choose the Link to File option, always copy your audio clip to the same folder as your presentation before you insert it within your slide. Then, if you want to move the presentation to another computer, you can copy the entire folder rather than just copying the presentation file.
- Once inserted or linked, PowerPoint will place an audio icon in the center of the slide, as shown in Figure 4, below.

Figure 4: Audio icon placed on slide - Note that when you hover your cursor over the audio icon in Normal view, you will see the Player Controls bar. You see a similar bar even in Slide Show view. You can use the Play button on the Player Controls bar, as shown in Figure 4, above.
- If you want the sound to play automatically in Slide Show view without having to hover or click the Play button, you first select the audio icon so that the Playback contextual tab is active on the Ribbon, as shown highlighted in green within Figure 5, below.

Figure 5: Audio Tools Playback tab of the Ribbon
Contextual Tabs
- The Playback and Audio Format tabs are contextual tabs. Contextual tabs are special tabs in the Ribbon that are not visible all the time. They only make an appearance when you are working with a particular slide object which can be edited using special options.
- This tab offers you different options to control the playback of the audio you have selected. Locate the Start option, as shown highlighted in red within Figure 5, above. Clicking this option brings up a drop-down list. From this list select the Automatically option, as shown highlighted in red within Figure 6, below. This step causes the selected audio clip to play automatically when the slide containing the clip comes up in Slide Show mode.

Figure 6: Automatically option selected within Start drop-down list - Note that the default option is In Click Sequence. If you select this option, the sound plays only after you press the space bar, or click your cursor in Slide Show mode to proceed to the next event. In addition, you can also see a third option, When Clicked On in the drop-down list, as shown in Figure 6, above. This option shows the Player Control, and you must press the Play button.
The Curious Case of the Visible Audio Icon
- One small issue that many presenters face is the visible audio icon, even in Slide Show view. Yes, there is a Hide During Show option in the Playback tab of the Ribbon, as shown highlighted in blue in Figure 6, above. However, it is even easier to just drag the audio icon off the Slide Area to the workspace area, as shown highlighted in red within Figure 7, below. Make sure you do so only if you choose the In Click Sequence or Automatically options in the Start drop-down list, as shown in Figure 6. If you choose the When Clicked On option, the audio icon needs to be visible, to click upon!

Figure 7: Drag the audio icon off the Slide Area
- Save your presentation often.


