Sound files of various types such as MP3, WMA, or WAV files can be inserted in PowerPoint 2013, which automatically embeds them into your presentation. This means that you no longer have to worry about linked files getting misplaced or lost. Even then, it is a good practice to keep your sound files in the same folder in which you save your presentation even before you insert them.
Before You Begin with Audio Files
As far as possible, work with a presentation that’s saved at least once. Also, do explore our PowerPoint Friendly Audio Formats page to understand which common and exotic audio file types you can insert in your PowerPoint slides.
Follow these steps to insert an audio clip in PowerPoint 2013 for Windows.
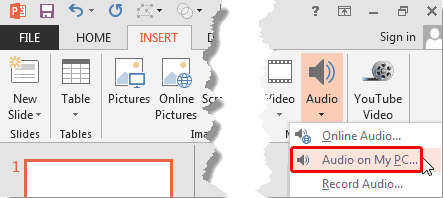
- Navigate to the slide where you want to add a sound. From the Insert tab of Ribbon, click the down-arrow below the Audio button to bring up the drop-down menu, as shown in Figure 1, below. Within this menu, choose the Audio on My PC option, as shown highlighted in red within Figure 1.

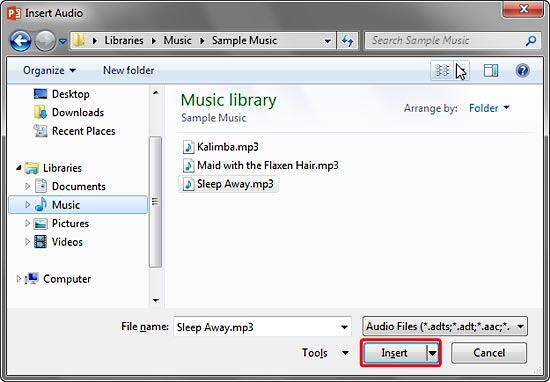
Figure 1: Audio on My PC option - Doing so brings up the Insert Audio dialog box, as shown in Figure 2, below. Navigate to the folder where your audio clips are saved, and click upon any audio file to select.

Figure 2: Insert Audio dialog box - Now, click the Insert button, as shown highlighted in red within Figure 2, above, to add the audio to the active slide and embed it as part of your presentation. This of course can balloon the file size, and you can still link the audio file rather than embedding it by following the alternative options explained next.
- To link rather than embed, click on the down-arrow next to the Insert button. Doing so brings up a menu with three options, as shown in Figure 3, below.

Figure 3: Choose if you want to link or embed Insert
- Insert is the default option that embeds the sound within the presentation. This is the same as discussed in step 3 above.
Link to File
- Link to File does not store the audio clip as part of your presentation but links to it. This is the same as the default behavior in previous versions of PowerPoint (PowerPoint 2007 and earlier). If you do choose the Link to File option, always copy your audio clip to the same folder as your presentation before you insert it within your slide.
Show previous versions
- Show previous versions is an option applicable only if you have overwritten your original audio clip and the previous version of the file is stored on an NTFS volume. According to Microsoft, "Previous versions are either backup copies—copies of files and folders that you back up by using the Back Up Files wizard, or shadow copies—copies of files and folders that Windows automatically saves as part of a restore point."
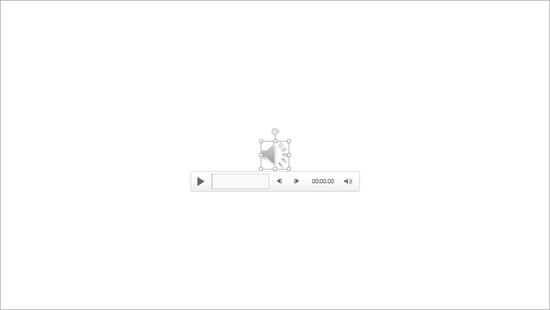
- Whichever option you choose, PowerPoint will place an audio icon on the center of the slide, as shown in Figure 4, below.

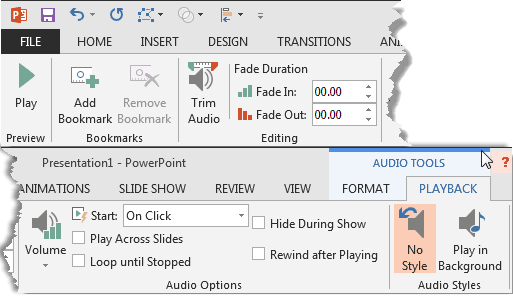
Figure 4: Audio icon placed on slide - You can use the Play button on the Player Controls bar, shown below the audio icon in Figure 4, above. You can also set the audio to play automatically. To do so, select the audio clip icon so that the two contextual Audio Tool tabs of the Ribbon are visible. Click the Audio Tools Playback tab of the Ribbon to activate it, as shown in Figure 5, below.

Figure 5: Audio Tools Playback tab of the Ribbon
Contextual Tabs
- The Audio Tools Format and Audio Tools Playback tabs are contextual tabs. Contextual tabs are special tabs in the Ribbon that are not visible all the time. They only make an appearance when you are working with a particular slide object which can be edited using special options.
- This tab offers you different options to control the playback of the audio you have selected. Within the Audio Options group, click within the box next to the Start option to open a drop-down list, as shown highlighted in red within Figure 6, below. Then, select the Automatically option to make the selected audio play automatically when the slide containing it comes up in Slide Show mode.

Figure 6: Automatically option selected within Start drop-down list - Save your presentation often.


