Connectors may be different than lines in some ways because they are linked to the shapes they connect. Move the linked shape, and the connector repositions
itself with the shape. Yet in other ways, connectors are just like conventional
lines in PowerPoint, especially when you explore their formatting options.
You can thus add arrowheads to your connectors (or remove them), make your connector a dashed line rather than an undashed one, and also change the thickness of the
connector. To format a connector in PowerPoint 2013 for Windows, follow these steps:
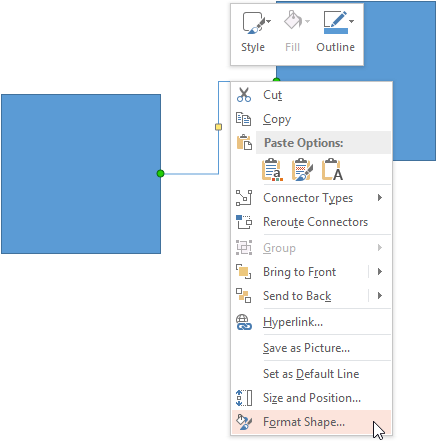
- Select the connector that you want to edit, right-click on it to open a contextual menu as you can see in Figure 1. Within the
contextual menu, choose the Format Shape option.

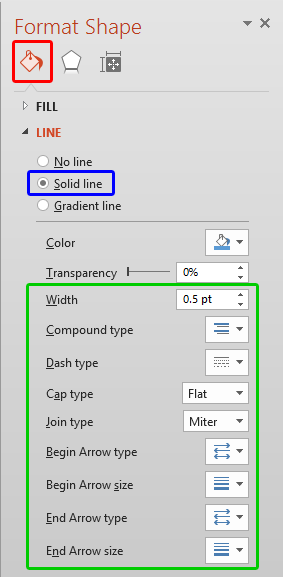
Figure 1: Format Shape option within contextual menu- This opens the Format Shape Task Pane
that you can see in Figure 2. Make sure that the Fill tab is selected (highlighted in red within
Figure 2). Within the Line section, select the Solid line radio button (highlighted in
blue within Figure 2).

Figure 2: Line formatting options within Format Shape Task Pane- All the Line formatting options (highlighted in green area within Figure 2,
above) are explained below:
- Width: Here you can increase or decrease the line weight (thickness) to any value you want.
- Compound type: Click to open Compound type drop-down menu, as shown in strong Figure 3. Choose from different
line styles such as simple, double-ruled, etc. Learn more in our
Formatting Outlines for Shapes (Weight/Thickness) in PowerPoint
2013 for Windows tutorial (explore point 4B).

Figure 3: Compound type drop-down menu- Dash type: This option opens the Dash type drop-down menu (see Figure 4). Choose any of the available dash
types. Explore more in our Formatting Outlines for Shapes (Dashes)
in PowerPoint 2013 for Windows tutorial.

Figure 4: Dash type drop-down menu- Cap type: This option allows you to choose between a Square, Round, or Flat line end type, as
shown in Figure 5.

Figure 5: Cap types- Join type: This allows you to choose between Round, Bevel, and Miter joins, as shown in
Figure 6.

Figure 6: Join type drop-down menu- You can also customize the arrow style by changing the Begin Arrow type, the Begin Arrow size, the End Arrow type,
and the End Arrow size.
- Figure 7 shows the Begin Arrow type drop-down. The End Arrow type drop-down has the
same options. In both these drop-downs, you'll find options for 5 arrow styles, and a No Arrow option.

Figure 7: Begin Arrow type options- You also have nine different choices regarding the size of the arrowhead, starting from Arrow L Size 1 to
Arrow L Size 9 (letter L stands for left). Figure 8 shows you the Begin size drop-down, and not surprisingly,
the End size drop-down offers the same options! But the only difference will be that the letter R will replace the letter L denoting Right. Learn
more in our Formatting Arrows (Arrowheads) in PowerPoint 2013 tutorial.

Figure 8: Begin Arrow size options
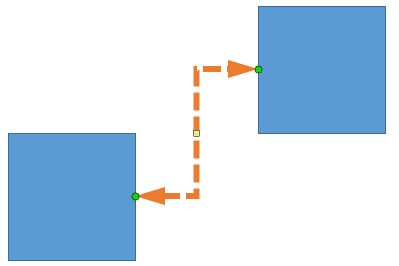
- Select the formatting options and format the connector as required. Figure 9 shows the connector that we started with after applied
with some of the formatting options.

Figure 9: Formatting applied to the connector


