In all PowerPoint versions, you can either animate the entire table, or apply no animation at all! There's no easy way to animate just one column, row, or cell individually. However, there is a workaround in PowerPoint versions on Windows, where users can ungroup the table so that the table gets converted into a bunch of individual shapes, and then you can animate the ungrouped table components individually.
However, if you are using PowerPoint 2011 for Mac, you can't ungroup the table like how you would do in Windows PowerPoint versions. Yet, there is one more workaround where you don't apply any animation to the table components, but when you play the slide containing the table, it appears that your table components are animating!
Follow these steps to fake-animate tables in PowerPoint 2011 for Mac:
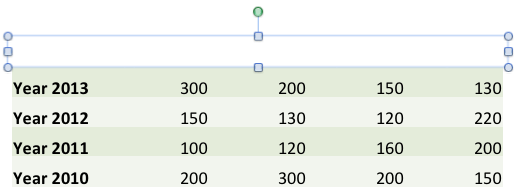
- Within your presentation, navigate to the slide containing the table that you want to fake-animate. If you don't have an existing table, insert a new table, and populate it with some content, as shown in Figure 1, below.

Figure 1: Table inserted and populated with some content - Think about how you would like your table to animate, i.e. whether row by row or column by column. Then, insert a rectangle over the first row/column of the table in such a way that it hides the entire row/column. In Figure 2, below, you can see a rectangle being drawn over the first row.

Figure 2: Rectangle inserted over the first row - After the rectangle is drawn, remove any outlines or shadow effects from it. Thereafter, add a Slide Background Fill to the rectangle. Doing so will make the rectangle completely invisible, and also shows the background of your slide, as shown in Figure 3, below. This is very essential if your slide background is filled with a picture, or a gradient, or anything else other than a plain white span.

Figure 3: Rectangle after removing shadow and outline, and applying Slide Background fill What's a Slide Background Fill?
- A slide background fill is essentially a fill that contains the background used by your slide. So, if the slide is a solid white color, all your slide background fills will be white. If your slide background is a picture or a gradient, then any shape with a slide background fill attribute will contain the same picture or gradient fill.
- Learn more about the slide background fill in our Add Slide Background Fill to Shapes tutorial.
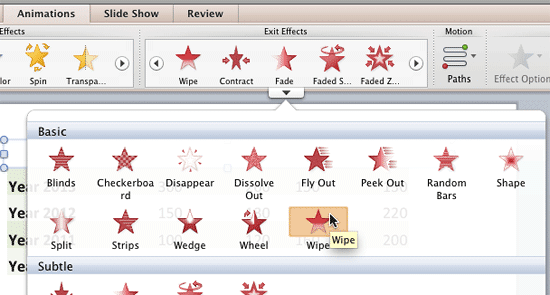
- Now, apply an Exit animation to the rectangle. In Figure 4, below, you can see that we have selected the Wipe exit animation within the Exit Effects drop-down gallery.

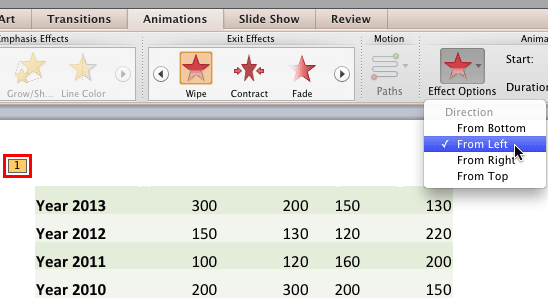
Figure 4: Wipe exit animation within the Exit Effects drop-down gallery - After applying the animation, make sure the animation is selected, as shown highlighted in red within Figure 5, below, and click the Effect Options button within the Animations tab of the Ribbon to bring up a drop-down gallery that contains options pertaining to the selected animation type. In Figure 5, you can see that we set our Wipe animation to play From Left.

Figure 5: Wipe animation set to play From Left - Then, set the animation event and speed as required. In Figure 6, below, you can see that the animation event has been set to start After Previous, as shown highlighted in red and Duration (speed) is set to 1.50 seconds, as shown highlighted in blue.

Figure 6: Animation event and speed set for the rectangle - You can also try some other options to make the animation more effective. To learn more about various animation options, explore our Animation and Transitions page.
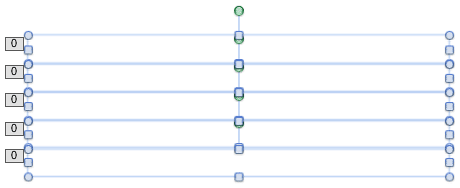
- Once you are done with applying an Exit animation to the rectangle, preview the animation once to check whether everything is working fine. Then, duplicate the rectangle by dragging so that the duplicate copy of the rectangle covers the next row/column. Similarly, continue duplicating the animated rectangles so that your entire table is covered by a set of adjacent rectangles, as shown in Figure 7, below. Since these rectangles were already animated, the animation also duplicates! Also note that the 0 digits that represent animation on all rectangles indicate that all rectangles are set to animate After Previous.

Figure 7: Table covered by the animated rectangles - When you play this slide, animated rectangles leave the slide one by one making the table's row/column below them to appear as they exit. This creates an illusion as if the table is animating.
- Save your presentation often.


