Insert an audio file within your PowerPoint slide, and choose to play it either with a click or set it to play automatically. Whichever option you choose, some files can sound loud and unexpected! Have you not experienced the sudden scare or shock when a shrill voice interrupts an almost silent environment? Rather than interrupt the flow of your presentation, you can use PowerPoint's fade options to add a gradual increase in the volume of your audio files. PowerPoint provides both Fade In and Fade Out effects that you can add to the beginning and end of your audio clips. These fade options make your audio clips sound smoother and more subtle.
Follow these steps to add Fade effects to the beginning and end of an audio clip in PowerPoint 2016 for Windows:
- Open your presentation, and navigate to the required slide where you have already inserted an audio clip. Select or double-click the audio clip to bring up the two contextual Audio Tools tabs in the Ribbon. These two tabs are Format and Playback. Click the Playback tab to activate it, as shown highlighted in blue within Figure 1, below.

Figure 1: Audio Tools Playback tab of the Ribbon Contextual Tabs
- The two contextual tabs in Audio Tools are Format and Playback. Contextual tabs are special tabs in the Ribbon that are not visible all the time. They only make an appearance when you are working with a particular slide object which can be edited using special options.
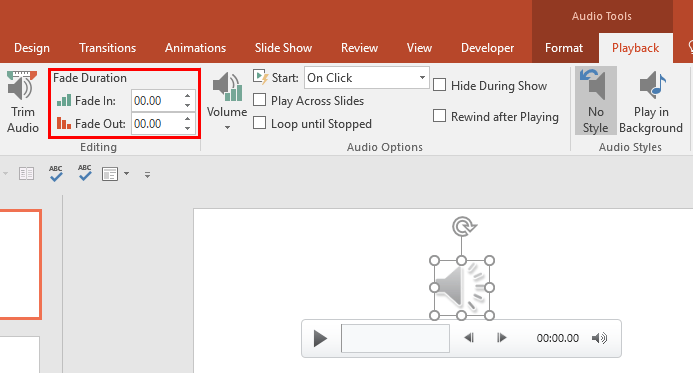
- Now, within the Audio Tools Playback tab, you'll find the Fade Duration options, as shown highlighted in red within Figure 2, below.

Figure 2: Fade Duration options - These are the two Fade Duration options:
Fade In
- Adds a timed fade effect at the beginning of the audio clip. Within the Fade In box, directly enter the exact number of seconds you want the clip to fade in. Alternatively, use the Up and Down arrows beside the box to increase or decrease the Fade In duration.
Fade Out
- Adds a timed fade effect at the end of the audio clip. Within the Fade Out box, directly enter the exact number of seconds you want the clip to fade out. Alternatively, use the Up and Down arrows beside the box to increase or decrease the Fade Out duration.
Longer Fades Sound Better
- A longer fade duration will result in smoother fades. Adding a 2 seconds fade to an audio clip that is 10 seconds in duration will not make too much of a difference. Adding a 10 seconds fade to a 2-minute audio file will result in a more pronounced change as far as the sound or volume is concerned.
- Experiment with different fade values to get the effect you want. Play your audio clip to preview the difference.
Remove the Fade?
- To remove a fade, set both the Fade In and Fade Out values back to 00.00, as shown highlighted in red within Figure 2, earlier on this page.
- Make sure to save your presentation often.
Fades in Older Versions of PowerPoint
Fade effects were introduced in PowerPoint 2010 for Windows. If you try to open the presentation with fade effects applied in older versions of PowerPoint, then those fades will be ignored. Also fades will not work if you choose the Play Sound Across Slides option.


