We looked at how you can manually save and share your AutoCorrect entries from one installation of PowerPoint or Word to another. However, this is a time-intensive task that is also prone to errors. Wouldn’t it be better if automated tools were available to perform these tasks? The good news is that such tools are available and we are looking at not one but two such tools in this tutorial.
These two tools are:
- AutoCorrect Utility Manager, a Word template
- Kutools for Word, a Word add-in
We will now explore both tools. Do note that while both these tools work within Microsoft Word, the resultant AutoCorrect entries will work in PowerPoint and all other Office programs as well. We need to do these steps in Word because that's the only Office program that can work so deeply with AutoCorrect. We used Word 365, but these techniques should work similarly in at least the other new versions of Word, including Word 2019 and 2021. All versions used are for Microsoft Windows.
1. AutoCorrect Utility Manager
The AutoCorrect Utility Manager is a Word template created by Greg Maxey and is available for free download from his site. Although it backs up and restores your AutoCorrect entries, it does so much more as well with AutoCorrect entries such as adding, deleting, and redefining AutoCorrect entries.
Follow these steps to get started with the AutoCorrect Utility Manager, also known as ACUM:
- Download the AutoCorrect Utility Manager file from Greg Maxey's site.
- The file you download will be a ZIP file. Extract the ZIP file and you will find that it contains a single Word template, called AutoCorrect Utility Manager.dotm, as shown highlighted in red within Figure 1, below.
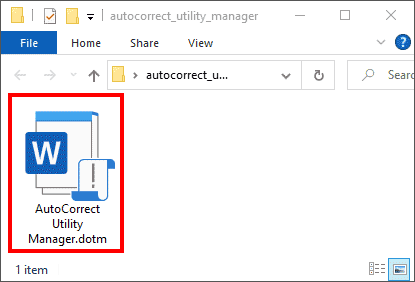
Figure 1: AutoCorrect Utility Manager Word template - Double-click this template file and you will see that Microsoft Word will load, as shown in Figure 2, below.
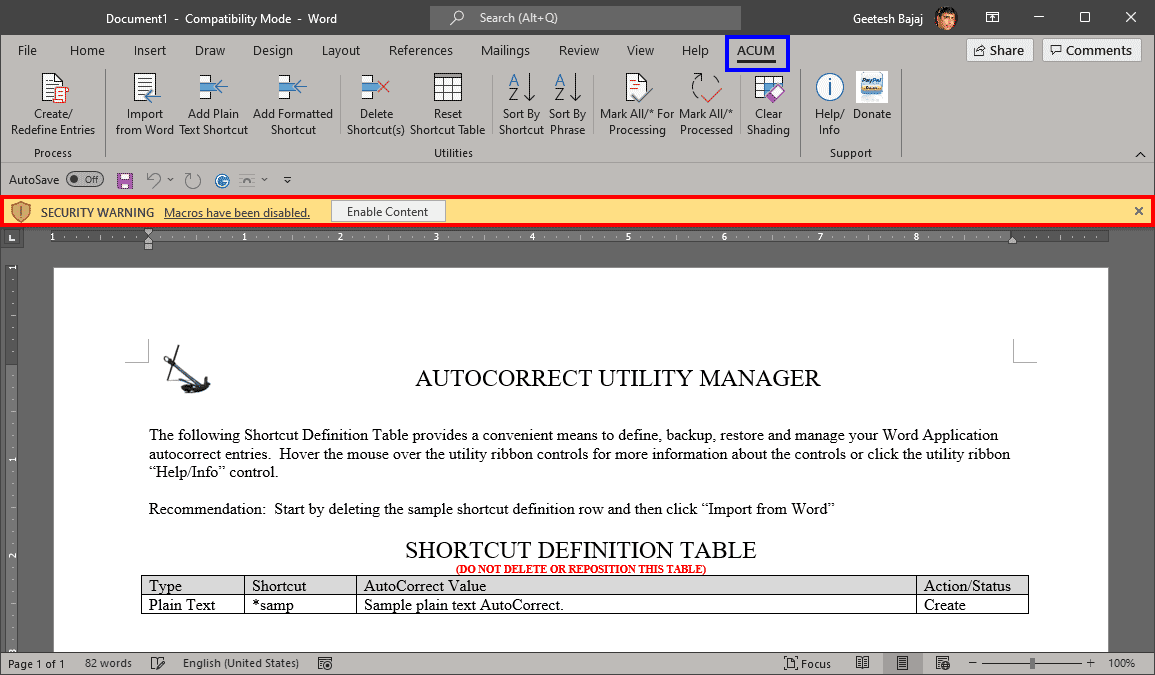
Figure 2: Word with ACUM tab on the Ribbon - As you can see in Figure 2, above, there's a new ACUM tab on the Ribbon, highlighted in blue. However, clicking on any of the options within this tab may not result in any activity. That's because this tab is disabled, as can be seen in the yellow bar highlighted in red within Figure 2. To proceed, you will have to click on the Enable Content button.
- Now, as you can see in Figure 3, below, the yellow bar is no longer visible, and you can use all options within the ACUM tab on the Ribbon.

Figure 3: ACUM tab is now enabled - Note that the Word document shown open in Figure 2, previously on this page has a Shortcut Definition Table that contains a sample AutoCorrect entry. You first need to remove this sample entry. To do so, click on the Reset Shortcut Table button, highlighted in red within Figure 4, below.
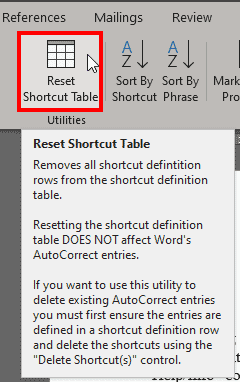
Figure 4: Reset Shortcut Table - None of your existing AutoCorrect entries have been imported into this Shortcut Definition Table yet. To remedy this situation, click the Import from Word button highlighted in red within Figure 5, below.
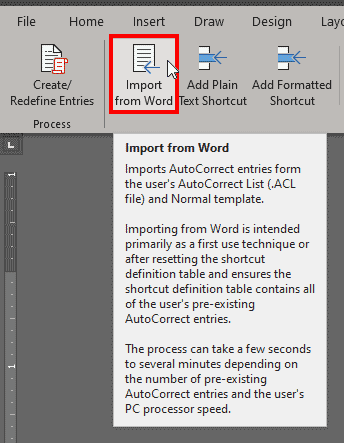
Figure 5: Import from Word
Import from Word, or from PowerPoint?
- Although the button is called Import from Word, the AutoCorrect entries you import will be valid for all Microsoft Office programs that can use AutoCorrect such as PowerPoint, Excel, and Outlook. AutoCorrect is a shared feature accessible to all Microsoft Office programs installed on your system.
- AutoCorrect Utility Manager will now start importing your existing AutoCorrect entries, as shown in Figure 6, below.
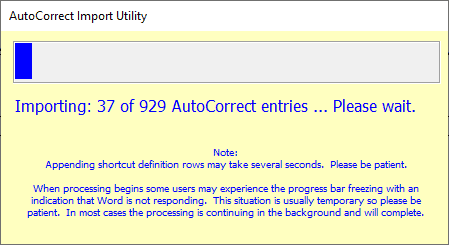
Figure 6: Importing AutoCorrect entries - Once the import is done, you'll see a table in the active Word document, as shown in Figure 7, below. This is the Shortcut Definition Table.
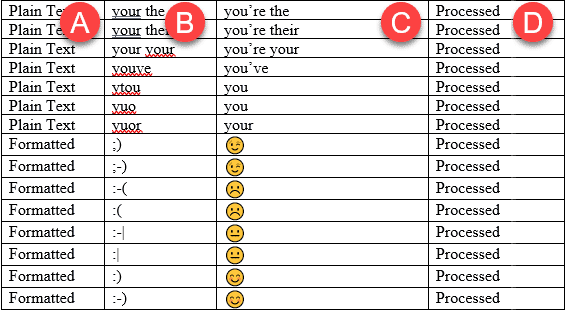
Figure 7: Shortcut Definition Table - The columns in this Shortcut Definition Table are explained below, as marked in Figure 7, above:
A. Type
- The Type column is restricted to two values: Plain Text or Formatted. Word calls these Unformatted and Formatted, and an explanation of these two types of AutoCorrect entries can be found in our Saving and Sharing AutoCorrect Entries in PowerPoint 365 for Windows tutorial.
B. Shortcut
- This column contains the shortcuts that activate AutoCorrect. Word and PowerPoint call this the Replace column. You can learn more in our Creating and Editing AutoCorrect Entries in PowerPoint 365 tutorial.
C. AutoCorrect Value
- This column contains the AutoCorrect content that's used in place of the shortcut you type. Word and PowerPoint call this the With column. You can learn more in our Creating and Editing AutoCorrect Entries in PowerPoint 365 tutorial.
D. Action Status
- This is a unique feature in AutoCorrect Utility Manager, and specifies the status of the AutoCorrect entry in the Shortcut Definition Table. All entries imported from Word are specified as Processed. There are more parameters in AutoCorrect Utility Manager for this column, but that's beyond the scope of this tutorial.
- To back up these AutoCorrect entries, save the Word file and save it in a local folder, an external hard drive, or a cloud location as a backup.
- To restore from this backup, follow steps 3 to 5 so that AutoCorrect Utility Manager is enabled. Then, open your saved Word document that contains the Shortcut Definition Table. Next, click the Create/Redefine Entries button, as shown in Figure 8, below.
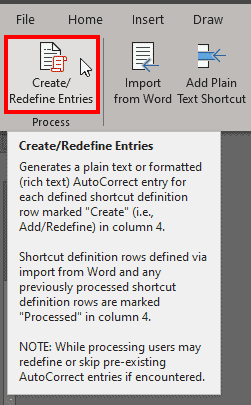
Figure 8: Create or Refine Entries - AutoCorrect Utility Manager will launch the Shortcut Validation Utility and restore all your AutoCorrect entries. You'll see a progress bar, as shown in Figure 9, below.

Figure 9: Shortcut Validation Utility - When done, you'll see the Action Complete window, shown in Figure 10, below.
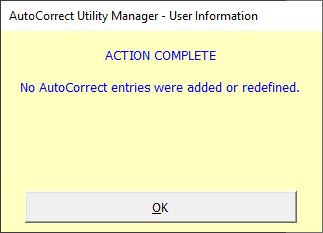
Figure 10: Action Complete window
2. Kutools for Word
The next tool that we are exploring for backing up and restoring AutoCorrect entries is Kutools for Word, a Word add-in from ExtendOffice, a company based out of Hainan, China. Our contact for this feature at ExtendOffice was Jay Chivo. Thank you, Jay.
Now, backing up and restoring AutoCorrect entries is just one of the hundred or so features included within Kutools. Also, unlike AutoCorrect Utility Manager, Kutools is not a free product. However, they do have a full-featured 30-day trial version available.
Follow these steps to get started with Kutools for Word:
- Download and install Kutools for Word.
- Once installed, you will see new Ribbon tabs within Word called Kutools and Kutools Plus, as shown highlighted in red within Figures 11 and 12, below.

Figure 11: Kutools tab of the Ribbon 
Figure 12: Kutools Plus tab of the Ribbon - To back up your AutoCorrect entries, access the Kutools Plus tab of the Ribbon and click the Export/Import button, as shown highlighted in red within Figure 13, below.
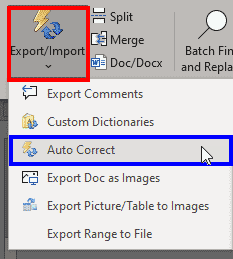
Figure 13: Export and Import options in Kutools for Word - Doing so brings up a drop-down menu, as shown in Figure 13, above. Choose the Auto Correct option, as shown highlighted in blue within Figure 13.
- Further instructions on this process can be found on the Kutools site.


