Now that you know how you can create a self-signed digital certificate outside PowerPoint, you will soon discover that these certificates are not trusted. This means that you can send these non-trusted certificates only to known people who are confident that the sender is the actual originator (or author) of the document. However, you can provide the recipients a certain level of confidence by converting these to trusted certificates.
In this tutorial you'll learn to stamp a self-signed certificate as trusted within PowerPoint. If you did not read our previous tutorials in this series, we would like to let you know that this tutorial is a continuation from point 7 of the Creating Digital Certificates Outside PowerPoint 2010 tutorial.
Thereafter, follow these steps to enable trusted certificates in PowerPoint 2010 for Windows:
- Bring up the Windows Security window, as shown in Figure 1, below, as explained in point 7 of the Creating Digital Certificates Outside PowerPoint 2010 tutorial. Note that you must create digital certificates to follow the techniques explained in the rest of this tutorial. Within the Windows Security window, as shown in Figure 1, choose any of the available certificates, and click the Click here to view certificate properties hyperlink within that area.
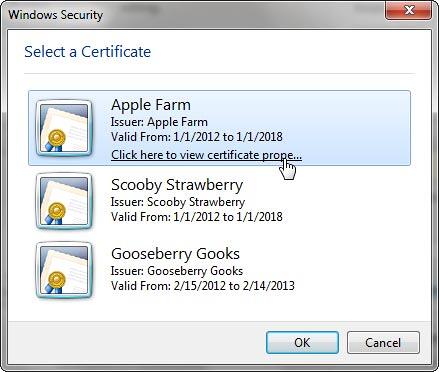
Figure 1: List of certificates within the Windows Security window- Doing so brings up the Certificate Details dialog box, as shown in Figure 2, below. Within this dialog box, make sure that you select the General tab. Here you can see the Certificate Information section, as shown highlighted in red within Figure 2, where there is a message to indicate that the certificate is not trusted, as indicated by a red cross mark.
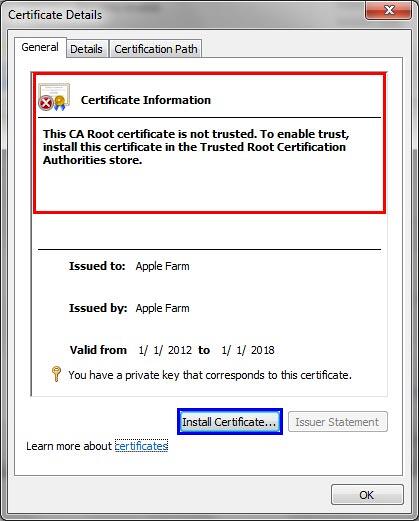
Figure 2: Certificate Details dialog box- To begin the process to make the certificate trusted, click the Install Certificate button, as shown highlighted in blue within Figure 2, above.
- Doing so opens the Certificate Import Wizard, as shown in Figure 3, below. Click the Next button, as shown highlighted in red within Figure 3.
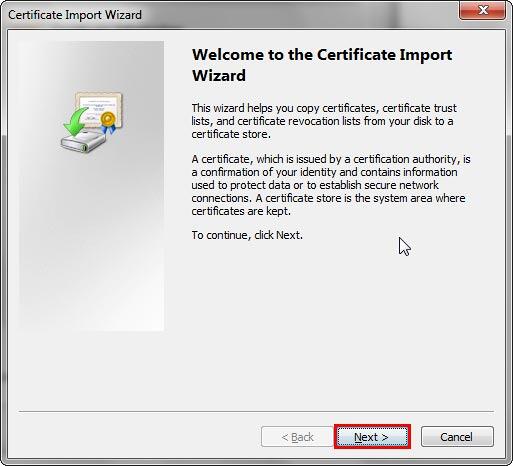
Figure 3: Certificate Import Wizard- This action will bring up the next screen of the wizard, as shown in Figure 4, below. Within this screen, select the Place all certificates in the following store radio button, as shown highlighted in red within Figure 4.
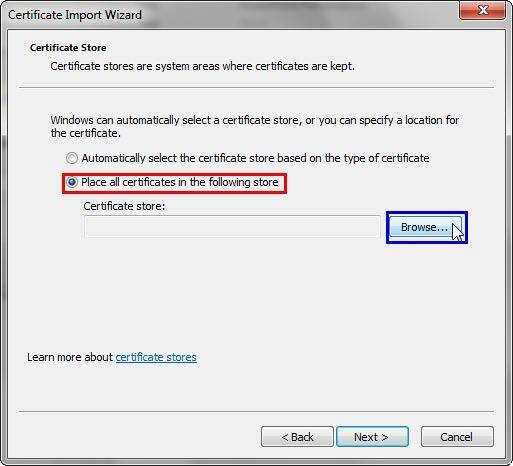
Figure 4: Storing the certificate- Doing so opens the Select Certificate Store dialog box, as shown in Figure 5, below. Within this dialog box select Trusted Root Certification Authorities folder, and click the OK button. Thereafter, click the Next button to go to the next screen of the wizard.
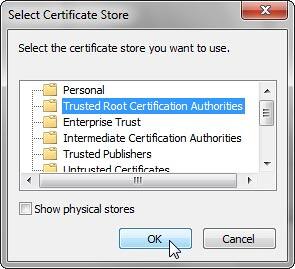
Figure 5: Select Certificate Store dialog box- This action will bring up the final screen of the Certificate Import Wizard. Click the Finish button, as shown in Figure 6, below.
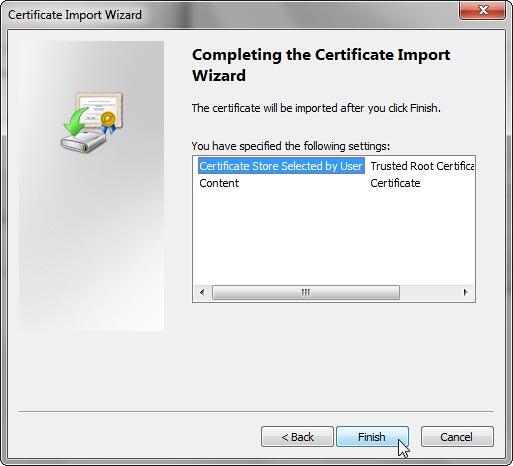
Figure 6: Final screen of the Certificate Import Wizard- Now, you can see the Security Warning window, as shown in Figure 7, below. This window displays a warning message before installing the certificate to the trust root on your system. Click the Yes button. You'll get a confirmation message window that says the certificate has been successfully imported. Click the OK to proceed.
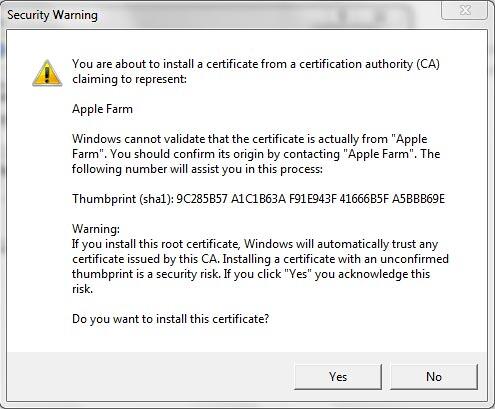
Figure 7: Security Warning window- Now, click the OK button in both successive dialog boxes to get back to PowerPoint. We have now ascertained that the certificate is a trusted certificate.


