Learn how to add emphasis animation effects in PowerPoint 2013 for Windows. You can animate any existing text, shape, image, graph or chart so that they remain on the slide itself after the animation has concluded.
Author: Geetesh Bajaj
Product/Version: PowerPoint 2013 for Windows
OS: Microsoft Windows 7 and higher
Emphasis Effect animations determine how the slide object calls attention to itself while it is on-the-slide. Entrance and Exit effect animations allow a slide object to enter or exit the Slide Area respectively, whereas slide objects with Emphasis Effect animations are already there on the slide area before they start animating, and will continue being on the slide after they have finished animating. Typical Emphasis Effects are Spin and Grow/Shrink. You can also apply Emphasis Effect animations to text objects so that fonts or text colors change.
In all, there are 50 or more Emphasis Effects that PowerPoint provides. With so many options, it's easy to go astray adding animations all the time. It's important to restrain and make sure you use animation only if it adds value to your presentation and helps you explain something better to your audience.
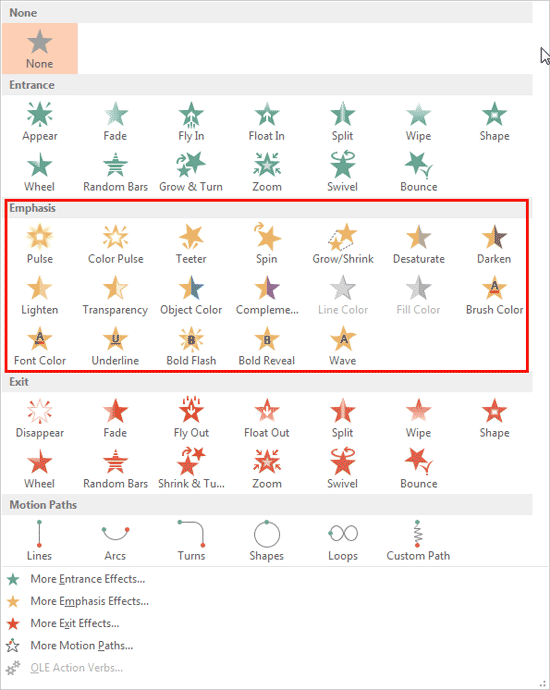
The Add Animation drop-down gallery of the Ribbon includes some of the Emphasis animations, as shown highlighted in red within Figure 1, below.

Figure 1: Emphasis Effects available for a shape (or a picture)
Notice that some of the Emphasis Effect animations such as Brush Color, Font Color, Wave etc. have been grayed out. This is because these effects work only with text, and we have selected a shape to apply animation. Now look at Figure 2, below that shows the Add Animation drop-down gallery we summoned for applying animation to a text box.

Figure 2: Emphasis Effects available for text
In Figure 2, above you can see that all Text animations are available. However, Line Color and Fill Color effects have been grayed out since they don't apply to text.
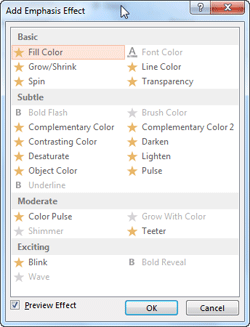
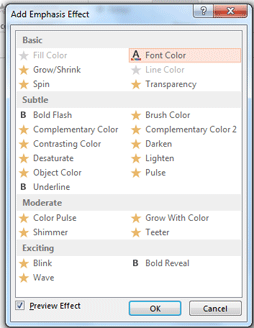
If you want to explore more Emphasis Effect animations, select the More Emphasis Effects option within the Add Animation drop-down gallery, as shown highlighted in blue within Figure 1, previously on this page. Doing so opens the Add Emphasis Effect dialog box, as shown in Figure 3, below. The emphasis effect animations within Add Emphasis Effect dialog box entirely depend upon the slide object you have selected. Within Figure 3, towards the left you can see the Add Emphasis Effect dialog box when a shape is selected. Here, we selected a Rectangle) for applying animation. If you select some text, it will look what you see towards the right within Figure 3.


Figure 3: Add Emphasis Effect dialog box
Within the Add Emphasis Effect dialog box you'll see that Emphasis Effects are divided into four categories:
These category names explain how much attention-seeking each of these available effects are:
As far as possible, you should use something simple such as an Appear, a Grow/Shrink, or a Transparency effect. These are all from either the Basic or Subtle categories.
The embedded sample presentation below shows all the Emphasis Effects animation available in PowerPoint 2013.
You can also learn how to add an animation in PowerPoint 2013, and the types of animation that PowerPoint provides.
See Also:
13 01 06 - Basics of Animation: Emphasis Animations in PowerPoint (Glossary Page)
Emphasis Animations in PowerPoint 2016 for Windows
Emphasis Animations in PowerPoint 2011 for Mac
Emphasis Animations in PowerPoint 2010 for Windows
Emphasis Animations in PowerPoint 2007, 2003, and 2002 for Windows
You May Also Like: Presentation Management is Risk Management | Mascara PowerPoint Templates


Microsoft and the Office logo are trademarks or registered trademarks of Microsoft Corporation in the United States and/or other countries.