Have you ever been in a situation where your presentation looked so awesome with some amazing typography, but when you
opened the same presentation on another computer, the text looked positively terrible! This behavior may happen if the font
you used is not available on the other computer. The best solution to this problem is to
use safe fonts that are available on most computers,
or you may also explore the option to embed fonts in your PowerPoint presentation.
Note: Do note that all fonts cannot be embedded, and also you may not know which fonts support embedding or
not! To learn which fonts can be embedded or not, look at our
Can this font be embedded? page.
Follow these steps to embed fonts in your presentation in
PowerPoint 2016:
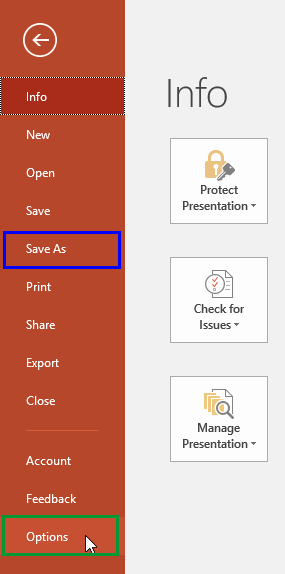
- Within PowerPoint 2016, click the File menu to bring up
Backstage View. Select
Options, as shown highlighted in green within Figure 1, below.

Figure 1: Backstage view
- Alternatively, select the Save As
option (keyboard shortcut: F12) as shown highlighted in blue within
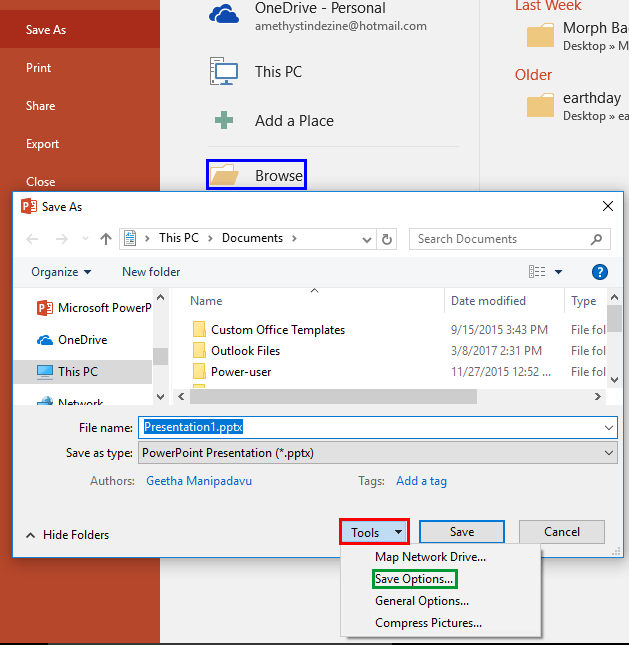
Figure 1, above. This action brings up the locations to save the persentation as shown in
Figure 2, below. Click the Browse button (highlighted in blue
within Figure 2). This brings up the Save As dialog box as shown in Figure 2.
Click the Tools button as shown highlighted in red within Figure 2
to open a drop down menu. Within this drop-down menu, select Save Options as shown highlighted
in green.

Figure 2: Save As dialog box- Either way, you summon the
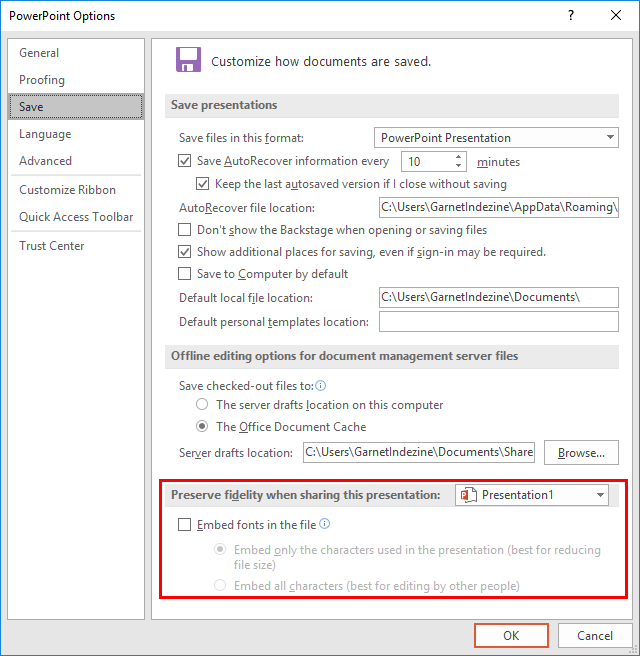
PowerPoint Options dialog box. Make sure
that the Save tab of this dialog box is selected, as shown in Figure 3, below. The options
related to embedding fonts are highlighted in red within Figure 3, below.

Figure 3: The Save tab provides font embedding options- First of all, if you did not get here via the Save As dialog box, you will need to select the
presentation within which you want to embed fonts. This action is especially important if you have more than one
presentation open. To do so, click the drop-down list next to the text that reads Preserve fidelity when sharing
this presentation, as shown in Figure 4, below. Now select the presentation you want.

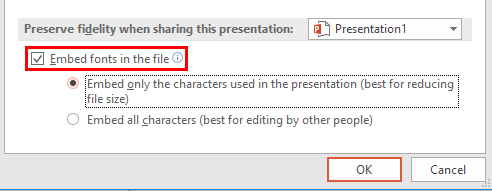
Figure 4: Choose the presentation for font embedding- Next, check the Embed fonts in the file option, as shown highlighted in
red within Figure 5, below.

Figure 5: Choose the Embed option- Finally, you need to select from one of two radio buttons, as explained below:
Embed only the characters used in the presentation
- This option will only embed characters you have used in your presentation. For example, if you create a
single slide presentation with just one text box that contains the word 'AFTER', then only capital-case characters of five
alphabets will be embedded. If you want to edit the text later, and do not have the embedded font on your system, then you will not
see the original font used!
Embed all characters
- This options gets over the limitation explained in the preceding paragraph!
- Click the OK button to accept these changes, or press Cancel to return without
making changes.
Test Embedded Fonts Before You Present in PowerPoint
Remember to open your presentation on a computer that does not have your embedded font installed to make sure that the font
has indeed been embedded. If you find that the font was not embedded, it could be that you are looking at the presentation
on PowerPoint for Mac, or other PowerPoint versions for tablets and phones. Font embedding is only supported on PowerPoint for
Windows.
Also, only True Type fonts support embedding, and even then they must have embedding options enabled. Confused? Look at
our Can this font be embedded? page for a
more detailed description.


