Indezine Logo


Edit Custom Dictionaries in PowerPoint 2010 for Windows

Learn how to edit custom dictionaries in PowerPoint 2010 for Windows. You can add, alter, and remove words.


Author:

Product/Version: PowerPoint 2010 for Windows

OS: Microsoft Windows XP and higher


Learn PowerPoint

Learn how to ungroup charts in PowerPoint.


Imagine this scenario: you have created a specialized, medical presentation that's full of squiggly, red, underlined words! These squiggly underlines indicate what PowerPoint considers to be as a misspelled word! Don't blame PowerPoint, because its medical skills are somewhat limited. We do know that almost all the words in your medical presentation are perfectly valid as far as spelling is concerned. The silver lining here though is that you can teach PowerPoint to spell those words, and enhance PowerPoint's custom dictionary.

Of course, not only can you teach PowerPoint how to spell medical words, but you can also teach the program how to spell words that enhance lexicons in various other subjects such as research, law, computing, etc. Any changes you make by adding new spellings of words in PowerPoint will also influence spell checking in other Microsoft Office programs such as Word, Excel, or Outlook because they all share the same dictionaries.

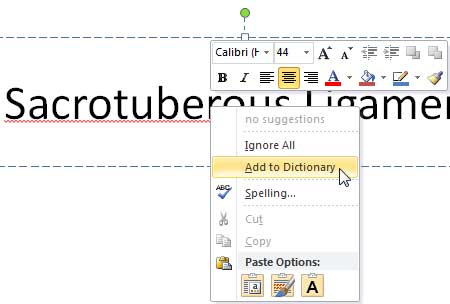
Typically, when you encounter a word indicated as misspelled, you can right-click to bring the contextual menu that you see in Figure 1, and then select the Add to Dictionary option. This action adds a new word to PowerPoint's custom dictionary.
  • Add to Dictionary option selected
    Figure 1: Add to Dictionary option selected
  • Alternatively, you can use the Add button from within the Spelling dialog box. Either way, this word is added to your custom dictionary. A custom dictionary is essentially a list of words that is different from PowerPoint's regular, built-in dictionary. Typically, PowerPoint refers to both its built-in and custom dictionaries to ascertain if any word is misspelled.

    Here is a typical side-effect of adding new words to your custom dictionary: you may click the Add to Dictionary option sometimes due to your cursor slipping, or just by mistake. Yes, you can remove that misspelled word from the dictionary, and also add new words to the dictionary by editing your Custom Dictionary:
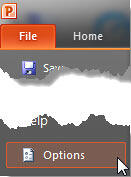
    1. Launch PowerPoint 2010 for Windows if it is not already open, and choose File |Options, as shown in Figure 2.
    2. Choose Options within the File menu
      Figure 2: Choose Options within the File menu
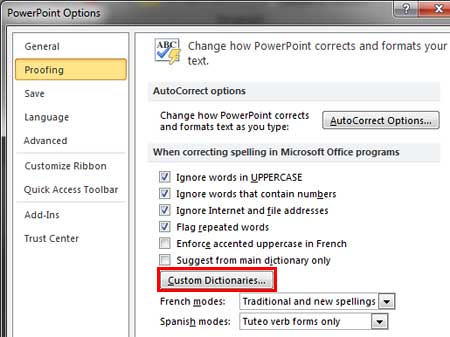
    3. This opens the PowerPoint Options dialog box. Click the Proofing option in the sidebar to view the interface that you see in Figure 3, below.
    4. Proofing section of PowerPoint Options dialog box includes the Custom Dictionaries button
      Figure 3: Proofing section of PowerPoint Options dialog box includes the Custom Dictionaries button
    5. Tip: If you are already doing a spell check, just click the Options button within the Spelling dialog box. This gets you to the Proofing section of the PowerPoint Options dialog box, as shown above in Figure 3. Want to know more about the Spelling dialog box? Head to our Spell Check in PowerPoint 2010 for Windows tutorial.
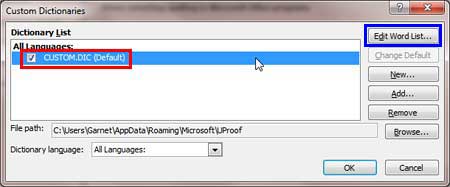
    6. Click the Custom Dictionaries button (highlighted in red in Figure 3, above). This summons the Custom Dictionaries dialog box (see Figure 4). Note that there is only one dictionary at this point of time named CUSTOM.DIC (highlighted in red in Figure 4). However it is entirely possible to have more than one custom dictionary.
    7. Custom Dictionaries dialog box displaying list of dictionaries
      Figure 4: Custom Dictionaries dialog box displaying list of dictionaries
    8. To edit the words within the selected CUSTOM.DIC dictionary (or any other dictionary), select it and click the Edit Word List button, as shown highlighted in blue in Figure 4, above.
    9. This opens the CUSTOM.DIC dialog box with a list of the words in the dictionary, as shown in Figure 5.
    10. CUSTOM.DIC dialog box
      Figure 5: CUSTOM.DIC dialog box
    11. Note that the Add button in the dialog box (highlighted in red in Figure 5) is grayed out.
    12. Note: In Figure 4 above, you can see that the dialog box is named CUSTOM.DIC. The name of this dialog box differs based upon the dictionary you have selected within the Custom Dictionaries dialog box. In this case, we had selected the CUSTOM.DIC, hence the name. If you have selected other dictionary, the dialog box will read the name of the other selected dictionary.
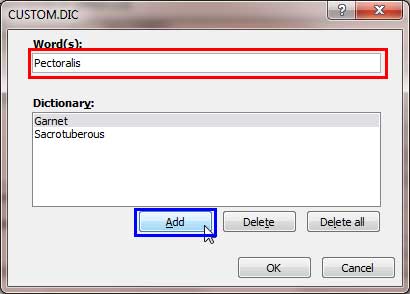
    13. To add a word within this dictionary, type the word within the Word(s) text box (highlighted in red in Figure 6). Note that as soon as a new word is typed, the Add button (highlighted in blue in Figure 6) is activated. Click the Add button to include this new word within your custom dictionary.
    14. Enter a new word within the Word(s) text box to add it to the dictionary
      Figure 6: Enter a new word within the Word(s) text box to add it to the dictionary
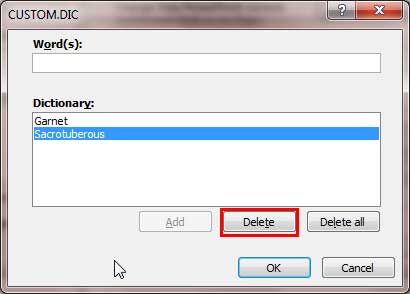
    15. To delete any existing word, just select it (refer to Figure 7), and click the Delete button (highlighted in red in Figure 7).
    16. Word selected for deletion
      Figure 7: Word selected for deletion
    17. Once done, click the OK button within the CUSTOM.DIC dialog box. This will take you back to Custom Dictionaries dialog box, where you click the OK button to save any changes you made.
    18. Save your presentation often.

    See Also:

    05 08 14 - Spelling, AutoCorrect, and Reference Tools: Edit Custom Dictionaries in PowerPoint (Glossary Page)

    Edit Custom Dictionaries in PowerPoint 365 for Windows
    Edit Custom Dictionaries in PowerPoint 2016 for Windows
    Edit Custom Dictionaries in PowerPoint 2013 for Windows
    Edit Custom Dictionaries in PowerPoint 2011 for Mac

    You May Also Like: Building PowerPoint Templates: Conversation with Julie Terberg | Spring PowerPoint Templates


    Popular Posts

    Apply Bevel Effects to Shapes in PowerPoint 2016 for Windows
    Apply Bevel Effects to Shapes in PowerPoint 2016 for Windows
    Learn how to apply bevel effects to shapes in PowerPoint 2016 for Windows.

    Creating Curved Shapes in PowerPoint 2010 for Windows
    Creating Curved Shapes in PowerPoint 2010 for Windows
    Learn how to create curved shapes in PowerPoint 2010.s

    Shapes
    Shapes
    Learn how you can create and manipulate shapes in PowerPoint -- knowledge of working with shapes is significant because they are the building blocks of creativity in PowerPoint.

    Insert Picture from the Office ClipArt Collection in PowerPoint 2013
    Insert Picture from the Office ClipArt Collection in PowerPoint 2013
    Learn how to insert picture using Office ClipArt in PowerPoint 2013.


    Feature List 01 (Layout with Tabs)

    The Feature List Layout comprises three sample PowerPoint presentations: one each to create a visual list for 4 features, 5 features, and 6 features. These work great when you have too much information to fit within one slide. This solution lets you use multiple slides, but the visual result is still that of one single slide!

    Buy and Download Feature List 01 (Layout with Tabs) for $4.99+ (671 kb)


    Microsoft and the Office logo are trademarks or registered trademarks of Microsoft Corporation in the United States and/or other countries.

    Home | PowerPoint | Photoshop | PowerPoint Templates | PowerPoint Tutorials | Blog | Notes | Ezine | Media Kit | Feedback | Site Map | About Us | Contact Us

    Link to Us | Privacy | Testimonials

    PowerPoint Backgrounds | Christian PowerPoint Backgrounds | Business PowerPoint Presentation Templates

    Plagiarism will be detected by Copyscape

    ©2000-2023, . All rights reserved.