Connectors are lines that link different shapes or any other slide objects, and yet they are somewhat different from conventional lines because connectors, as the
name implies stay connected to the shapes they are linked from. You have already learned about
connectors and the
types of connectors in previous tutorials. In this tutorial, you will
learn how you can draw connectors that link shapes. Although we use shapes as examples in this tutorial, you can attach a connector to any other slide object using
the same process.
Remember: Draw your connectors only after the shapes they are going to link are drawn. You'll need at least two shapes to start with. If you draw
your connector before the shapes are in place, your connector will end up being a mere line with no "connects".
Follow these steps to draw a connector between shapes in PowerPoint 2011 for Mac. Please note that even
though we have used two closed shapes in the example shown, the same procedure is used to connect any other slide objects:
- Insert two shapes on the slide and place them a little apart. Access
the Home tab of the Ribbon, locate the Insert group,
and within this group, click the Shape button to bring up the Shape
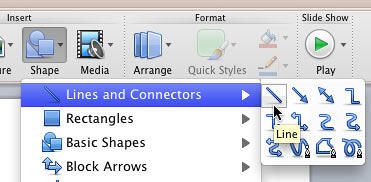
gallery. In this gallery, select the Lines and Connectors category. Then, choose any of the first nine variants in this category. For this tutorial,
we selected the Line variant (refer to Figure 1).

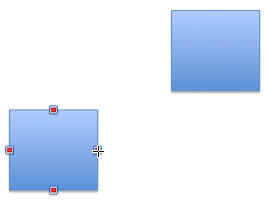
Figure 1: Lines and Connectors category within the Shape gallery- This changes the cursor into a crosshair. Notice that when you move the cursor near any of the shapes you have already inserted, you'll find
several red square points highlighted on the shape (see the shape on the left in Figure 2). Click on any of these red handles to establish the
starting point of your connector.

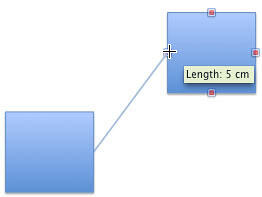
Figure 2: Red square points highlighted on the shape- Drag the cursor without releasing the mouse button toward the shape that you want to connect (as shown in the shape to the right in
Figure 3). As the cursor reaches the target shape, red square points appear on that shape. Drag the mouse cursor to any of these red square points
on the target shape, and release the mouse button as shown in Figure 3.

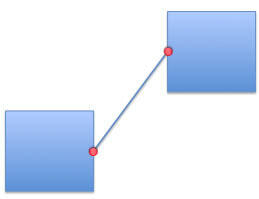
Figure 3: Connector connecting the target shape- This creates a connector between the two shapes as shown in Figure 4. Now, if you
nudge or move any of the shapes (or slide objects you have connected), you will
find that the connector resizes and reorients according to the new position of the shape.

Figure 4: Shapes connected with the connector
- Note: If your connector gets linked to a shape, the end of the connector line displays a red circle (see top left example in
Figure 5). If it does not get linked, you will see a white circle (see bottom right example in Figure 5). It is
important to understand that mere "touching" of a connector's end to a shape or slide object does not indicate that it has been linked to
that shape or slide object. When you see a red circle at the connector's ends—only then you can be assured that the ends are connected.

Figure 5: Connectors may or may not be linked properly
- Save your presentation often.


