Learn how to detach, re-attach, and delete connectors in PowerPoint 2011 for Mac. You can quickly ascertain if a connector is detached by moving it on the slide.
Author: Geetesh Bajaj
Product/Version: PowerPoint 2011 for Mac
OS: Mac OS X
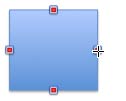
When a connector is inserted to link two shapes or slide objects together, it gets attached to a certain point on both objects. For every object, there are several anchor points where you can attach a connector for a typical rectangle (or square) shape, you will see four anchor points (red squares) when you are attaching a connector to it, as shown in Figure 1.

Figure 1: Red anchor points indicate where connectors can be attached
Sometimes you may attach your connector to the wrong anchor point, and may need to detach it from that point, and attach it to some other anchor point or, maybe you connected to the wrong slide object altogether, and now want to detach the connector from one slide object and attach it to another. In this tutorial, we will explore ways to detach and attach connectors. First of all, let us explore if you need to detach at all in the first place.
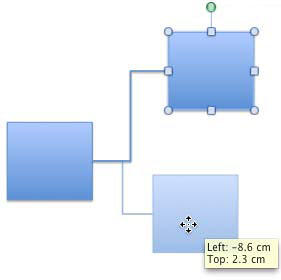
BackIf you have a connected slide object on your slide which you want to be repositioned elsewhere on the slide, you don't have to worry about detaching and then re-attaching the connector. When a slide object that has an attached connector is moved (or nudged), the connector moves along with it and automatically adjusts its length to accommodate the new distance between two linked slide objects. As you can see in Figure 2, the attached connector also moves when the shape is repositioned (or even when it is resized). The semi-transparent square without handles (and the semi-transparent connector) represents the shape's new position, and the selected square (with handles) represents the square's old position.

Figure 2: Moving the slide object also moves the attached connector
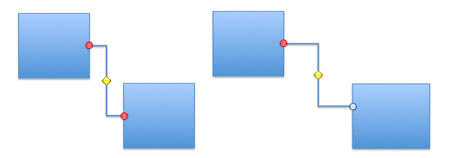
Sometimes you may move your connected slide objects and yet your connectors may not reposition at all. That's because even though it might appear to you that the connector is linked, it might not be so. Do remember that connectors can be selected as well, so go ahead and select your connector by clicking once on it. Now look at both ends of your connector does it show red circles on both ends, as you see in the example shown on the left in Figure 3? Or is one of the connector ends unattached, as identified by the light blue circle, as shown in the example on the right in Figure 3.

Figure 3: Connector's attached end shows red circle, and unattached end shows light blue circle
To detach a connector, select the connector. Then click on one of the ends (red circles), and drag it off. This detaches the connector from one slide object. To attach it to another slide object, drag the connector's end to the new slide object so that you see red square points (as shown in Figure 1, earlier on this page). Then, drag the connector's end to any of those points.
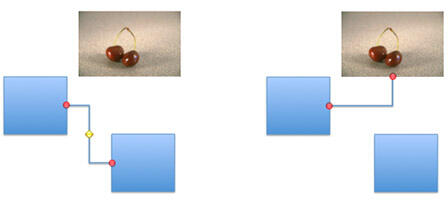
Alternatively, you can detach and drag the connector end to another slide object at the same time, to connect it to the other slide object. In Figure 4, towards left you can see the connector connecting two squares, and towards right, you can see the same connector detached from second square and attached to the picture above it.

Figure 4: Same connector detached from one slide object and attached to another
Do you want to just delete a connector, and start from scratch all over again? Just select the connector and press the Delete key on your keyboard.
See Also:
Detach, Re-attach, and Delete Connectors in PowerPoint 2013 for Windows
Detach, Re-attach, and Delete Connectors in PowerPoint 2010 for Windows
You May Also Like: Nine of the Best Props to Add Impact to Your Presentation | Flags and Maps - A PowerPoint Templates


Microsoft and the Office logo are trademarks or registered trademarks of Microsoft Corporation in the United States and/or other countries.