Content and appearance are the two major components of presentation slides. Among them, the former is always more significant than the latter. But that does not mean that you should neglect the latter. A simple looking presentation with a clean background is always a great idea since
that doesn't overpower your message. Yet, there are plenty of opportunities to go beyond a plain background and use a less restrained background
instead. Your choice for a slide background should complement the content of your presentation. For example, you'll want a flashier background for
slides created for kindergarten students, or if you were creating a PowerPoint greeting card. On the other hand, you may want a washed out, faded,
or even a subtle patterned picture for a typical business presentation.
PowerPoint 2016 does provide you with 12 default slide
Background Styles which can be applied to both the
Slide Master and individual
Slide Layouts. Other than these default background
styles, you can also opt to use a custom slide background such as a solid color, a gradient, a pattern or texture, or even a picture.
Note that the process to change the slide background for the Slide Master or individual Slide Layouts is almost the same. The difference lies
in what you select before applying these changes. For more background info, explore our
Slide Layouts within Slide Master View in PowerPoint 2016
tutorial, which explains the differences between the Slide Master and its Slide Layouts. For now, follow these steps to change the default slide
background for Slide Master and Slide Layouts in PowerPoint 2016:
- Launch PowerPoint. You will see the
Presentation Gallery. Here, select the Blank Presentation to open a blank presentation with a new slide. Access the View tab of the
Ribbon, and click the Slide Master button, as shown
highlighted in red within Figure 1.
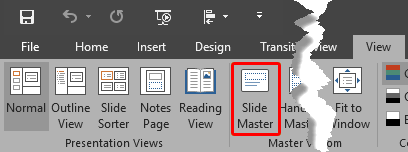
Figure 1: Slide Master button- This opens Slide Master View, as shown in
Figure 2. In Slide Master view, you'll find that the left pane contains two distinctly different elements: a larger thumbnail
representing the Slide Master (highlighted in red within Figure 2) and several smaller
slide thumbnails below representing individual Slide Layouts (highlighted in blue within
Figure 2).
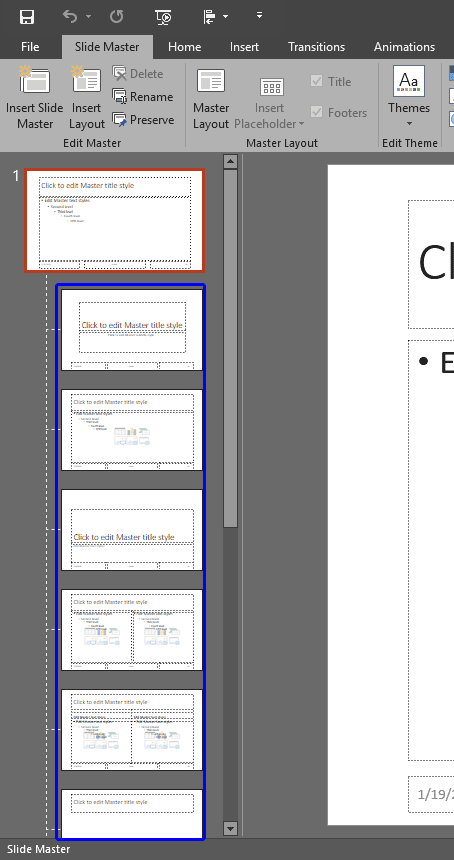
Figure 2: Slide Master and Slide Layouts within PowerPoint- Now, based on your requirement, select either the Slide Master, or any of the individual
Slide Layouts. For this tutorial we have selected the Title Slide Layout . The orange highlight around the layout
thumbnail indicates that it has been selected, as shown in Figure 3. Next, click the Background Styles button
(highlighted in blue within Figure 3).
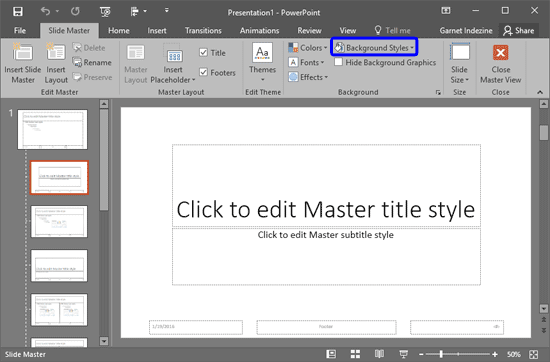
Figure 3: Background Styles button within the Slide Master view- This brings up the Background Styles drop-down gallery. Within the Background Styles drop-down
gallery, select the Format Background option, as shown highlighted in red within
Figure 4.
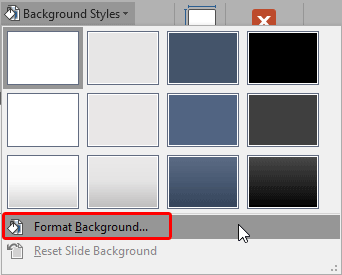
Figure 4: Background Styles drop-down gallery- Alternatively, you can right-click the selected Slide Layout (or the Slide Master), and from the context menu, select the
Format Background option, as shown highlighted in red within Figure 5.
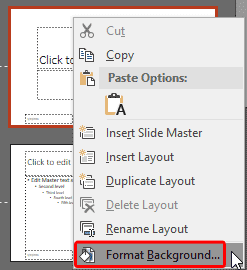
Figure 5: Format Background option to be selected- Either of these options will launch the Format Background
Task Pane, as shown in Figure 6.
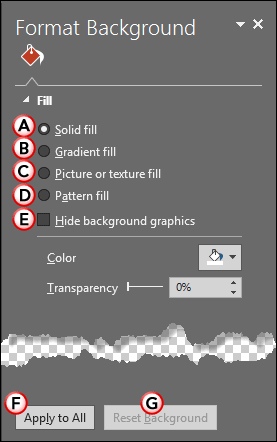
Figure 6: Format Background Task Pane- Options within the Format Background Task Pane are explained below, as marked in Figure 6,
above:
A. Solid fill
- Adds a solid color background to your slide. You can use any of the
Theme colors, standard colors, or any other color of your choice. Learn more
about Solid fills for Slide Backgrounds in
PowerPoint 2016.
B. Gradient fill
- Applies gradients as slide background. A gradient is a blend of two or more colors merging into
each other. Explore more in our Gradient Fills
for Slide Backgrounds in PowerPoint 2016 tutorial.
C. Picture or texture fill
- Allows you to use a picture or a texture as slide background. To learn more, read our
Picture Fills for Slide Backgrounds in
PowerPoint 2016 and Texture Fills for Slide
Backgrounds in PowerPoint 2016 tutorials.
D. Pattern fill
- Choose from 48 two-colored patterns contained within PowerPoint. In our
Add Pattern Fills for Slide Backgrounds in
PowerPoint 2016 tutorial you can explore more about this option.
E. Hide background graphics
- If your slide background includes graphics which you want to hide for printing purposes,
or another reason, you can select this check-box. Although the background graphics will remain part of your presentation, it will be hidden from
view. Also note that this check-box is only active when you have selected a Slide Layout.
Tip: The Hide background graphics check-box can also be found beneath the Background Styles
button on the Slide Master tab of the Ribbon (refer to Figure 3, shown earlier on
this page).
F. Apply to All
- Click this button if you want the changes made to be applied to all the
Slide Layouts including the Slide Master.
G. Reset Background
- You can also find this option within the Background Styles drop-down gallery
with a slightly different name: Reset Slide Background (highlighted in red within
Figure 7).
- This option lets you reset the Background Style of any Slide Layout to the inherited style from the
Slide Master. If the Reset Slide Background option grayed out when you select a particular
Slide Layout, this indicates that the particular Slide Layout already inherits the Background Style from the
Slide Master. Also note that this button will be grayed out if you selected the Slide Master.
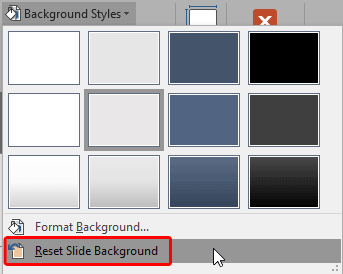
Figure 7: Reset Slide Background option within the Background Styles gallery
- Choose any of these options to change your slide background. This will apply the selected custom background style to the selected
Slide Layout or the Slide Master. In Figure 8 you can see a texture applied to the
Title Slide Layout since we had selected that Layout earlier (see Figure 3, shown earlier on this page). If you
had selected the Slide Master, all Slide Layouts following that Slide Master will be applied with the selected custom background style.

Figure 8: Background Style applied to the selected Slide Layout- When done, click the Close Master View button (highlighted in red within
Figure 8) on the Slide Master tab of the Ribbon. This will get you back to
Normal View, where you can see the new Background Style applied to any
slide that uses this particular Slide Layout. You can similarly change backgrounds for other Slide Layouts, or
even the Slide Master.
- Save your presentation often.


