Indezine Logo


Edit Points: Curved and Straight Line Segments in PowerPoint 2011 for Mac

Learn about Curved and Straight line segments within PowerPoint 2011 for Mac. These segments are the lines between points or vertexes.


Author:

Product/Version: PowerPoint 2011 for Mac

OS: Mac OS X


Learn PowerPoint

Learn how you can close linked presentations in PowerPoint.


A line (outline) in PowerPoint 2011 for Mac contains both points and segments. You already learned about the three types of points in PowerPoint 2011 for Mac in a previous tutorial. Now we are going to show you how to work with segments, the lines that connect one point and another. There are two types of segments: Straight and Curved. You can edit these segments and also convert a straight segment to a curved segment and vice versa, as you will learn in this tutorial.

Curved Segment

To change a straight segment into a curved segment, follow these steps:
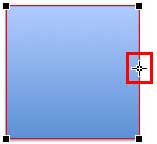
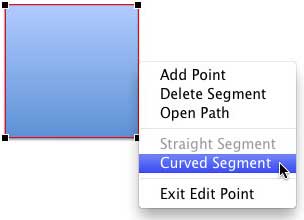
  1. Select the shape which has straight segments (such as a square, as shown in Figure 1) and switch to Edit Points mode (just right-click the shape, and choose the Edit Points option in the resultant contextual menu). Place the cursor on top of the shape's outline so that it is placed above a segment rather than a point. The cursor will change to a square with a plus sign, as shown in Figure 1 (highlighted in red).
  2. Cursor placed on the segment of the square
    Figure 1: Cursor placed on the segment of the square
  3. Right-click to get the contextual menu—from this menu, choose the Curved Segment option, as shown in Figure 2.
  4. Curved Segment option selected
    Figure 2: Curved Segment option selected
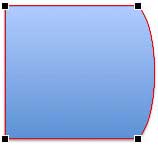
  5. This converts the straight segment of the square to a curved segment, as shown in Figure 3 (compare with Figure 1).
  6. Straight segment changed to Curved segment
    Figure 3: Straight segment changed to Curved segment

Straight Segment

To change a curved segment into a straight segment, follow these steps:
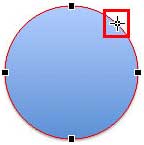
  1. Select the shape which has curved segments (such as a circle, as shown in Figure 4) and switch to Edit Points mode (just right-click the shape and choose the Edit Points option). Place the cursor on top of the outline of the shape. The cursor will change to a square with a plus sign, as shown in Figure 4 (highlighted in red).
  2. Cursor placed on the outline of the circle
    Figure 4: Cursor placed on the outline of the circle
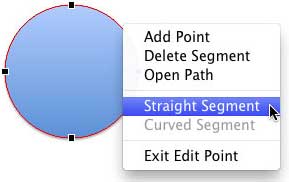
  3. Right-click to get the contextual menu—from this menu, choose the Straight Segment option as shown in Figure 5.
  4. Straight Segment option selected
    Figure 5: Straight Segment option selected
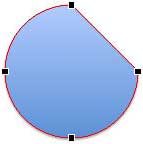
  5. This converts the curved segment of the circle into a straight segment, as shown in Figure 6 (compare to Figure 4).
  6. Curved segment changed to Straight segment
    Figure 6: Curved segment changed to Straight segment

Directly Working with Segments

You can also click anywhere on a segment and drag it as required to change the structure of the shape. PowerPoint automatically adds a new point (vertex) at the point where you clicked and dragged the segment, as shown in Figure 7 (compare to Figure 4).
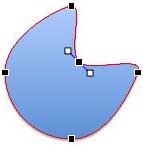
New point added on the segment at the clicked and dragged position
Figure 7: New point added on the segment at the clicked and dragged position


See Also:

06 14 05 - Advanced Drawing Techniques: Edit Points: Curved and Straight Line Segments in PowerPoint (Glossary Page)

Edit Points: Curved and Straight Line Segments in PowerPoint 2007 for Windows
Edit Points: Curved and Straight Line Segments in PowerPoint 2010 for Windows
Edit Points: Curved and Straight Line Segments in PowerPoint 2013 for Windows
Edit Points: Curved and Straight Line Segments in PowerPoint 2016 for Windows

You May Also Like: Video for Communication: Conversation with Haydn Rushworth | Ecology PowerPoint Templates


Popular Posts

Shapes
Shapes
Learn how you can create and manipulate shapes in PowerPoint -- knowledge of working with shapes is significant because they are the building blocks of creativity in PowerPoint.

Insert Picture from the Office ClipArt Collection in PowerPoint 2013
Learn how to insert picture using Office ClipArt in PowerPoint 2013.

Snow Effect in PowerPoint
Create a snow fall effect inside PowerPoint using animation techniques.

PowerPoint Transitions: Curtains
Explore the Curtains transition effect in PowerPoint.


Jigsaw Graphics for PowerPoint

Here are 10 jigsaw graphics containing different shapes. These graphics are available in both black and white and are contained within separate sample presentations that you download. Additionally, these jigsaw graphics are vector shapes, so you can easily edit them within your Microsoft Office program by changing fills, lines, and effects or even applying Shape Styles.

Download and use these Jigsaw Graphics in your slides for just $4.99+


Microsoft and the Office logo are trademarks or registered trademarks of Microsoft Corporation in the United States and/or other countries.

Home | PowerPoint | Photoshop | PowerPoint Templates | PowerPoint Tutorials | Blog | Notes | Ezine | Media Kit | Feedback | Site Map | About Us | Contact Us

Link to Us | Privacy | Testimonials

PowerPoint Backgrounds | Christian PowerPoint Backgrounds | Business PowerPoint Presentation Templates

Plagiarism will be detected by Copyscape

©2000-2023, . All rights reserved.