After inserting a picture in your slide, you should first consider if the picture you have used complements the message of your presentation and slide. Even if it is relevant, you should consider making it more pertinent by removing the areas that may be not required. In other words, you must ponder and decide whether you want to use PowerPoint's Crop options. Cropping an area removes extraneous areas, and lets you add focus to the areas of the picture that are appropriate to the topic of your presentation.
For example the picture on the left side in Figure 1 below, shows starfish on a beach. Cropping the same picture in the sample on the right focuses attention solely on the starfish, and creates a more powerful visual.
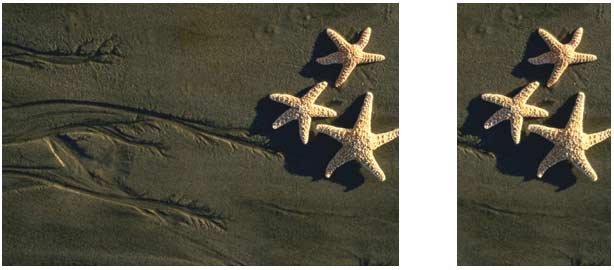
Figure 1: Picture cropped to focus attention on a particular element
The Crop tool lets you achieve these edits and more, and cropping works with both pictures that are inserted on slides, or with pictures that constitute a shape fill.
Follow these steps to explore more in PowerPoint 2016 for Windows:
- We are assuming you already have a picture inserted on your slide, or a shape filled with a picture. Select the picture to display the Picture Tools Format tab (highlighted in red within Figure 2) of the Ribbon. Activate this contextual tab by clicking on it, and click the down-arrow below the Crop button (highlighted in blue within Figure 2).
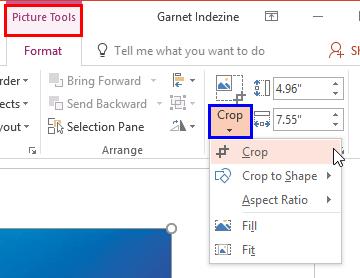
Figure 2: Crop button within the Picture Tools Format tab Note: The
Picture Tools Format tab is a
Contextual tab. These tabs are special tabs in the
Ribbon that are not visible all the time. They only make an appearance when you are working with a particular slide object which can be edited using special options.
- This opens the Crop drop-down gallery with five crop options, as you can see in Figure 2, above. Let us explore all the five Crop options and their capabilities:
Crop
- This basic Crop tool is used to make a simple crop. When you select this tool (which is equal to simply clicking the Crop button within the Size group), dark crop handles appear on the edge of the picture (or on the edge of the shape if you are cropping any picture used as a fill), as shown in Figure 3. Typically, you will see four corner handles and four side handles.
- Now, do one of the following:
- To crop one side of the picture, drag the side handle of that side inward. For example, if you want to crop from the right side, drag the right side handle.
- To crop equally on two sides at the same time, press and hold Ctrl key while you drag the side handle on either side inwards.
- To crop equally on all four sides at the same time, press and hold Ctrl key while you drag any corner handle inwards.

Figure 3: Result of applying Crop option on a picture in a placeholder- You can also move the picture within the placeholder area to show more important areas of the picture. To do that, place your cursor anywhere in the middle of the placeholder away from the edges so that your cursor changes to a four-headed arrow as shown in Figure 4, below. Then click and drag the picture contents to reposition as required.

Figure 4: Picture being repositioned within the content placeholder - Once you are happy with what you have achieved, press the Enter key or double-click the picture to perform the crop.
Crop to Shape
- Enables you to crop the picture into a specific shape. When a picture is cropped to a specific shape, it automatically trims to fill the geometry of the shape and picture proportion is maintained. Select the picture or pictures that you want to crop to a specific shape. Learn more about this option in our Crop to Shape tutorial.
Aspect Ratio
- With this option you can crop the picture to a common aspect ratio (the ratio between picture width and picture height) so that it easily fits into a picture frame. With the picture still selected, access the Crop drop-down gallery and select the Aspect Ratio option to bring up a sub-gallery, as shown in Figure 5. Choose any of the Square, Portrait, or Landscape ratios.
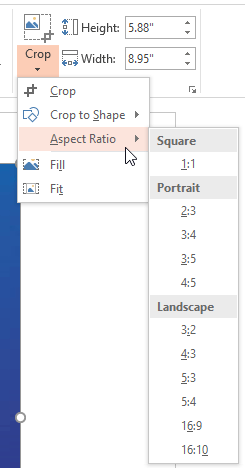
Figure 5: Aspect Ratio sub-gallery within the Crop drop-down gallery Fill
- A very common problem occurs when you use a picture fill for a shape; it gets squished down to fit sinside the shape, as shown in the example on the left side in Figure 6. Choosing Fill will scale the picture to completely fill the shape while retaining the proportions of the original picture as you can see on the right side in Figure 6. You can later nudge the picture and make a particular area to be seen within the shape. We explain this option in our Reposition Picture Fills with Crop in PowerPoint 2016 tutorial.
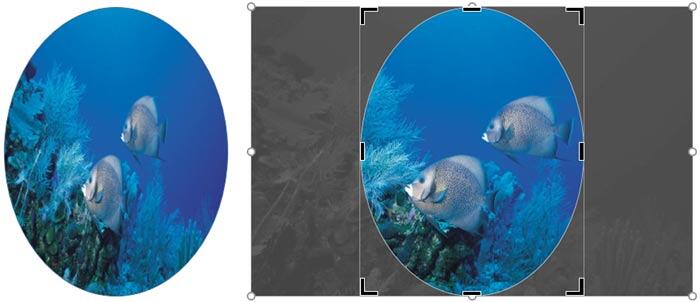
Figure 6: Squished picture fill can be rectified with the Fill crop option Fit
- This option scales the picture so that it fits entirely within the shape, and also maintains the original picture aspect ratio. Figure 7 shows the difference.
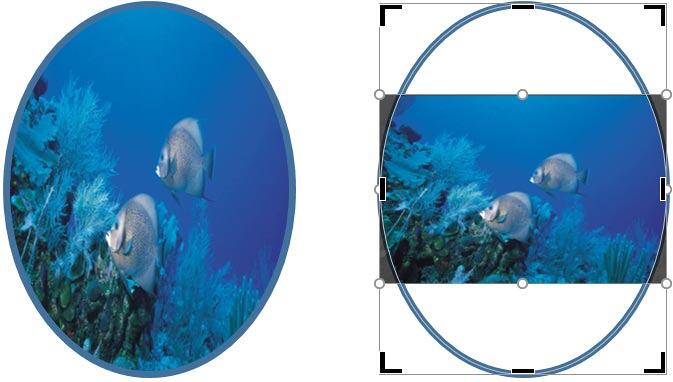
Figure 7: Shape with picture fill and same shape with Fit crop option applied - Save your presentation often.


