Indezine Logo


Creating Formatted AutoCorrect Entries in PowerPoint 365 for Windows

Learn how to create and use formatted AutoCorrect entries PowerPoint 365 for Windows. Creation of formatted AutoCorrect entries needs to be done using Microsoft Word.


Author:

Product/Version: PowerPoint 365 for Windows

OS: Microsoft Windows 10 and higher


Learn PowerPoint

Learn about Presentation Industry Events


We explored differences between formatted and unformatted AutoCorrect entries in our Saving and Sharing AutoCorrect Entries tutorial. In simple terms, formatted AutoCorrect entries include formatted attributes such as font choices, bold, italics, etc., but can also include images, tables, and other content types. On the other hand, unformatted AutoCorrect entries comprise plain text.

So, while you can use some preset formatted AutoCorrect entries in PowerPoint, you cannot create them in PowerPoint. Also, you cannot use all sorts of formatted content in PowerPoint. While some content with formatted text and dingbat fonts may work, and even this is a big "if", other content such as images, tables, etc. work only in Microsoft Word, and not in PowerPoint.

In this tutorial, we will explore both these scenarios:

  1. Creating formatted AutoCorrect entries that work only in Microsoft Word, PowerPoint, and other Microsoft Office programs.
  2. Creating formatted AutoCorrect entries that work in Microsoft Word. These may sometimes work in PowerPoint, and other Microsoft Office programs.

To create such AutoCorrect entries, you have to use Microsoft Word. The good news is that it’s relatively easy to create formatted AutoCorrect entries in Microsoft Word.

Formatted AutoCorrect Content Suitable for Word

Follow these steps to create a formatted AutoCorrect entry with pictures and formatted text in Word:

  1. In Word, create content that has formatting attributes such as a font you like, some bold text, and possibly even a picture. You can also copy some of your existing content from PowerPoint and paste it into a new Word document.
  2. We next selected this content, as shown in Figure 1, below.
  3. Our content contains both a picture and some formatted text
    Figure 1: Picture and formatted text in Word
  4. You can access the AutoCorrect dialog box shown in Figure 2, below as per instructions explained in our AutoCorrect Options in PowerPoint 365 for Windows tutorial. Alternatively, press both the Alt and T keys together, and next press A.
  5. Bring up the AutoCorrect dialog box
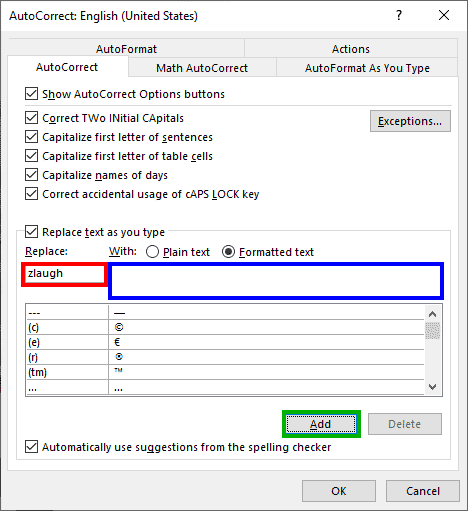
    Figure 2: AutoCorrect dialog box in Word
  6. PowerPoint Keyboard Shortcuts

    PowerPoint Keyboard Shortcuts

    Do you want more keyboard shortcuts?

    Explore our PowerPoint Keyboard Shortcuts and Sequences Ebook that is updated for all PowerPoint versions.
  7. Since we have formatted content selected in Word, you'll see that the Formatted text radio button is already selected. Provide a shortcut for this new AutoCorrect entry in the Replace box, highlighted in red within Figure 2, above. We used zlaugh as the shortcut. The content that's being used for replacement is already within the area highlighted in blue within Figure 2, but you cannot see a preview since the content is larger than this box area.
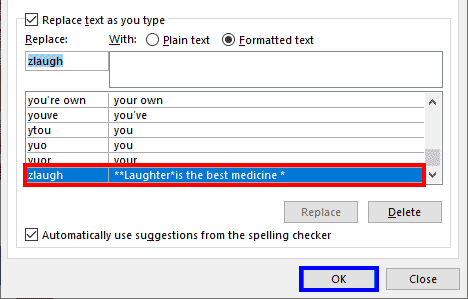
  8. Next, click the Add button, highlighted in green within Figure 2, to add this new AutoCorrect entry. The new entry can be seen, highlighted in red within Figure 3, below.
  9. Add an AutoCorrect entry in Word
    Figure 3: New AutoCorrect entry
  10. Click the OK button, highlighted in blue within Figure 3, above.
  11. Create a new Word document and test this AutoCorrect entry.

Do note that this entry will only work in Word and not within other Microsoft Office programs such as PowerPoint, Excel, or Outlook. On the other hand, AutoCorrect entries that use only formatted text, without any pictures, tables, or other elements will work in other Microsoft Office programs, as we will explore in the next section.

Formatted AutoCorrect Content Suitable for All Office Programs

Follow these steps to create an AutoCorrect entry containing formatted text in Word:

  1. In Word, type in some text. Change the font and the text color. Apply formatting attributes such as bold text, and play with font sizes. You can also copy some of your existing text content from PowerPoint and paste it into a new Word document.
  2. We next selected this content, as shown in Figure 4, below.
  3. Select formatted text in Microsoft Word
    Figure 4: Formatted text in Word
  4. Now, access the AutoCorrect dialog box shown in Figure 5, below. You can find instructions to do so in our AutoCorrect Options in PowerPoint 365 for Windows tutorial. Alternatively, press both the Alt and T keys together, and next press A.
  5. Summon the AutoCorrect dialog box
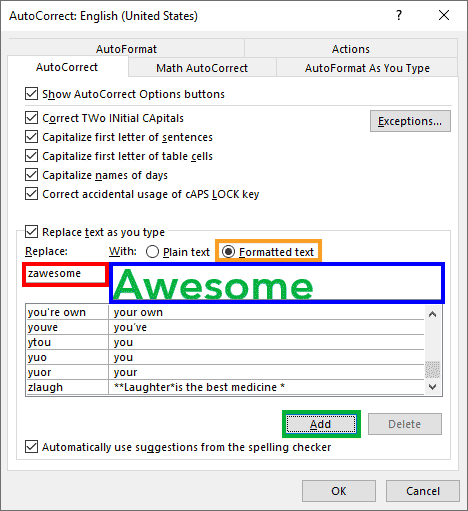
    Figure 5: The AutoCorrect dialog box in Word
  6. Since we have formatted content selected in Word, you'll see that the Formatted text radio button is already selected, as shown highlighted in orange in Figure 5, above. Provide a shortcut for this new AutoCorrect entry in the Replace box, highlighted in red within Figure 5. We used zawesome as the shortcut. The content that's being used for replacement is already within the area highlighted in blue within Figure 5, but you can only see part of the preview (compare with Figure 4, shown previously on this page) since the content is larger than this box area.
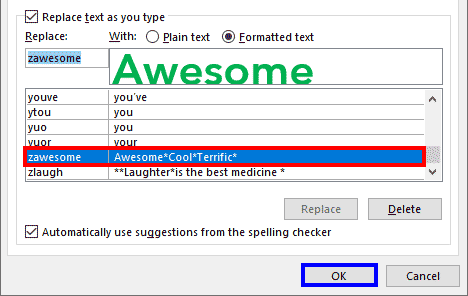
  7. Next, click the Add button, highlighted in green within Figure 5, to add this new AutoCorrect entry. The new entry can be seen, highlighted in red within Figure 6, below.
  8. Another AutoCorrect entry added
    Figure 6: Another AutoCorrect entry
  9. Click the OK button, highlighted in blue within Figure 6, above.
  10. Create a new Word document and test this AutoCorrect entry.

Do note that this entry will certainly work in Word, and may or may not work within other Microsoft Office programs such as PowerPoint, Excel, or Outlook. If needed, you can open a new instance of Word, use the AutoCorrect entry in a blank document, and then copy the content to thereafter paste it within PowerPoint or other Microsoft Office programs.


05 08 10 - Spelling, AutoCorrect, and Reference Tools: Creating Formatted AutoCorrect Entries in PowerPoint (Glossary Page)

You May Also Like: Complex Data-driven PowerPoint Dashboard | India China PowerPoint Templates


Popular Posts

Changing Location of Slide Numbers in PowerPoint 2010
Learn how to change location of slide numbers in PowerPoint 2010.

Text Alignment within Table Cells in PowerPoint 2013 for Windows
Learn about the options for text alignment within Table cells in PowerPoint 2013 for Windows.

Keyboard Shortcuts for PowerPoint 2011 for Mac
Explore keyboard shortcuts in PowerPoint 2011 for Mac.

Insert Video from Facebook in PowerPoint 2016 for Windows
Learn how to insert video from your Facebook account in PowerPoint 2016 for Windows.


Polygon Center Circles for PowerPoint

These special circles have polygon centers: the centers are made of triangles, squares, pentagons, and hexagons! And based on the sides of the polygon, the rest of the circle has that many segments.

Download and use these Polygon Center Circles in your slides for just $4.99


Microsoft and the Office logo are trademarks or registered trademarks of Microsoft Corporation in the United States and/or other countries.

Home | PowerPoint | Photoshop | PowerPoint Templates | PowerPoint Tutorials | Blog | Notes | Ezine | Media Kit | Feedback | Site Map | About Us | Contact Us

Link to Us | Privacy | Testimonials

PowerPoint Backgrounds | Christian PowerPoint Backgrounds | Business PowerPoint Presentation Templates

Plagiarism will be detected by Copyscape

©2000-2023, . All rights reserved.