PowerPoint 2007 and higher versions include several built-in
Theme Fonts sets. Additionally, you
can also create custom Theme Fonts
sets from within PowerPoint. Yes, all Theme Fonts sets comprise a few lines of code within an Open XML file. You can open any
Theme Fonts file with the .XML extension, and then edit them within a text editor such as Notepad. Save this file with a new name
in a designated folder and you actually end up creating your own custom Theme Fonts set!
More than Latin (English / Western European) Font Choices?
You can also edit font choices for non-Latin (not English / Western European) scripts. This option is beneficial if your
organization uses multiple scripts, or if you want to explore extra options available within the Theme Fonts specifications. To do
so, you can easily edit or create your own custom Theme Fonts by editing the actual files, as explained in this tutorial.
Follow these steps to learn how to edit a built-in Theme Fonts set, or create a new one:
-
Find out where the built-in Theme Fonts sets are located on your system. These XML files are typically found in the following
location:
- Office 2016 on Windows 7, 8, and 10:
C:\Program Files (x86)\Microsoft Office\Root\Document Themes 16\Theme Fonts
C:\Program Files\Microsoft Office\Root\Document Themes 16\Theme Fonts
- Office 2013 on Windows 7, 8, and 10: C:\Program Files\Microsoft Office\Document Themes 15\Theme Fonts
- Office 2010 on Windows Vista, 7, 8, and XP: C:\Program Files\Microsoft Office\Document Themes 14\Theme Fonts (see
Figure 1)
- Office 2007 on Windows Vista, 7, 8, and XP: C:\Program Files\Microsoft Office\Document Themes 12\Theme Fonts
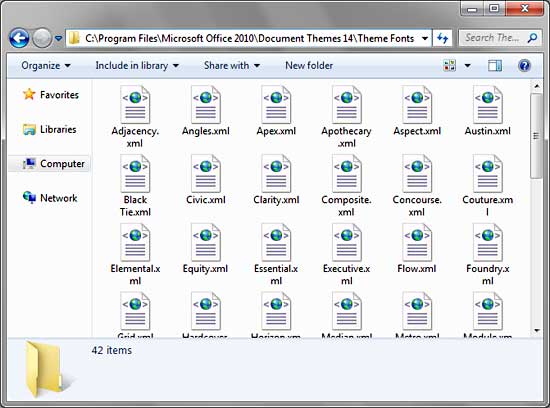
Figure 1: The location of built-in Theme Fonts- It's a good idea to use an existing Theme Fonts set because most of them include many definitions for a range of language
scripts and some extra code. Additionally, these can be edited rather easily, and will thus save you time compared to typing every single
character on your own. Plus, you won't make mistakes!
-
Now carefully right-click the XML file to summon a fly-out menu, see Figure 2. From the fly-out menu choose the
Open with | Notepad option, as shown highlighted in red within
Figure 2.
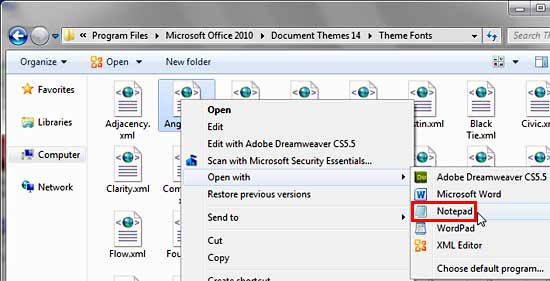
Figure 2: Notepad option selected
-
This will open the XML file into Notepad. Since you want to create a new Custom Theme Fonts set, save this file with a
new name to another location where your custom Theme Fonts sets need to be placed. Do note that the location to save your Custom Theme
Fonts differs from where the built-in Theme Fonts live:
- Windows 10, Vista, 7, or 8:
C:\Users\<Username>\AppData\Roaming\Microsoft\Templates\Document Themes\Theme Fonts
- Windows XP:
C:\Documents and Settings\<Username>\Application Data\Microsoft\Templates\Document Themes\Theme Fonts
- Within Notepad, choose the File | Save As option and save the XML fine
with a new name to this folder location as shown in Figure 3, below.
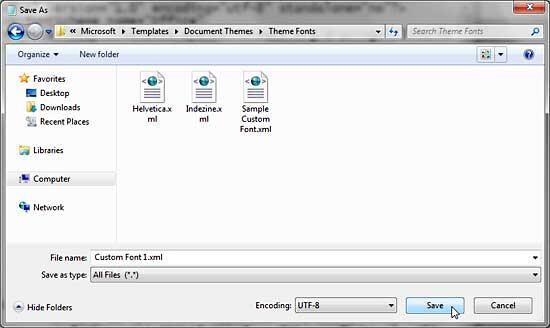
Figure 3: Save the XML file to designated folder
- Now let us explore this XML file, as shown in Figure 4 below. We have color coded this screenshot
to explain what the code does.
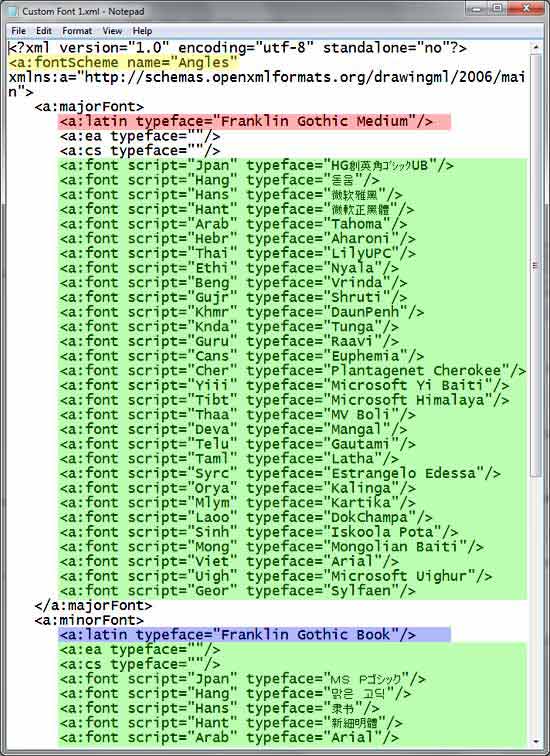
Figure 4: XML file opened within Notepad- Here are the details:
-
Yellow: This line indicates your custom Theme Fonts' name.
- In the example shown in Figure 4, you'll find the following line:
<a:fontscheme name="Angles"- Change this to the name you specified while saving the exiting Theme Fonts set
within Notepad, as shown in Figure 5.
<a:fontscheme name="Custom Font 1"
- Pink: This line indicates the Heading font. Type in the name of the font you want to use for all Headings in
your presentation. Do note that this font will only be used for your slide titles and nowhere else.
- In the example shown in Figure 4, you'll find the following line:
<a: latin typeface="Franklin Gothic Medium">- The term "Latin" indicates use in English and some other Western European languages that use the Latin script. Change
this so that "Franklin Gothic Medium" is now another font typeface. We chose "Gills Sans MT", as shown in
Figure 5. It is important that your spellings of the font names are accurate.
<a: latin typeface="Gills Sans MT">- Violet: This line indicates the Body font. Type in the name of the font you want to use for all Body text in
your presentation. Do note that this font will be used everywhere in your slides apart from slide titles.
- In the example shown in Figure 4, you'll find the following line:
<a: latin typeface="Franklin Gothic Book">- As mentioned earlier, the term "Latin" indicates use in English and some other Western European languages that use the
Latin script. Change this so that "Franklin Gothic Book" is now another font typeface. We chose "Arial", as
shown in Figure 5. Again, it is important that your spellings of the font names are accurate.
<a: latin typeface="Arial">- Green: You can also edit the typefaces for a range of font scripts, as marked in green within
Figure 4 above. Note that you should leave these areas alone if you only work with an English
(Latin script) version of PowerPoint, or Microsoft Office. However, if you will need any changes done to the font choices for
international scripts, go ahead and change those font typefaces in the same way you made these changes for the Latin scripts.
-
In Figure 5 you can see that the Heading and the Body fonts are changed.
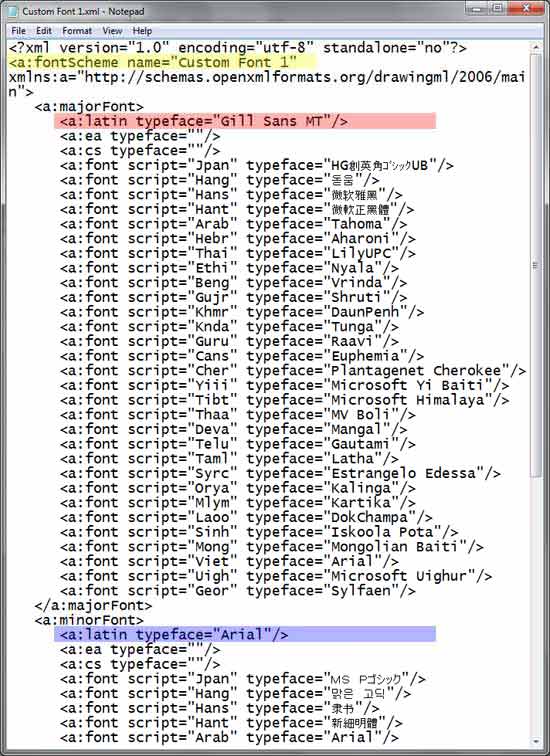
Figure 5: Heading and Body fonts changed in XML
- Save your XML file. When you run PowerPoint the next time and access the Fonts drop-down gallery,
the new Theme Fonts set can be found within the Custom section of the Fonts drop-down gallery, as shown highlighted in red
within Figure 6.
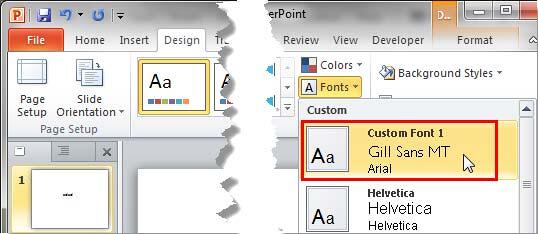
Figure 6: New Theme Fonts set within the Fonts drop-down gallery


