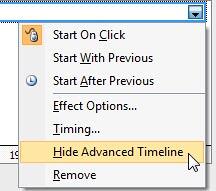
Learn how you can control animation timings with the Advanced Timeline in PowerPoint 2007 for Windows. You'll need to zoom in or out and drag sliders to alter animation timings.
Author: Geetesh Bajaj
Product/Version: PowerPoint 2007 for Windows
OS: Microsoft Windows XP and higher
The main advantage of using the Advanced Timeline to edit your animation is that you can control the start time, duration, and end time of your animation to the most minute level. You are not limited to the time or speed presets that PowerPoint provides. For example, by using the Advanced Timeline you can animate a slide object very slowly to span over a whole minute or more by just dragging the start and end points of any animation bar outwards in the timeline. We have already explored how to show/hide the Advanced Timeline within PowerPoint 2007 for Windows.
Follow the steps to learn how to control animations with help of Advanced Timeline within PowerPoint 2007 for Windows:

The duration of any animation is its end time minus its start time. As in the example shown in Figure 1, that would be 2 seconds minus 0 seconds, thus the duration for this particular animation is 2 seconds.

Note that you just changed the start time, you can drag the animation bar leftwards as well, as long as you do not go to a point before 0 seconds. Also, of the three animation events (On Click, After Previous, and With Previous), the After Previous animations can be dragged only rightwards.


See Also:
13 03 07 - Advanced Animation Concepts: Control Animation Timings using the Advanced Timeline in PowerPoint (Glossary Page)
Control Animation Timings using the Advanced Timeline in PowerPoint 2013 for Windows
Control Animation Timings using the Advanced Timeline in PowerPoint 2010 for Windows
You May Also Like: Becoming a Webinar Expert: Conversation with Ellen Finkelstein | Eid-ul-Fitr PowerPoint Templates


Microsoft and the Office logo are trademarks or registered trademarks of Microsoft Corporation in the United States and/or other countries.