Indezine Logo


Cinematize 2 Pro

Read the Indezine review of Cinematize 2 Pro.


Author:

Product/Version: PowerPoint


Learn PowerPoint

Learn how to turn off Animation Preview in PowerPoint.


Introduction
About Cinematize 2 Pro
Download and Installation
Using Cinematize 2 Pro
Pricing and Support
Conclusion


Introduction

You probably know that PowerPoint allows you to place movie clips within a slide with a few clicks. These movies can be in several PowerPoint friendly movie formats, although if you need a movie clip from a DVD, you might not find things too easy! And Cinematize, a product I have reviewed earlier does extract movie clips from a DVD, and then it saves those extracts into different movie file formats that can be inserted in PowerPoint.

And now the folks who create Cinematize have launched a Professional version of the same product. So what does it do better than the basic version? Read on...

Back

About Cinematize 2 Pro

Cinematize 2 Pro is from Miraizon, a company based in California, USA. You can learn more about their products from their site.

Cinematize 2 Pro allows you to extract almost any content from a DVD, be it an audio track, a video track, or a subtitle. It has the ability to batch-extract any number of segments from both DVD menus and movies, multi-channel audio extraction, subtitle decoding to QuickTime video and images. Preset settings can be saved -- and you can use the extracted movie clips in PowerPoint, QuickTime, iMovie, Final Cut Pro, Keynote, iTunes, and iPods. The product is available in both Windows and Macintosh versions.

My contact at Cinematize for this review was Naoko Miyazaki - thank you, Naoko.

Back

Download and Installation

Download the installer, run the setup routine and follow the instructions. You'll end up with an Miraizon program group in your Windows Start menu (see Figure 1 below).

Miraizon Start menu Group
Figure 1: Miraizon Start menu Group

Back

Using Cinematize 2 Pro

Be sure that you have a movie DVD in your drive, before using the application.

This DVD must allow decryption -- and most commercial movie DVD's don't do that! Miraizon does mention that Cinematize can work with DVD discs that are decrypted using decryption programs -- but Cinematize itself won't do that for you.

Follow these steps to extract a movie clip from a DVD using Cinematize 2 Pro:
  1. Go to your Windows Start menu and choose All Programs | Miraizon | Cinematize 2 Pro (see Figure 1 above).
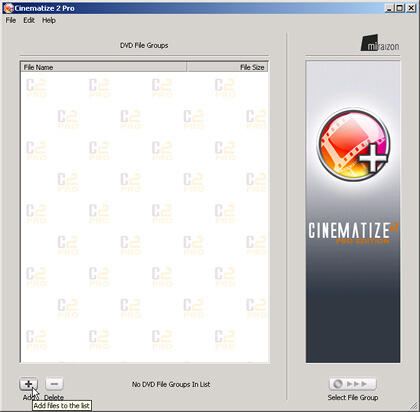
  2. This launches the Cinematize 2 Pro interface, as shown in Figure 2

    Adding Files
    Figure 2: Adding Files

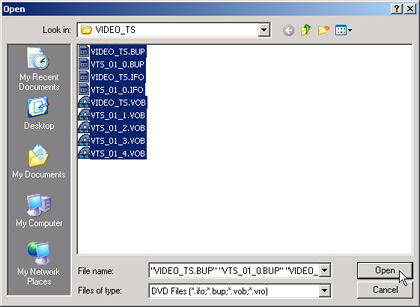
    Clicking on the Add button will open a dialog box from where you can select the files under the "VIDEO_TS" directory within your DVD disc, as shown in Figure 3.

    Open
    Figure 3: Open

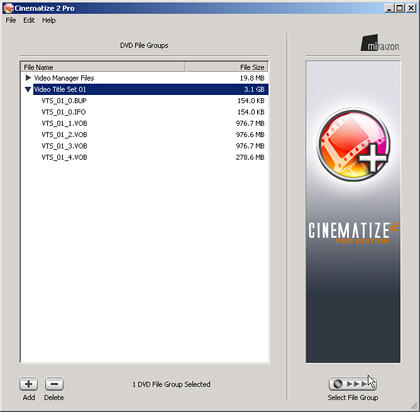
    All video data files for the DVD must be inside a directory named "VIDEO_TS" -- make sure you select all the files, and click Open. This will add all the files into the DVD Files list within the Cinematize main window (see Figure 4).
  3. Select the Video Title Set 01 (or similar) from the added list and click the Select VTS button, as shown in Figure 4

    List
    Figure 4: List
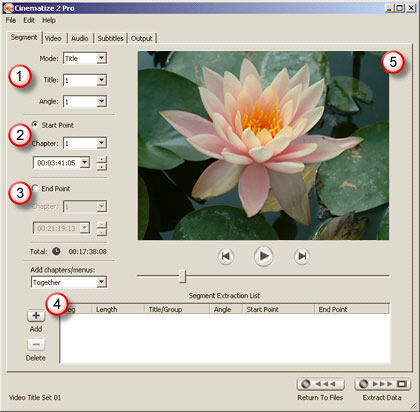
  4. This will render the selected chapter of the DVD -- which could take a while, if your selected chapter is long. Thereafter, you will see the main interface of Cinematize 2 Pro , as shown in Figure 5

    Main Interface
    Figure 5: Main Interface

    The interface has five tabs -- but we will explore only the Segment and Output tabs.

    The Segment tab provides the main options:

    1. Title and Angle: Title allows to select the title you want to work with. A DVD can have more than one title as in a different episode, an extra bonus feature, an alternate ending, etc. Angle is for selecting multiple camera angles. Some options will work only if the DVD being used provides these features.
    2. Start Point here you can select the start point from where you want to extract the clip.
    3. End Point allows to set the end point for the clip you want to extract. As you select the start and end points, the slider below the preview window also moves -- and the scene itself can be seen in the preview window.
    4. Segment Extraction List allows to do a a batch extraction. You can add as many segments you want to extract to the Segment Extraction List, and then you can extract them all are by pressing Extract Data. It's a nice excuse to go and get a cup of coffee while Cinematize Pro is working!
    5. Preview: It shows the preview of the frame you have selected.

      Right at the bottom of the preview window, there are navigation buttons and a slider bar which can be used to make selections and view the movie clip.
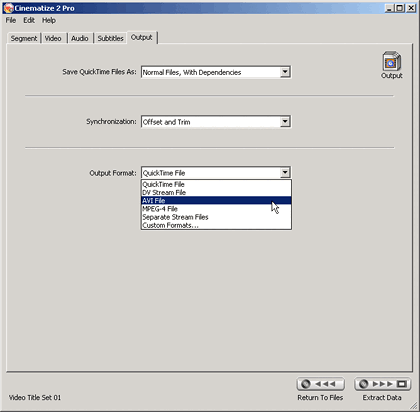
  5. When the selections are made in the Segment tab, select the Output tab (see Figure 6) to choose the format for the extraction. Make sure that you choose AVI if you intend to use the movie clip on a PowerPoint slide.

    Output
    Figure 6: Output
  6. Finally, click on Extract Data button, which is at the bottom right of the interface (see Figure 7).

    Extract Data
    Figure 7: Extract Data

Select the location to save the extracted file -- Cinematize will start processing the extraction. Depending upon the length of the segment and extraction option settings you choose, this process can take a while.

Back

Pricing and Support

Cinematize 2 Pro for Windows costs $129.95 for the download version, whereas the boxed version costs $149.95.

Miraizon provides an upgrade path from Cinematize 2 to Cinematize 2 Pro for Windows (downloadable) which costs $89.95. The boxed, upgrade version of Cinematize 2 Pro costs $109.95.

Support options include e-mail, phone support, and an online FAQ.

Back

Conclusion

Cinematize 2 Pro makes easy work of a complicated job ensuring that almost anyone can extract movie clips from a DVD using a simple learning curve.

Back

You May Also Like: Lobster PowerPoint Templates | Sync Audio and Animation Timings in Adobe Presenter


Popular Posts

Creating Slide Backgrounds in Photoshop for PowerPoint
Learn how to create slide backgrounds for PowerPoint in Photoshop.

Formatting Arrows (Arrowheads) in PowerPoint 2016 for Windows
Learn how to format arrowheads for lines in PowerPoint 2016 for Windows.

Creating Semi-Circles in PowerPoint 2013
Learn how to create a semi-circle in PowerPoint 2013.

Apply Two or More Animations to One Object at the Same Time in PowerPoint
Apply multiple animations to one slide object in PowerPoint, and make all animations play together.


Jigsaw Graphics for PowerPoint

Here are 10 jigsaw graphics containing different shapes. These graphics are available in both black and white and are contained within separate sample presentations that you download. Additionally, these jigsaw graphics are vector shapes, so you can easily edit them within your Microsoft Office program by changing fills, lines, and effects or even applying Shape Styles.

Download and use these Jigsaw Graphics in your slides for just $4.99+


Microsoft and the Office logo are trademarks or registered trademarks of Microsoft Corporation in the United States and/or other countries.

Home | PowerPoint | Photoshop | PowerPoint Templates | PowerPoint Tutorials | Blog | Notes | Ezine | Media Kit | Feedback | Site Map | About Us | Contact Us

Link to Us | Privacy | Testimonials

PowerPoint Backgrounds | Christian PowerPoint Backgrounds | Business PowerPoint Presentation Templates

Plagiarism will be detected by Copyscape

©2000-2023, . All rights reserved.