Indezine Logo


Changing Proofing Language for an Entire Presentation in PowerPoint 2013 for Windows

Learn how to set proofing language for an entire presentation in PowerPoint 2013 for Windows. These guidelines will help you approach the task of changing the proofing language.


Author:

Product/Version: PowerPoint 2013 for Windows

OS: Microsoft Windows 7 and higher


Learn PowerPoint

Solve this problem: Click, and all my text becomes white or disappears!


While it is easy to change proofing language for selected text containers, that happens to be a piece meal approach and can be a great time-waster if you need the language changed across all content in 100 or more slides! There are two ways to set the proofing language for your entire presentation, and you can use one or both of these approaches. Make sure you have the proofing tools installed for all or any of the languages that you need to work within PowerPoint. Then follow these steps:
  1. Launch PowerPoint 2013 for Windows, and navigate to any slide. Within the slide, select all the text containers. You can select the text containers in three ways:
    1. If there is only one text container on the slide, just click on the edge of the text container to select it.
    2. If there are more than one text container on the slide and nothing else, press Ctrl + A to select all the text containers.
    3. If there are more than one text container on the slide that also includes other slide objects, press Ctrl + A to select all the slide objects on the slide, and then deselect the slide object which you don't want to be the part of the selection. You can quickly deselect any object by Shift +clicking the object.
    Note: A text container is any slide object that typically contains text. These include text placeholders, text boxes, and shapes.
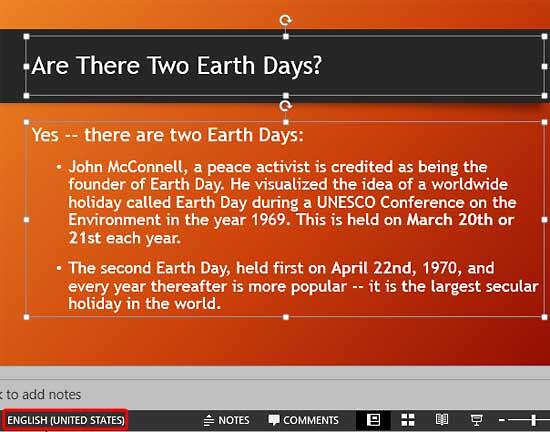
  2. At this point of time, you have selected the text containers you want to alter the proofing language for, as shown in Figure 1. Now click the Language option on the Status Bar (highlighted in red within Figure 1).
  3. Text containers on the slide selected
    Figure 1: Text containers on the slide selected
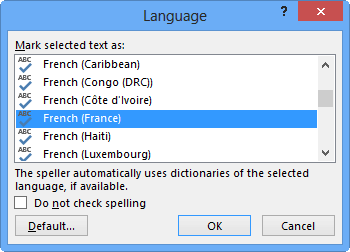
  4. This brings up the Language dialog box that you see in Figure 2. Scroll down to select an installed Editing Languages; installed languages can be recognized by the checkmark preceding them as shown in Figure 2. Choose the language you want to use for your selected text container. Thereafter click the OK button.
  5. Check mark denotes the installed language
    Figure 2: Check mark denotes the installed language
  6. This will change the proofing language option on the Status Bar
  7. You can repeat this process to change the Language option for all the other slides in your presentation.

Another way of setting the proofing language for the entire presentation is through the Outline view:
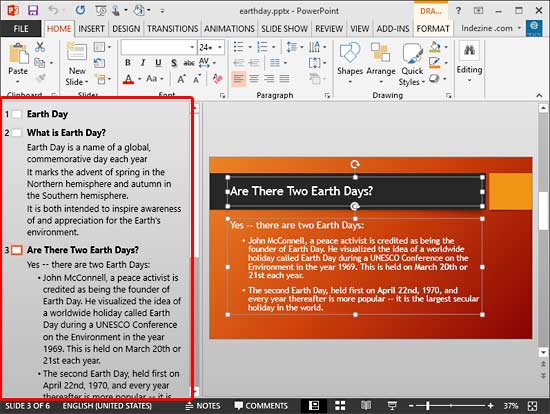
  1. With your presentation open, access the Outline view. Figure 3, below, shows the Outline view (highlighted in red) within the PowerPoint 2013 interface.
  2. Outline view within PowerPoint 2013 interface
    Figure 3: Outline view within PowerPoint 2013 interface
  3. Within the Outline view, select the entire text by pressing Ctrl + A on your keyboard. Now, click the Language option on the Status Bar (highlighted in red within Figure 4).
  4. Entire text selected in the Outline pane
    Figure 4: Entire text selected in the Outline pane
  5. This summons the same Language dialog box that you saw in Figure 2 above.
  6. Make changes to the proofing language, as required. This changes the proofing language for your entire presentation. Note that this approach only changes the proofing language for text placeholders, and leaves text boxes and shapes untouched. For more information on the differences between these various text containers, look at our Text Placeholders vs. Text Boxes tutorial. Shapes with text behave just like Text Boxes.
  7. Save your presentation.

See Also:

05 08 20 - Spelling, AutoCorrect, and Reference Tools: Changing Proofing Language for an Entire Presentation in PowerPoint (Glossary Page)

Changing Proofing Language for an Entire Presentation in PowerPoint 365 for Windows
Changing Proofing Language for an Entire Presentation in PowerPoint 2011 for Mac
Changing Proofing Language for an Entire Presentation in PowerPoint 2010 for Windows

You May Also Like: Presentation Summit 2016: Conversation with Rick Altman | Gorilla PowerPoint Templates


Popular Posts

Create Animated GIFs from PowerPoint Slides
Explore ways to create animated GIFs from PowerPoint slides.

PowerPoint Tutorials
These PowerPoint tutorials have many screen shots that show you exactly what you see in your computer!

Use Safe Fonts Available on All Systems in PowerPoint
Learn about using safe fonts in PowerPoint.

10 Tips for Pecha Kucha
Read 10 amazing Pecha Kucha tips that will help you create and deliver a better Pecha Kucha presentation.


Night Sky Starlit Backgrounds

The ZIP file that you will download contains five Night Sky Starlit Backgrounds in three resolutions: Full Size: 4000x2250 pixels (16:9), Widescreen Size: 1365x768 pixels (16:9), and Standard Size: 1024x768 (4:3). Also included are five PowerPoint Presentations with Night Sky Starlit Backgrounds, set to work with the Morph transition. Yes, these background designs can also animate between slides using PowerPoint's Morph transition.

Go ahead and get this product! You’ll see the price on the order page


Microsoft and the Office logo are trademarks or registered trademarks of Microsoft Corporation in the United States and/or other countries.

Home | PowerPoint | Photoshop | PowerPoint Templates | PowerPoint Tutorials | Blog | Notes | Ezine | Media Kit | Feedback | Site Map | About Us | Contact Us

Link to Us | Privacy | Testimonials

PowerPoint Backgrounds | Christian PowerPoint Backgrounds | Business PowerPoint Presentation Templates

Plagiarism will be detected by Copyscape

©2000-2023, . All rights reserved.