Read the Indezine review of Anystream Apreso, Page 3 of 4..
Author: Geetesh Bajaj
Product/Version: PowerPoint
About the test presentation
Capturing with Apreso
Apreso Workspace
Apreso Hosting & Publish Points
I would have usually used my online rich media benchmark presentation for capture with Apreso - but the Apreso manual states that presentations use as little animation as possible. There are also no claims to capture inserted video content or be able to include sound across slides.
In all fairness, Apreso is a different style of online rich media (ORM) product - the video part in Apreso is actually a live person being recorded through a webcam or attached camcorder. So, I'm using a fairly simple conventional presentation to test Apreso. Also, comparing Apreso to products that cost 30 times over while expecting the same capability would certainly be unfair.
Here's some feedback from Darian:
"You’re pointing out a tip that we should clarify in our manual. In the end our advice to users should be to avoid EXCESS animations, not eliminate them. This is really more a function of the end user’s computer processing power, rather than a limitation of our software. Those on the lower end of our minimum system requirements probably want to be conservative with animation. It shouldn’t be an issue for those on the higher end."
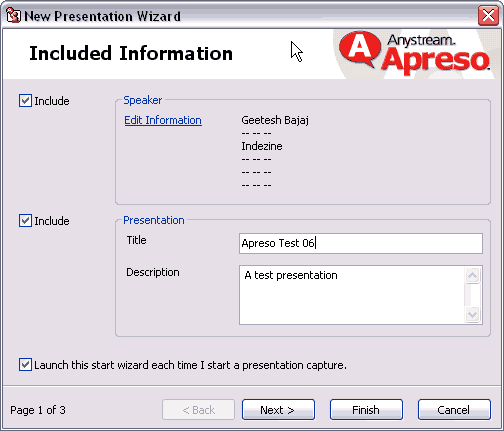
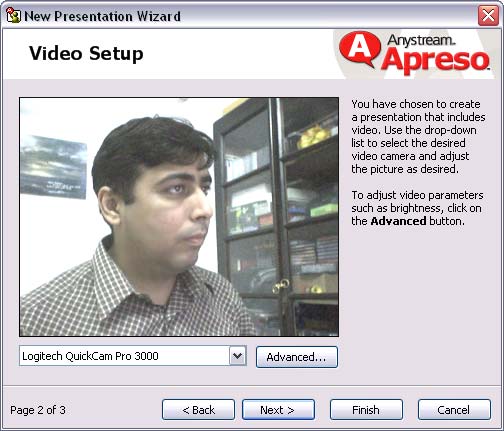
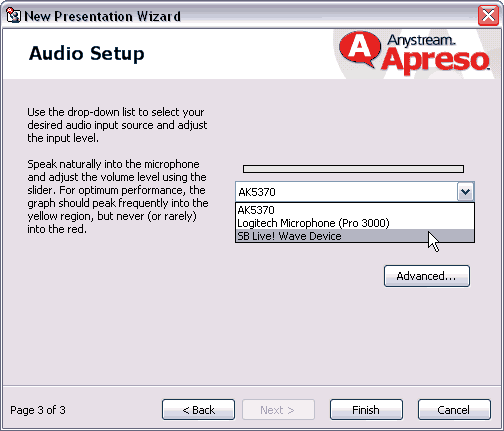
BackWhen you configure Apreso, your webcam and microphone are checked so that you can start a presentation capture with Apreso using stored settings. Assuming your hardware is working fine, just open any presentation in PowerPoint and click the first icon on the Apreso toolbar (or choose Apreso | Start Presentation Capture).
You'll be presented with a three-screen sequential wizard that:


If you had chosen to start capture manually, you'll get in slideshow mode with two buttons - Capture and Cancel. Click Capture to start.
You'll now face the camera and speak into the microphone in the same way you would have if you needed to do a live presentation. Progress your slides and elaborate your points normally. Once you finish the presentation, you'll see a dialog box that informs you that Apreso is processing the captured content.
Once the content has been captured, you'll be provided with an option to view it.
For now, I'll just click OK and look at Apreso Workspace.
BackThere are two ways to access the Apreso workspace:
The Apreso Workspace is where you work with your captured Apresos - rename, convert or publish them and do so much more. The three paned interface resembles Microsoft Outlook and uses a similar hierarchy so most of you should feel at home.
Left Pane: The left pane is a listing of your Publish Points - Publish Points could be your hard disk where all your captured Apresos are stored - in Apreso parlance this is called a Local Publish Point. You also have Network Publish Points, which could be your Internet or intranet server - it could also be the Apreso Presentation Hosting service which you need to subscribe separately - we'll look at Apreso Hosting later in this review.
Top Pane: When you select a Publish Point on the left pane, you can see all its contents on the top pane. For instance, the above screenshot shows all the Apresos I have created on my Local Publish Point.
Bottom Pane: Much like Outlook or any other email application, the bottom pane is the preview pane.
Toolbar: The Apreso Workspace also has a convenient toolbar above these panes.
BackWe just explored Local Publish Points - by default Apreso includes a single Local Publish Point called Apreso - you can create more Local Publish Points by designating any folder on your hard disk as a Publish Point.
Network Publish Points work similarly to create Publish Points on any system that's part of your Network - Network Publish Points also include any server or the Apreso Online Presentation Hosting service.
To use Apreso Online, you need to sign up for this service at the Apreso site - until March 1st, 2004 Apreso Online is free.
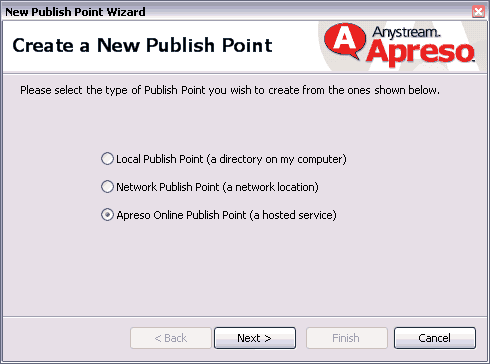
Once you sign, you are provided a unique login:password. Within the Apreso Workspace, choose the File | New Publish Point... option and choose Apreso Online
Publish Point from the resultant dialog box.

Enter your login:password details and you should find the Apreso Online Publish Point listed on the left pane of the Apreso Workspace.
BackYou May Also Like: Birds PowerPoint Templates | Articulate Engage


Microsoft and the Office logo are trademarks or registered trademarks of Microsoft Corporation in the United States and/or other countries.