There's more to text animation than just adding some movement to your selected text. By default, when you animate a text placeholder or text box, all text contained animates at one go unless your text content is within a bulleted or numbered list. In that case, all text animates as sequenced paragraphs. Even then, the animation is sequenced to first level paragraphs (first level bullets), and any sub-bullet levels contained in your text placeholders or text boxes animate along with the parent level. In this tutorial, you will learn to access some specialized options for animating paragraphs and bulleted text sequentially by words, by letters, and by paragraph levels.
Follow these steps to explore various special options for text animation in PowerPoint 2013 for Windows:
- Select the entire text box or placeholder with bulleted (or paragraphed) text, as shown in Figure 1, below. It is important that you do not select some text, but the entire placeholder. Notice that no individual text is selected in Figure 1. Rather, the entire text container is selected. The easiest way to make this selection is to click on the edge of the text container.
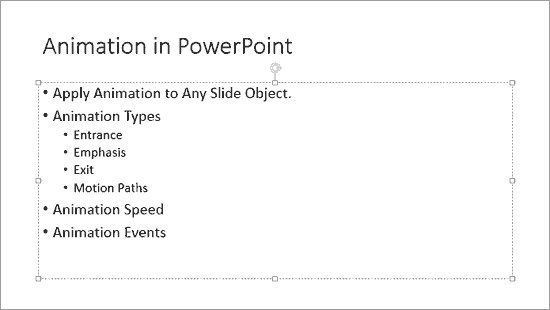
Figure 1: Text container selected - Now, access the Animations tab of the Ribbon, as shown highlighted in red within Figure 2, below. Then, click the Add Animation button, as shown highlighted in blue within Figure 2.

Figure 2: Add Animation button Animation Pane Toggle Option
The Animation Pane button is a toggle option. So, if your Animation Pane is already visible, then clicking this button will make the pane disappear. Click again to make it appear again.
- Doing so opens the Add Animation drop-down gallery, as shown in Figure 3, below. Within this gallery, select any of the four animation types Entrance, Emphasis, Exit, and Motion Paths that PowerPoint supports. For this tutorial, we chose the Wipe Entrance animation effect.
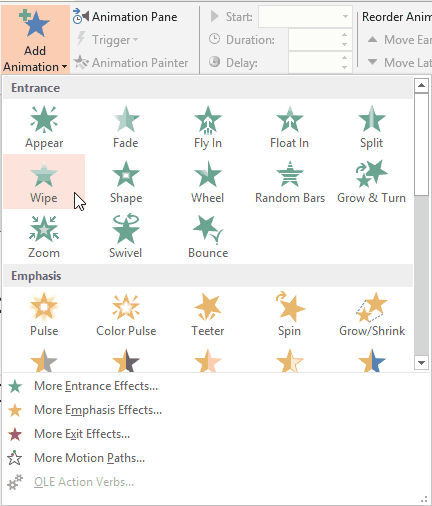
Figure 3: Add Animation drop-down gallery Effect Options for Wipe
- If you choose the Wipe animation as we did, then make sure that you click the Effect Options button within the Animations tab of the Ribbon, as shown highlighted in red within Figure 4, below, and then choose the From Left option so that your text animates from left to right, rather than the bottom to top default.
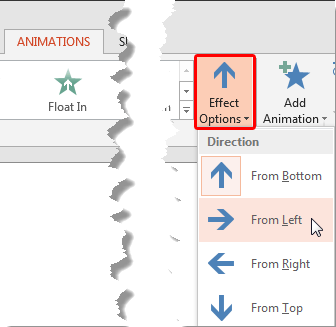
Figure 4: Effect Options - Now, make the Animation Pane visible by clicking the Animation Pane button, as shown highlighted in red within Figure 5, below.

Figure 5: Animation Pane button - Within the Animation Pane, right-click the text animation to bring up a drop-down list, as shown in Figure 6, below. Within this drop-down list, choose Effect Options, as shown in Figure 6. Alternatively, double-click the text animation within the Animation Pane.
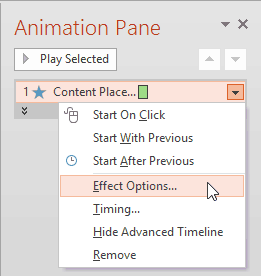
Figure 6: Effect Options to be selected for the animation - Either way, you summon a multi-tabbed dialog box, as shown in Figure 7, below. The name of this dialog box depends upon the animation you have selected/applied.
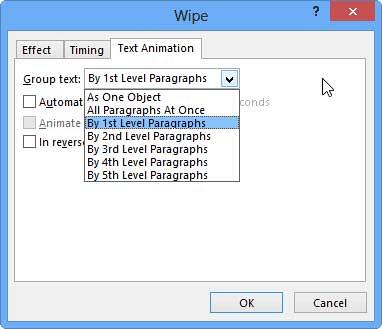
Figure 7: Group text options for Text Animation - Click the Text Animation tab, and from the Group text drop-down list, choose from any of the following options:
- As One Object: Animates the entire text container (text placeholder or text box) at one go.
- All Paragraphs At Once: Animates all paragraphs or bullet levels at one go.
- By 1st Level Paragraphs: Animates by 1st level paragraphs or bullet levels. This is the default option that PowerPoint uses for text containers.
- By 2nd Level Paragraphs: Animates by both 1st and 2nd level paragraphs or bullet levels. Of course, this works only if you have 2nd level paragraphs or bullet levels in your selected text.
- By 3rd Level Paragraphs: Works the same way, animating all levels from 1st to 3rd level paragraphs or bullet levels.
- By 4th Level Paragraphs: Works the same way, animating all levels from 1st to 4th level paragraphs or bullet levels.
- By 5th Level Paragraphs: Works the same way, animating all levels from 1st to 5th level paragraphs or bullet levels.
- You can set the delay time of the text animation by choosing Automatically after check-box, as shown in Figure 8, below. Then, type in the time in seconds for the delay period you want to use. There are two more options within the Text Animation tab:
- The Animate attached shape option is only available if your text container is a shape.
- When selected, the In reverse order check-box will cause the text animation to play in reverse order.

Figure 8: Text animation options - You can also make your text animate by paragraphs, words, or letters. To access these options, click the Effect tab, as shown in Figure 9, below, and from the Animate text drop-down list, choose from any of the following options:
- All at once: Animates the text by paragraphs. This is the default option
- By word: Animates text by one word at a time
- By letter: Animates text by one letter (character) at a time
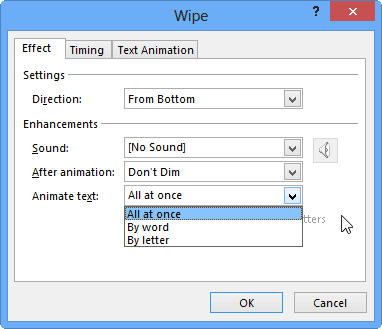
Figure 9: Effect tab - Clearly, you need to have a compelling reason to use the By word or By letter options because no audience will be very kind to you choosing these options otherwise!
- Click the OK button to apply the changes. Thereafter, preview your animation to ascertain if you like the result so that you can edit further as required.
- Save your presentation.


