You animate text just the way you animate any slide object in PowerPoint. Additionally, there's more you can do to text animation, as we shall explore in this tutorial. By default, when you animate a text placeholder or text box, all text contained animates at one go unless your text content is within a bulleted or numbered list. In that case all text animates as sequenced bulleted lists. Even then, the animation is sequenced to first level paragraphs (first level bullets) only, and any sub-bullet levels contained in your text placeholders or text boxes animate along with its parent level. In this tutorial you will learn to access some specialized options for animating paragraphs and bulleted text sequentially by words, by letters, and by paragraph levels.
Follow these steps to explore various special options for text animation in PowerPoint 2011 for Mac:
- Select part of the text, or the entire text box or placeholder that contains bulleted text (or paragraphs). In Figure 1, below, you can see a text placeholder selected.
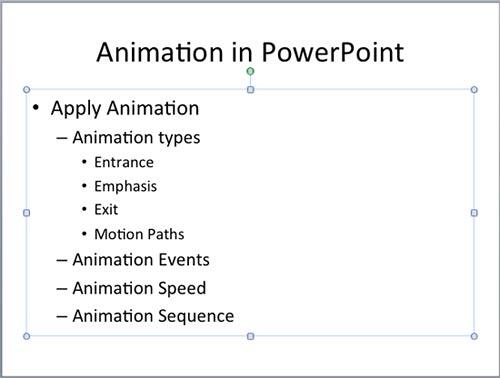
Figure 1: Text placeholder selected Selection for Text Animation
- If you select partial text content, then you will not be able to animate all text sequentially by paragraphs, as explained later on this page. If you need this sequential animation, you must select the entire text placeholder, box, or any other text container.
- With the text selected, access the Animations tab of the Ribbon, as shown highlighted in red within Figure 2, below, and hover the cursor over the Entrance Effects group, as shown highlighted in blue within Figure 2.

Figure 2: Entrance Effects group within the Animations tab - Doing so enables a down-arrow button below the Entrance Effects group, as shown highlighted in red within Figure 3, below. Click this down-arrow button to open the Entrance Effects drop-down gallery, as shown in Figure 3. Within the Entrance Effects drop-down gallery, you can select any of the Entrance Effects that PowerPoint supports. For this tutorial, we chose the Wipe Entrance animation effect.
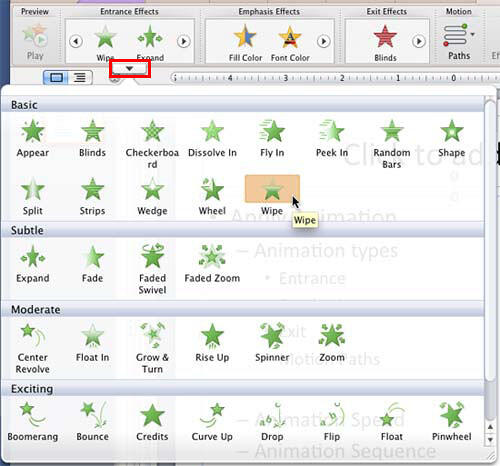
Figure 3: Entrance Effects drop-down gallery Entrance, Empasis, or Exit?
- Based on your requirement, you can even apply an Emphasis Effect or an Exit Effect to animate your text.
- Now, access the Animations tab of the Ribbon, and click the Reorder button, as shown highlighted in red within Figure 4, below.
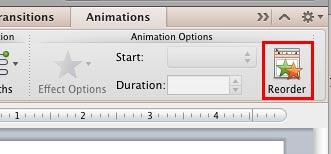
Figure 4: Reorder button within Animations tab - Doing so brings up the Custom Animation tab of the Toolbox, as shown in Figure 5, below. Select the animation applied to the text within the Animation order pane, and click the Text Animations pane, as shown highlighted in red within Figure 5.
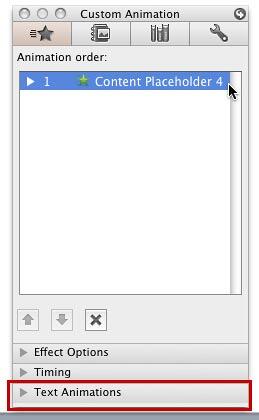
Figure 5: Text Animations pane within the Custom Animation tab of the Toolbox - This action reveals the options within the Text Animations pane, as shown in Figure 6, below.
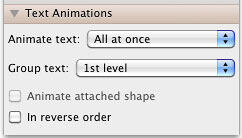
Figure 6: Options within the Text Animations pane - Let us explore text animation options in the order they appear within the Text Animations pane:
- Animate text: Animate text drop-down list includes three options, as shown in Figure 7, below.

Figure 7: Animate text options - Choose any of these options:
- All at once: Animates the text by paragraphs. This is the default option.
- By word: Animates text by one word at a time.
- By letter: Animates text by one letter (character) at a time.
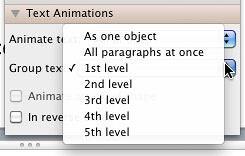
Figure 8: Group text options for animating text - Group text: Group text drop-down list includes the following options as shown in Figure 8, above:
- As one object: Animates the entire text container (text placeholder or text box) at one go.
- All paragraphs at once: Animates all paragraphs or bullet levels at one go.
- 1st level: Animates by 1st level paragraphs or bullet levels. This is the default option that PowerPoint uses.
- 2nd level: Animates by both 1st and 2nd level paragraphs or bullet levels. Of course, this works only if you have 2nd level paragraphs or bullet levels in your selected text.
- 3rd level: Works the same way, animating all levels from 1st to 3rd level paragraphs or bullet levels.
- 4th level: Works the same way, animating all levels from 1st to 4th level paragraphs or bullet levels.
- 5th level: Works the same way, animating all levels from 1st to 5th level paragraphs or bullet levels.
- Animate attached shape: This option is available only if your
text container is a Shape.
- In reverse order: Select this check-box to play the text animations in reverse order.
- Tweak settings as required. Thereafter, preview your animation in Slide Show view to ascertain if you like the results. If not, you can edit further as required.
- Save your presentation.


