In PowerPoint, a Motion Path is a path or route along which a slide object animates on your slide. Motion Paths can be either anchored to the slide object, or not. The anchoring (unlocking) and unanchoring (locking) of Motion Paths are rarely explored options, and that may be because these are not too well documented or even intuitive. However, it's good to know more about anchoring of Motion Paths, since this knowledge can help you create better animations. You have already learned how to add a Motion Path animation to any slide object. We also explained the concept of reversing paths and opening or closing paths.
Now, follow the steps to learn how to access and use the options to unanchor and anchor Motion Paths in PowerPoint 2011 for Mac:
- First, insert a shape on a blank slide, and apply a motion path animation. Refer to adding a Motion Path or drawing a custom Motion Path tutorials to get started.
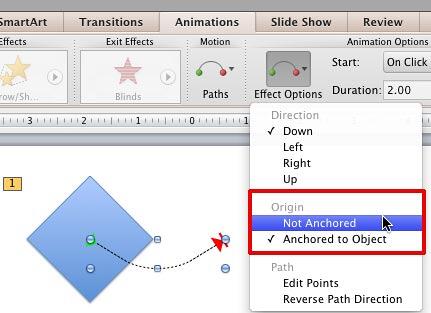
- At this point, the Animations tab of the Ribbon should be active. Now, select the motion path by clicking on this dashed line. Then, click the Effect Options button within the Animations tab of the Ribbon. Doing so opens the Effect Options drop-down gallery, as shown in Figure 1, above.

Figure 1: Not Anchored option being selected - Within the Effect Options drop-down gallery, locate the Origin section, as shown highlighted in red within Figure 1, above. This section contains two options:
Not Anchored
- Selecting this option locks the Motion Path to its current position on the slide. The selected Motion Path will no longer be anchored to the slide object to which it has been applied. If you move the slide object to another location on the slide, the Motion Path itself remains in the original location. This option is equivalent to the Locked option in PowerPoint 2010 for Windows.
Anchored to Object
- Selecting this option connects (anchors) the Motion Path to its slide object. Now, if you move the selected object, the associated Motion Path will also move. This is the default option and is the same as the Unlocked option in PowerPoint 2010 for Windows.
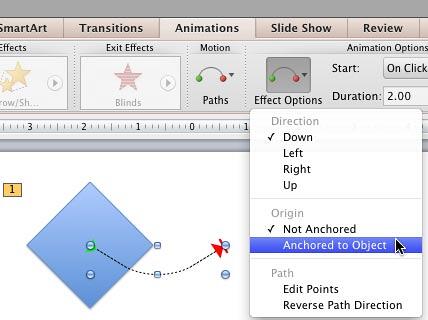
- As you can see in Figure 1, above, there is a tick mark in front of the Anchored to Object option, which indicates that the selected Motion Path is currently anchored to its slide object. When you select the Not Anchored option, the tick mark will now show up in front of this selected option, as shown in Figure 2, later on this page.
- Now, if you drag the animated shape or slide object to a different place on the Slide Area, the Motion Path won't move along with it! However, you can move the custom path manually by selecting and dragging it, but then, it moves independently. Now, if you want to change the anchoring back to its original status, i.e., if you want to anchor the Motion Path back to its slide object, first select the Motion Path, then open the Effect Options drop-down gallery again, and choose the Anchored to Object option, as shown in Figure 2, below.

Figure 2: Anchored to Object option being selected - Doing so will anchor the Motion Path to the slide object again.
Remember
You don't need to lock/unlock a motion path from its slide object to move it around. To do so, select the actual motion path, not the slide object to which it has been applied, and drag it around as required. This process moves the motion path and leaves the slide object in its original place. However, if you move the slide object, the motion path also starts moving accordingly, even though it is away from the slide object. Confusing? Yes, it is a little, unless you play around with this technique a few times!


