Introduction
AKVIS Sketch 14 is a photo to sketch Photoshop plug-in that converts your photos into pencil sketches, watercolor paintings, charcoal art, and pastel drawings. You can create realistic color or black and white renditions that imitate the technique of graphite, color pencils, charcoal, or watercolor. Add effects to your picture background and once the picture is converted into a sketch, you can further personalize the work of art by adding an inscription (signature). This new version of AKVIS Sketch introduces the new Timeline feature which creates stepwise, sequential shots.
AKVIS Sketch 14 is from AKVIS, a company based in Russia that specializes in graphic programs. Apart from Sketch, AKVIS also creates other Photoshop plug-ins like ArtWork, Refocus, Retoucher, Chameleon, MultiBrush, Enhancer, Decorator 3, Coloriage, etc.
You can download a free 10-day trial version of Sketch 14 from the AKVIS site.
My contact at AKVIS for this review was Kat Kharina. Thank you, Kat.
Back
How To Use
We have already reviewed the AKVIS Sketch plug-in for Photoshop earlier, and so much has changed since that earlier version. Follow these steps or just read along to do a quick walkthrough of AKVIS Sketch 14:
- Open an image you want to use inside Adobe Photoshop or a similar program.
- Choose the Filter | AKVIS | Sketch option, as shown in Figure 1, below.

Figure 1: AKVIS Sketch plug-in within the Filter menu - Doing so opens the image within the AKVIS Sketch 14 interface, as you can see in Figure 2, below.

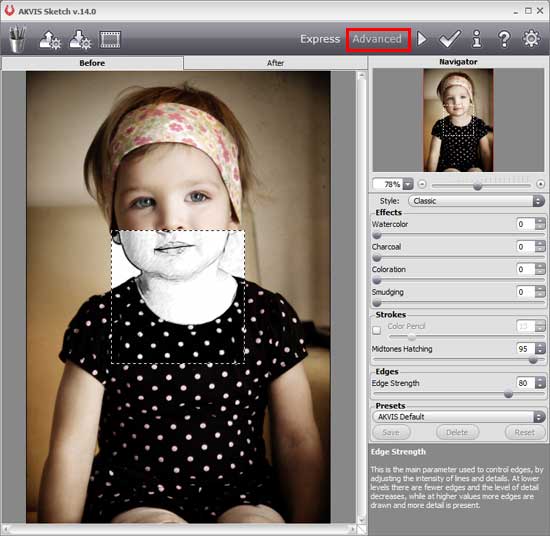
Figure 2: AKVIS Sketch 14 interface - AKVIS Sketch works with two editing modes: Express and Advanced. The Express editing mode (see Figure 2) provides a minimal set of parameters needed to quickly obtain results. In contrast, the Advanced editing mode reveals the full functionality of the plug-in.
- For this review, we'll explore the Advanced editing mode. You can easily turn on the Advanced editing mode by clicking the Advanced button, highlighted in red within Figure 2, above.
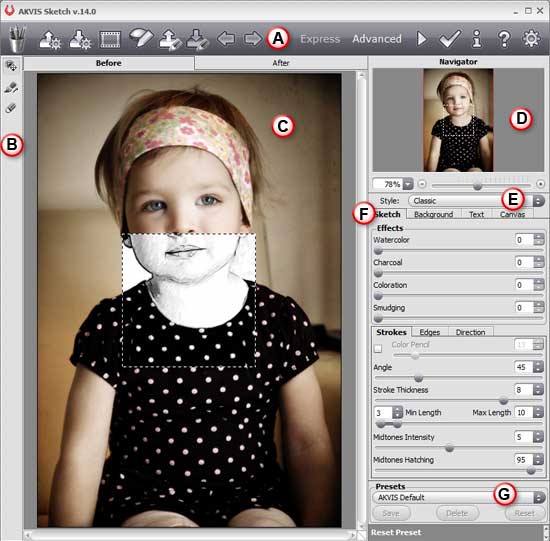
- Figure 3, shows the AKVIS Sketch 14 interface with the Advanced editing mode active.

Figure 3: AKVIS Sketch 14 interface with Advanced editing mode active - AKVIS Sketch 14's Advanced editing interface is explained below. Each point below corresponds to the area marked in Figure 3:
A. Buttons
- The upper part of interface is the Control Panel with buttons located on both the left and right sides. Options are available to undo/redo, to show/hide drawn lines, to start processing the image, and to apply the result to the image. There are also buttons to launch the information dialog, help files, open the AKVIS Sketch home page, and access the Preferences dialog box.
B. Tools
- Here you can show/hide the Preview Window (a dotted frame that displays instant results of effects selected). Another button activates the Stroke Direction tool. And you can also access tools to create outline areas for background effects (these tools are visible and active only when using either Sketch & Photo or Sketch & Blur mode). There is also an Eraser tool used to erase the stroke direction line.
C. Preview
- Preview has two tabs: Before and After, which show previews of original and changed images.
D. Navigator
- On the top right, you'll find the Navigator. This also lets you chose the area of the image to be shown in the Preview pane.
E. Style
- Choose from the photo-to-sketch conversion style (Classic/Artistic), and adjust the parameters.
F. Settings Panel
- Settings Panel has four tabs of settings: Sketch, Background, Text and Canvas.
Sketch
- In this tab you can adjust the settings for photo-to-sketch conversion of the selected style.
Background
- Within this tab you can define the area of the picture that should be blurred, or the areas that should remain in their original state.
Text
- This tab enables you to add an inscription to your drawing.
Canvas
- In this tab, you can adjust the settings for the canvas on which the resulting sketch is applied.
G. Presets
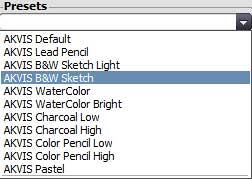
- Click the Presets option to bring ups the drop-down list of ready made effects available (see Figure 4). Then just hover your cursor over the preset effects available to see a quick preview window. Additionally you can even save your current settings as a preset to use them in the future. The current settings can be saved, edited, deleted. When you launch the program, it uses the settings of the last used preset.

Figure 4: Presets drop-down list - Play with the parameters, and when you get the desired result, apply the changes within the plug-in by pressing the Run button (shown below).

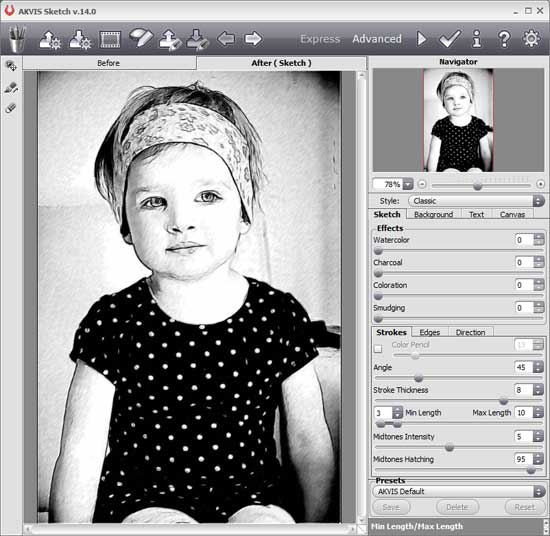
- This applies the effect and creates a preview of the changed image in the After, as shown in Figure 5, below.

Figure 5: Preview the changes - Once you’re happy with the preview, apply the result to the image by clicking the Apply button (shown below) to return to the image editor.

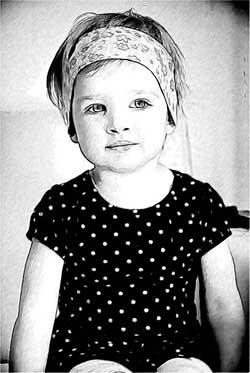
Here are some Before and After samples created using AKVIS Sketch 14:


Back
Specifications
| Photoshop Versions: |
Photoshop 6 and higher |
| Platforms: |
Windows, Mac |
| Site: |
AKVIS |
| Price: |
USD $72 and above |
| Trial Version: |
Available for 10 days |
Back
