Introduction
AKVIS MakeUp 3 is a Photoshop plug-in that you can use on pictures that include humans. Make Up includes special algorithms that smoothen small defects on the skin without changing other aspects of your photo. You can thus improve portraits by adding a glamorous element to them.
AKVIS MakeUp 3 is from AKVIS, a company based in Russia that specializes in graphic programs. Apart from MakeUp, AKVIS also creates other Photoshop plug-ins like ArtWork, Refocus, Retoucher, Chameleon, MultiBrush, Sketch, Enhancer, Decorator 3, Coloriage, etc.
You can download a free 10-day trial version of MakeUp 3 from the AKVIS site.
My contact at AKVIS for this review was Kat Kharina. Thank you, Kat.
Back
How To Use
We have already reviewed the AKVIS MakeUp 1 plug-in for Photoshop. In this review, we will explore some features that were not covered in that review.
Follow these steps, or just read along to do a quick walkthrough of AKVIS MakeUp 3:
- Open the image you want to use inside Adobe Photoshop or a similar program.
- Choose the Filter | AKVIS | MakeUp option, as shown in Figure 1, below.

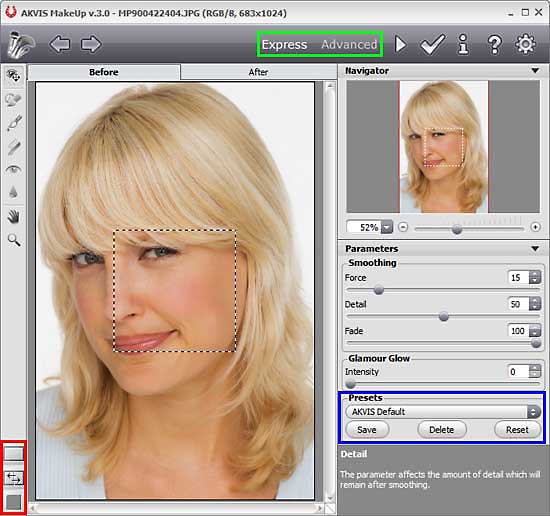
Figure 1: AKVIS MakeUp plug-in within the Filter menu - Doing so opens the image within the AKVIS MakeUp 3 interface, as you can see in Figure 2, below.

Figure 2: AKVIS MakeUp 3 interface - The plug-in provides two editing modes, highlighted in green within Figure 2, above:
A. Express
- Here you will find minimal set of parameters needed to quickly obtain results.
B. Advanced
- This mode reveals the full functionality of the plug-in. You can choose the tone of the skin more precisely using the eyedropper tool and play with additional parameters. There are also special effects which can be used. For example, High Key Lighting, which removes harsh shadows, small imperfections, and shadows under the eyes.
- This new version introduces the retouching tools such as: Teeth Whitening, Red Eye Removal, and Blur. You can now also choose a mode of the History Brush tool.
- The AKVIS MakeUp 3 interface has three buttons, highlighted in red within Figure 2, above, at the bottom of the Toolbar which control how the Image Window looks like.
- These three buttons are explained below:
Set Image View Mode
- Click the button to bring up a sub-menu containing various options for viewing the original and processed images, as shown in Figure 3, below.

Figure 3: Image View Mode options - The first option is the standard Image Window.
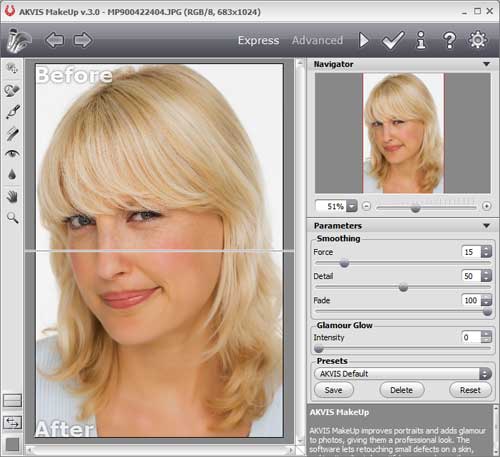
- The second and fourth options divide the Image Window into two portions vertically or horizontally, respectively. The original and processed images are partially visible. The Before and After tabs are combined to form the whole picture, as shown in Figure 4, below.

Figure 4: Image Window divided into two windows horizontally - The third and fifth options also divide the Image Window into two (vertically or horizontally). However, in contrast to the previous option, the windows display the same fragment of the image before and after processing.
Swap the position of the original image and result
- This button swaps the positions of the original image and result when displaying two windows.
Change background color for Image Window
- This button lets you choose the background color of the Image Window. Click this button to change the background color to white, gray, or black, you can even choose any other color of your choice from the Select Color dialog box.
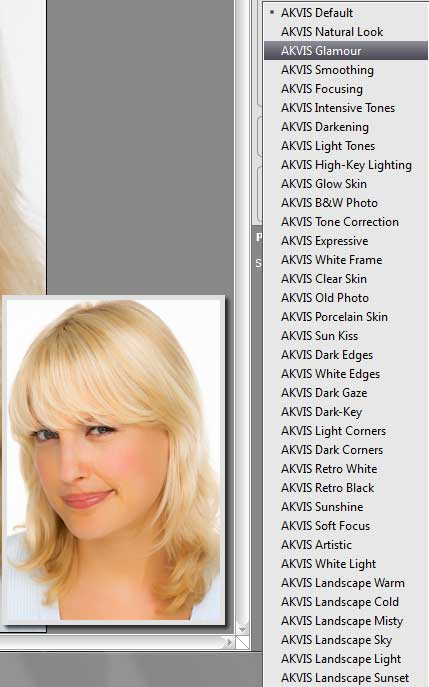
- You can also apply any of the readymade effects from the Presets list, highlighted in blue within Figure 2, above. Click the Presets option to bring ups the drop-down list of ready-made effects available, just hover your mouse cursor over the preset effects available to see a quick preview window, as shown in Figure 5, below.

Figure 5: Presets list - Choose from Presets or play with the parameters, and when you get the desired result, apply the changes within the plug-in by pressing the Run button, as shown below.

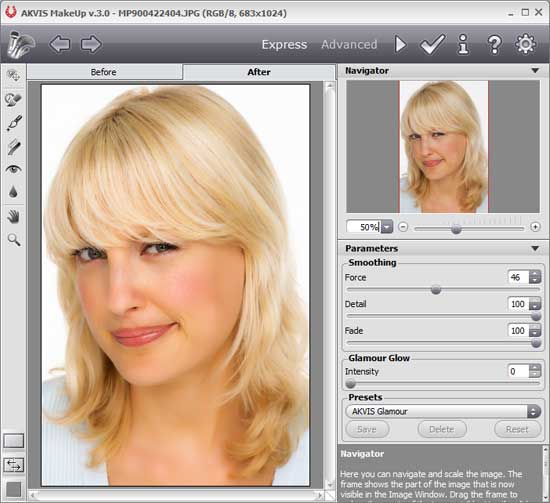
- This applies the effect and creates a preview of the changed image in the After tab, as shown in Figure 6, below.

Figure 6: Preview the changes - Once you’re happy with the preview, apply the result to the image by pressing the Apply button, as shown below, to return to the image editor.

Here are some Before and After samples created using AKVIS MakeUp 3:


Back
Specifications
| Photoshop Versions: |
Photoshop 6 and higher |
| Platforms: |
Windows, Mac |
| Site: |
AKVIS |
| Price: |
USD $39 and above |
| Trial Version: |
Available for 10
days |
Back
