Introduction
AirBrush is an Adobe Photoshop compatible plug-in that creates an airbrush-style drawing from any photograph. AKVIS AirBrush works as an artistic filter creating stylish colorful airbrush designs from images using its preset or tweaked algorithms. This results in a photo to painting conversion. Best of all, you don't need to perform complex calculations or draw lines and details with tools. Just choose one of AirBrush's 40 ready-to-use presets or play with the effect settings to create your own presets.
AKVIS AirBrush is from AKVIS, a company based in Russia that specializes in graphic programs. Apart from AirBrush, AKVIS also creates other Photoshop plug-ins like Sketch, ArtWork, Refocus, Retoucher, Chameleon, MultiBrush, Enhancer, Decorator 3, Coloriage, etc.
You can download a free 10-day trial version of AirBrush from the AKVIS site.
My contact at AKVIS for this review was Kat Kharina. Thank you, Kat.
Back
How To Use
Once the AirBrush is installed, follow these steps, or just read along to do a quick walkthrough of AirBrush.
- Launch an image editor such as Adobe Photoshop (where you installed the AirBrush plug-in) and open any picture.
- Choose Filter | AKVIS | AirBrush, as shown in Figure 1, below.

Figure 1: AirBrush plug-in within the Filter menu - Doing so opens the image within the AKVIS AirBrush interface, as you can see in Figure 2, below.

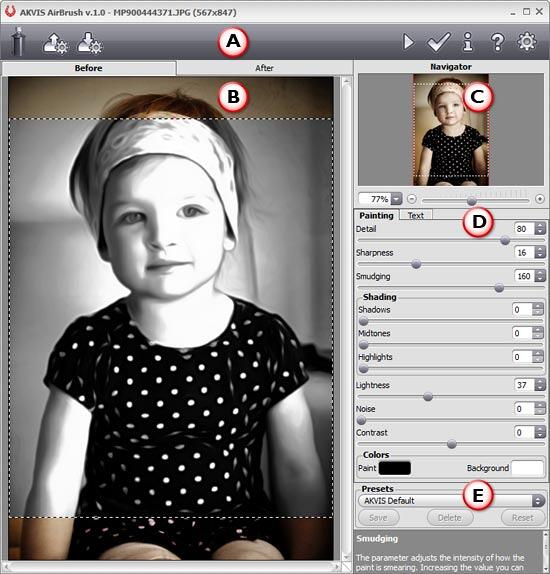
Figure 2: AKVIS AirBrush interface - The AKVIS AirBrush 1.0 interface is explained below. Each area corresponds to an area marked in Figure 2 above:
A. Buttons
- The upper part of interface is the Control Panel with buttons on both the left and right sides representing the options to import and export presets, to start processing the image, and to apply the results to the image. There are also buttons to launch the information dialog, help files, open the AKVIS AirBrush web page, and the Preferences dialog box.
B. Preview
- The Preview has two tabs: Before and After, to show the previews of both the original and changed images.
C. Navigator
- On the top right, you'll find the Navigator. This also lets you chose the area of the image to be shown in the Preview pane.
D. Settings Panel
- Settings Panel has two tabs of settings: Painting and Text:
- Within the Painting tab, you can adjust settings for photo-to-paint conversion (refer to Figure 2, above).
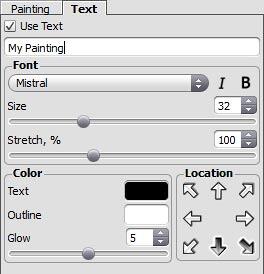
- The Text tab (see Figure 3) allows you to add an inscription to your "painting".

Figure 3: Text tab within the Settings Panel E. Presets
- The Presets area enables you to save the current settings as a preset to use them in the future. There are 40 ready-to-use presets.
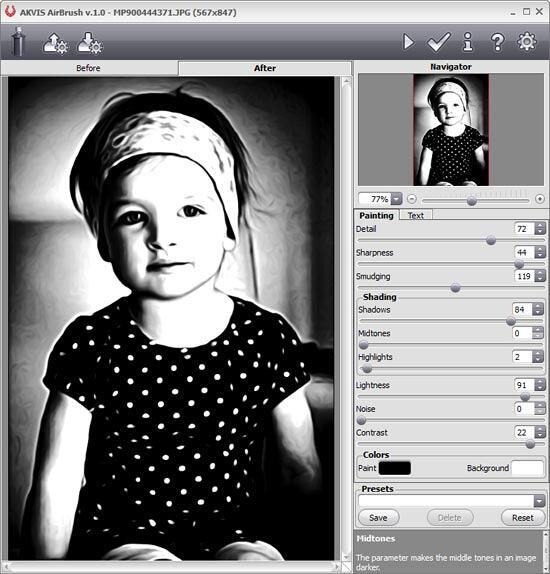
- Play with the parameters, or choose from any of the available presets—when you get the result you want, apply the changes to the preview by clicking the Run button (located within the Control Panel on the top) that you can see below.

- This applies the effect and creates a preview of the changed image in the After tab, as shown in Figure 4.

Figure 6: Preview the changes - Once you’re happy with the preview, apply the result to the image by clicking the Apply button located within the Control Panel on the top (shown below) to return to the image editor.

Here are some Before and After samples created using AKVIS AirBrush:


Back
Specifications
| Photoshop Versions: |
Photoshop 6 and higher |
| Platforms: |
Windows, Mac |
| Site: |
AKVIS |
| Price: |
USD $49 and above |
| Trial Version: |
Available |
Back
