In PowerPoint, all the property fields are saved as metadata. This metadata can be very useful in the cataloging and search of presentations and individual slides. In addition to editing or adding the Property content in Backstage view, you can also bring up the same Properties with the Document Panel, as an interface element within PowerPoint 2013 for Windows which directly appears above the active slide, and below the Ribbon. Additionally, you can use the Advanced Properties option.
Follow these steps to view and edit current presentation properties through the Advanced Properties option in PowerPoint 2013 for Windows:
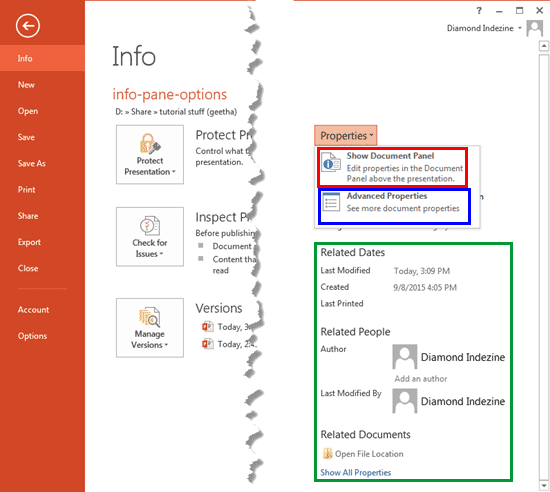
- Open any presentation in PowerPoint that has been saved at least once. Access the File menu to get to Backstage view, and select the Info pane, as shown in Figure 1, below. Within the Properties pane, click the Properties button to bring up a drop-down list, as shown in Figure 1.

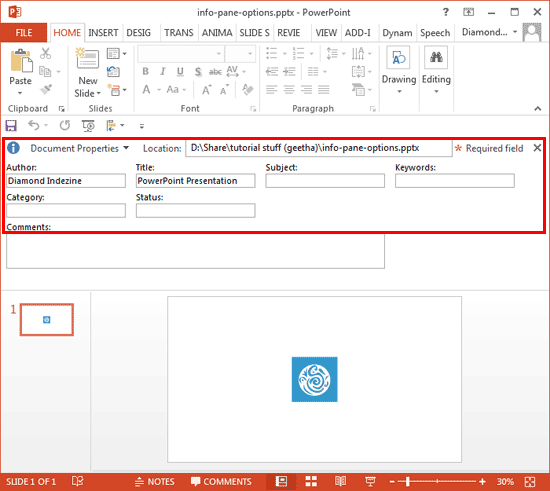
Figure 1: Properties drop-down list- Within the Properties drop-down list, select the Show Document Panel option, as shown highlighted in red within Figure 1, above. Doing so opens the Document Panel within the active PowerPoint below the Ribbon, as shown highlighted in red within Figure 2, below.

Figure 2: Document Panel within the active presentation- Edit any of the properties within the Document Panel as required, such as: adding Authors, changing the Title, Subject, Keywords, Category, etc.
- Once done, close the Document Panel by clicking on the X located at the top right corner of the panel. You can see all updated or newly added properties within the Properties pane, as shown highlighted in green within Figure 1, previously on this page.
- For more advanced options with regard to presentation properties, you can access the Properties dialog box. To access these advanced options, select the Advanced Properties option, as shown highlighted in blue within Figure 1, previously on this page.
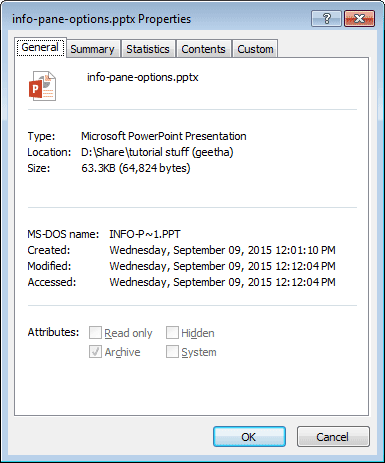
- Doing so brings up the Properties dialog box, as shown in Figure 3, below. Note that the name of the presentation is included as part of the title of the dialog box. This makes it quick and easy to know which presentation you are editing the properties for, especially if you have more than one presentation currently open.

Figure 3: Properties dialog box- The Properties dialog box includes five tabs which are explained below:
General
- Within this tab, you can see overview of the properties including dates for creation, modifications, and last access.
Summary
- Here you can see Title, Author, Subject, Keywords, etc.
Statistics
- This tab displays creation date, time spent creating, number of slides and words, etc.
Contents
- Here you can see which Font(s) and Theme(s) are used in presentation, and Titles of slides.
Custom
- This tab contains additional information that can be added or deleted, such as name of client, name of person who checked the presentation, etc.
- Once done, with editing or adding properties, make sure to save your presentation.


