Indezine Logo


Adding Clip Media to the Clip Organizer in PowerPoint 2010 for Windows

Learn how to add clip media to the Clip Organizer in PowerPoint 2010 for Windows. You can add frequently-used content, so that it is easily accessible within Microsoft Office applications.


Author:

Product/Version: PowerPoint 2010 for Windows

OS: Microsoft Windows XP and higher


Learn PowerPoint

Learn how to pause slides, sounds, and movies – and resume!


We explored the Clip Organizer previously, especially its interface. However, the real benefit of using Clip Organizer is only if you add your frequently used clips within its Collections. There are essentially two ways to add clip media. In this tutorial, we'll explore both ways.

What is the Clip Organizer?

If you are new to Clip Organizer, it's a basic digital asset management program that lets you catalog clip media to be used within PowerPoint and other Microsoft Office programs. Do note that while you can catalog and organize media using the Clip Organizer, you will still have to insert these clip media via the Clip Art task pane in Microsoft Office applications.

The version we are exploring was included as part of Microsoft Office 2000, but the techniques we explore will work for previous versions too. However, Clip Organizer no longer works within newer versions of Microsoft Office released thereafter, such as Office 2013 or subsequent versions.

Follow these steps to learn more PowerPoint 2010 for Windows:
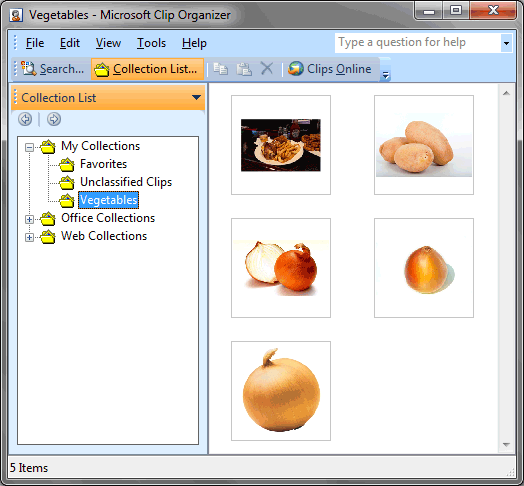
  1. Launch Microsoft Clip Organizer. Make sure that the Collection List pane is active, as shown in Figure 1, below. Then choose the collection to which you want to add the clip media. Figure 1, below shows the collection named 'Vegetables' selected. You can select any collection of your choice.
  2. Collection List pane is active
    Figure 1: Collection List pane is active
  3. Note: Yes, Vegetables is not a Collection that you will find within the Clip Organizer. You have to create it and name it Vegetables, or anything else you want. Learn more in our Create and Organize Collections in Clip Organizer tutorial.
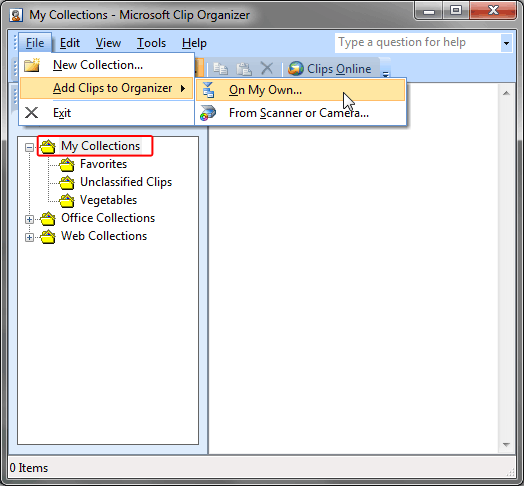
  4. For this tutorial, we selected the top-level My Collections folder as shown highlighted in red within Figure 2. Once your destination Collection is selected, choose the File | Add Clip to Organizer | On My Own menu option, as shown Figure 2.
  5. Add your clips to the Clip Organizer
    Figure 2: Add your clips to the Clip Organizer
  6. Note: The From Scanner or Camera option works only if you have a scanner or a camera attached to your system.
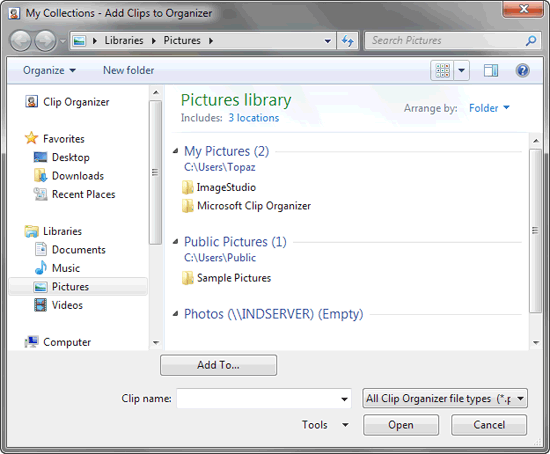
  7. This opens the Add Clips to Organizer dialog box, as shown in Figure 3. Here, locate and select the folder that contains the clip media you want to add.
  8. Add Clips to Organizer dialog box
    Figure 3: Add Clips to Organizer dialog box
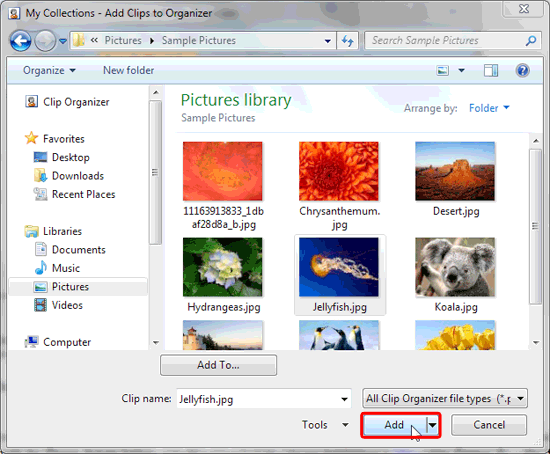
  9. Within the folder, select the clip media, and then click the Add button, as shown highlighted in red within Figure 4.
  10. Select the clip media
    Figure 4: Select the clip media
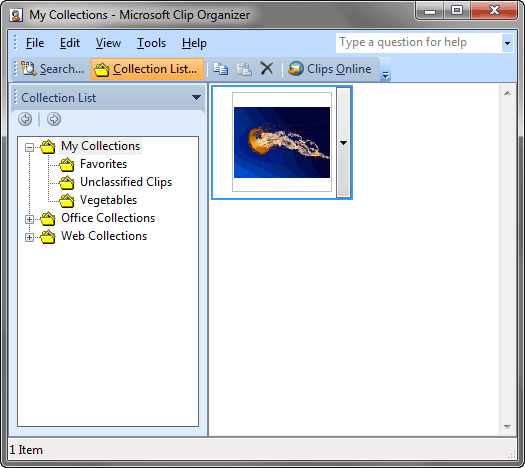
  11. Doing so will add the selected clip media within the Collection folder we selected earlier in Microsoft Clip Organizer. In Figure 5, you can see that the clip media we selected has been added to My Collections.
  12. Clip media added within the Microsoft Clip Organizer
    Figure 5: Clip media added within the Microsoft Clip Organizer

In the next tutorial of this series, we will explore how you can Create and Organize Collections in Clip Organizer.


Clip Organizer: Adding Clip Media to the Clip Organizer (Glossary Page)

You May Also Like: Explore Fonts: Bell MT | Organization of American States (OAS) PowerPoint Templates


Popular Posts

Apply Bevel Effects to Shapes in PowerPoint 2016 for Windows
Learn how to apply bevel effects to shapes in PowerPoint 2016 for Windows.

Creating Curved Shapes in PowerPoint 2010 for Windows
Learn how to create curved shapes in PowerPoint 2010.s

Shapes
Shapes
Learn how you can create and manipulate shapes in PowerPoint -- knowledge of working with shapes is significant because they are the building blocks of creativity in PowerPoint.

Insert Picture from the Office ClipArt Collection in PowerPoint 2013
Learn how to insert picture using Office ClipArt in PowerPoint 2013.


Jigsaw Graphics for PowerPoint

Here are 10 jigsaw graphics containing different shapes. These graphics are available in both black and white and are contained within separate sample presentations that you download. Additionally, these jigsaw graphics are vector shapes, so you can easily edit them within your Microsoft Office program by changing fills, lines, and effects or even applying Shape Styles.

Download and use these Jigsaw Graphics in your slides for just $4.99+


Microsoft and the Office logo are trademarks or registered trademarks of Microsoft Corporation in the United States and/or other countries.

Home | PowerPoint | Photoshop | PowerPoint Templates | PowerPoint Tutorials | Blog | Notes | Ezine | Media Kit | Feedback | Site Map | About Us | Contact Us

Link to Us | Privacy | Testimonials

PowerPoint Backgrounds | Christian PowerPoint Backgrounds | Business PowerPoint Presentation Templates

Plagiarism will be detected by Copyscape

©2000-2023, . All rights reserved.