When you share a presentation via email rather than delivering it in-person or virtually, you should consider an interactive presentation. An interactive PowerPoint presentation always interests audiences since it gets them involved actively navigating the slides. However, audiences must be aware that some interactivity has been included so that they can click a slide object to cause an action to happen. With trigger animations, you click on a PowerPoint shape, or even an Action Button or any other slide object to cause an audio or video clip on the same slide to play, pause, resume, or even stop.
We assume that you have already added some actions to play, pause, or stop your media. Depending upon the type of media you are using, explore these tutorials to learn how you can add actions to them:
The procedure explained in this tutorial is for a video clip, but these techniques work the same way for audio clips.
Follow these steps to add Trigger animations for Media Actions in PowerPoint 2010 for Windows:
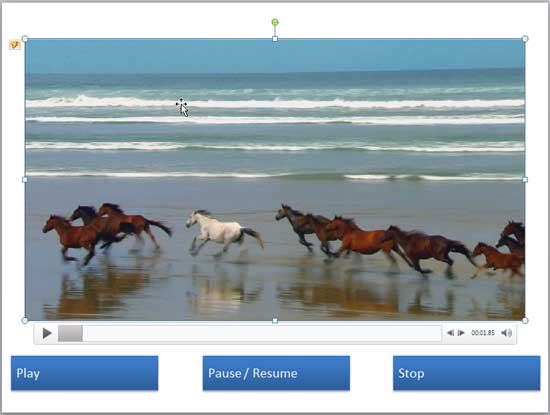
- Select a slide that contains an audio or a video clip with some Audio Actions or Video Actions added. Now, insert three shapes which will work as navigation buttons. For our tutorial example, we inserted three rectangle shapes that had text reading Play, Pause/Resume, and Stop within them, as shown in Figure 1, below. Also, note the video clip on the slide.

Figure 1: Slide with a video clip and shapes used as navigation buttons Basic Shapes or Action Buttons?
- You can also use Action Buttons instead of regular shapes.
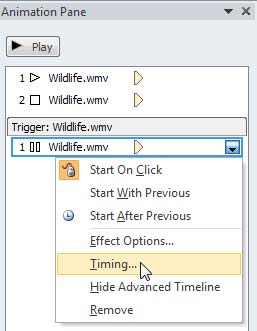
- Within the Animation Pane, right-click any of the Video Actions (or Sound Actions). We chose the Pause action. From the resultant menu, choose the Timing option, as shown in Figure 2, below.

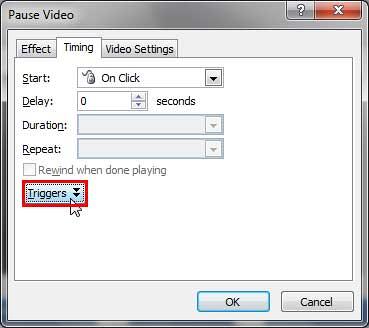
Figure 2: Timing option for the selected action - Doing so brings up a dialog box with Timing options for the selected Action. In our example, the Pause Video dialog box was brought up since we selected Pause action for a video, as shown in Figure 3, below.

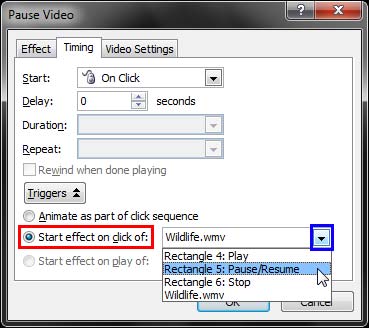
Figure 3: Triggers button within the Timing tab of the Pause Video dialog box - Within the options that come up, select the Start effect on click of radio button, as shown highlighted in red within Figure 4, below. Thereafter, click the downward pointing arrow, as shown highlighted in blue within Figure 4, to bring up a list containing names of objects on the same slide.

Figure 4: List of slide objects displayed for the Start effect on click of option - Within this list, you will find the name of the object through which you want to trigger the selected Action. In this case, we have chosen the shape with Pause / Resume written on it.
Choose Suitable Words
- The words Pause / Resume written in this case are merely the text contained within your shape. Similarly, any text you type in the shape will show up in the Start effect on click of: drop-down list.
- Click the OK button to apply the effect and get back to the slide.
- Now, view your slide in Slide Show view, and play the video clip. While the clip is playing, click the Pause / Resume button. You will find that this now causes the video clip to pause.
- You can similarly add a Play action to the previous shape, the shape that contains the Play text, as shown previously on this page in Figure 1. When done, play your slide, you will find that:
- Clicking the Play button plays your video clip.
- Clicking the Pause / Resume button pauses your video clip.
- Clicking the Pause / Resume button again resumes your video clip from the point where you paused it.
- Clicking the Stop button does nothing as of now, since you still need to add it as a trigger for the Stop Action, we do that next.
- Add a Stop action to the final shape, and the shape that contains the Stop text, as shown in Figure 1, previously on this page. When done, play your slide to ascertain that the Stop action now works.
- Save your presentation often.


