Adding animation to any slide object imparts movement of some sort to that object, and draws the attention of the audience. Of course, you can tweak the animation event, the speed of the animation, and also the delay time before the animation happens. In this tutorial, we'll explore how you can add sound to an animation. The combination of movement and sound makes it compelling for your audience to focus on the object that is being animated. However, this sort of pizzazz only works if you use sound sparingly to highlight the most important part of your presentation. Animation sounds play along with the animation. It is important that you use the perfect sound type for any animation, as using clapping or blasting sounds is very cliché. Now that we have made you aware of the benefits and caveats of using sounds within animations in PowerPoint, let us go ahead and learn how to do so.
Follow this procedure to add sound to an animation in PowerPoint 2010 for Windows:
- Make sure that there is an animated slide object on your slide. You may want to look at our Adding an Animation tutorial if you don't have a slide with an animated object. To begin, we suggest you use a simple shape that has an Entrance animation effect applied.
- Select the slide object that is already animated. Then, ensure that the Animation Pane is visible. To do so, access the Animations tab of the Ribbon, and click the Animation Pane button, as shown in Figure 1, below. Remember that this is a toggle button. So, if your Animation Pane is already visible, then clicking this button will make the pane disappear.
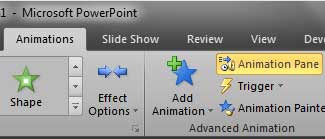
Figure 1: Animation Pane button within Animations tab - You should now see the Animation Pane, as shown in Figure 2, below. Within this pane, you will see a list of animations applied to all objects on the active slide. In Figure 2, you can see that there's a solitary animation on the entire slide.

Figure 2: One animation listed within the Animation Pane - Within the Animation Pane, right-click the animation to which you want to add sound, and from the resultant menu, choose Effect Options, as shown in Figure 3, below. Alternatively, you can also double-click the animation itself within the Animation Pane.
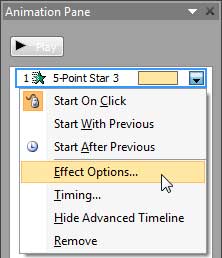
Figure 3: Effect Options selected for the animation - Either way, you bring up a dialog box with options to edit the animation, as shown in Figure 4, below. Within this dialog box, make sure the Effect tab is selected. Within this tab click the Sound option, as shown highlighted in red within Figure 4.
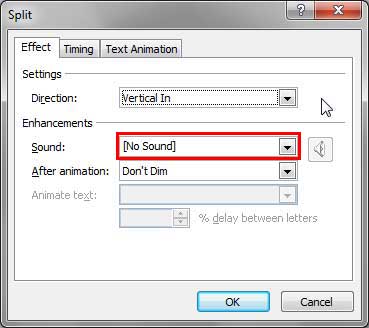
Figure 4: Sound option within animation dialog box Note
- In Figure 4 above, you can see that the dialog box is named Split. The name of this dialog box differs based upon the type of animation applied. In this case, we had applied a Split animation, hence the name. If you had a Wipe animation applied, the dialog box would read Wipe rather than Split. In any case, the Sound options work the same way for any animation effect.
- Doing so reveals the Sound drop-down list, as shown in Figure 5, below. Select any of the pre-built sounds that PowerPoint contains such as Arrow, Bomb, Breeze, Camera, etc. The sounds are of very short duration, typically under 2 or 3 seconds. In Figure 5, you can see that the Applause sound has been selected within the Sound drop-down list.
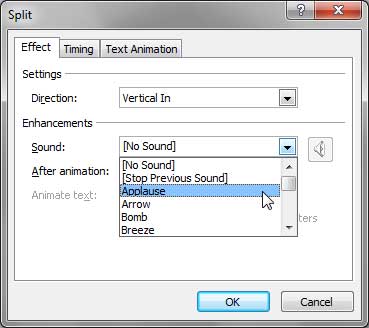
Figure 5: Applause sound selected to play along with the animation - As soon as you select a sound, the volume button located next to the Sound drop-down list becomes activated. Click it to bring up a volume slider that lets you increase or reduce the volume of the animation sound, as shown highlighted in red within Figure 6, below.
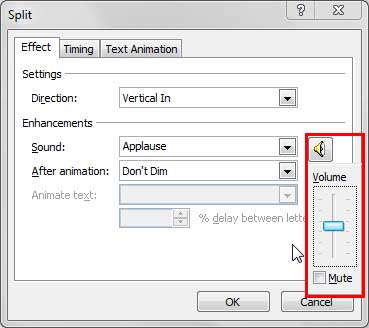
Figure 6: Volume slider within animation dialog box - If you want to add a sound clip other than the preset sounds, scroll down to the bottom of the Sound drop-down list where you will find the Other Sound, option as shown in Figure 7, below. Select this option.
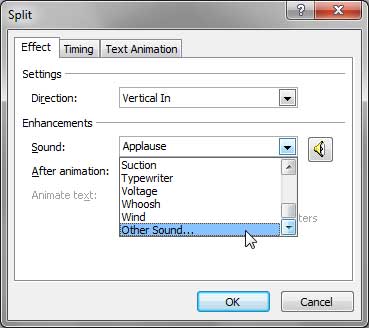
Figure 7: Other Sound option within the Sound drop-down list - This action will take you to the Add Audio dialog box, as shown in Figure 8, below. In this dialog, navigate to the folder where you have saved the sound you want to play as part of the animation. Select the required sound file, and click the OK button in this dialog box, as shown highlighted in red within Figure 8, to add your sound clip to the animation.
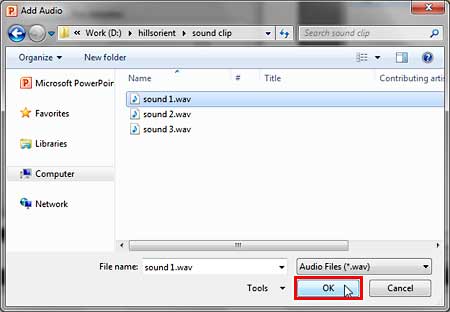
Figure 8: Add Audio dialog box WAVs only for Animation Sounds?
- You can only use WAV files for Animation sounds. Other sound formats such as WMA and MP3 that PowerPoint accepts cannot be used as animation sounds. However, WAV files are typically larger in size than the same MP3 file. You can actually use an MP3 file with a WAV header and trick PowerPoint. Learn more about creating such files in our Use CDex to Add WAV Headers to MP3 Files tutorial.
- In addition to the preset sound library in PowerPoint, and the Other Sound option, you will find two more options at the top of the Sound drop-down list. These are No Sound and Stop Previous Sound, as shown highlighted in red within Figure 9, below.
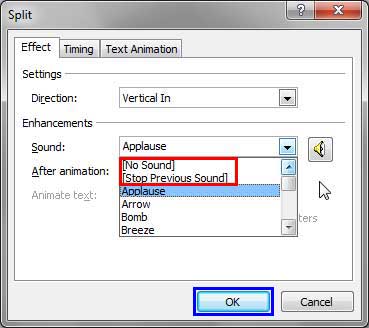
Figure 9: No Sound and Stop Previous Sound options within Sound drop-down list - Here is an explanation of what these options do:
No Sound
- This is the default option which is active before you add any sound to your animation. Choosing this option after you add a sound to your animation provides a quick way to remove sound from your animation.
Stop Previous Sound
- Lets you stop the sound playing along with a previous animation. Sometimes you may add a longer sound clip and you may not want it to play longer. In that case, the next animated object with the Stop Previous Sound event selected will stop that sound from playing further.
- Once you are done selecting the required sound, click the OK button, as shown highlighted in blue within Figure 9, above. Doing so will result in the selected sound playing when the object animates.
- Save your presentation often.


