Indezine Logo


Add and Rename Slide Masters in PowerPoint 2016 for Mac

Learn how to add and rename Slide Masters in PowerPoint 2016 for Mac.


Author:

Product/Version: PowerPoint 2016 for Mac

OS: Mac OS X


Learn PowerPoint

Learn how to ungroup charts in PowerPoint.


In your presentation, a Slide Master is the element that influences everything, be it the slide background or the fonts used for text. Despite having different layouts, all slides in a presentation share a common look, which is provided by the Slide Master. There will be at least one Slide Master in every presentation. However, while adding slides from other presentations, you may end up adding more Slide Masters inadvertently to your presentation. So, how do you know how many Slide Masters your presentation contains? And, how do you add another one? In fact, why do you need another Slide Master at all?

Those are great questions, and we shall explore answers to these questions on this page. First things first though: let us find out how many Slide Masters your presentation contains. To find out, access the Home tab of the Ribbon, and click the Layout button. This brings up the Layout drop-down gallery you see in Figure 1, below.
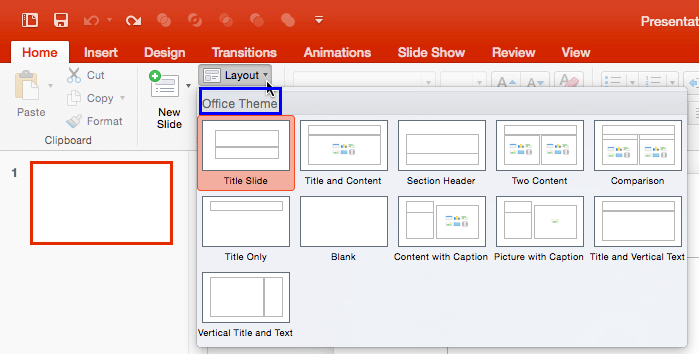
The Layout gallery
Figure 1: The Layout gallery

Notice that the thumbnails that you see in Figure 1 are not Slide Masters. They are Slide Layouts which are contained within the Slide Master. Most new presentations you create in PowerPoint contain just one Slide Master based on the Office Theme. Typically the Theme name may also be used for the Slide Master name, as highlighted in blue within Figure 1, above. Now that we have established the fact that most new presentations contain at least a single Slide Master, why would you need to add a new Slide Master? The reasons may differ but for most users that's because they want their slides to contain two or more different looks (backgrounds, colors, fonts, effects, etc.). For design purists, it is difficult to justify this as a reason. Most professional PowerPoint template designers will only add a second Slide Master for small and subtle differences. Whatever your opinion may be, it's actually quite easy to add a new Slide Master:
Adding a New Slide Master

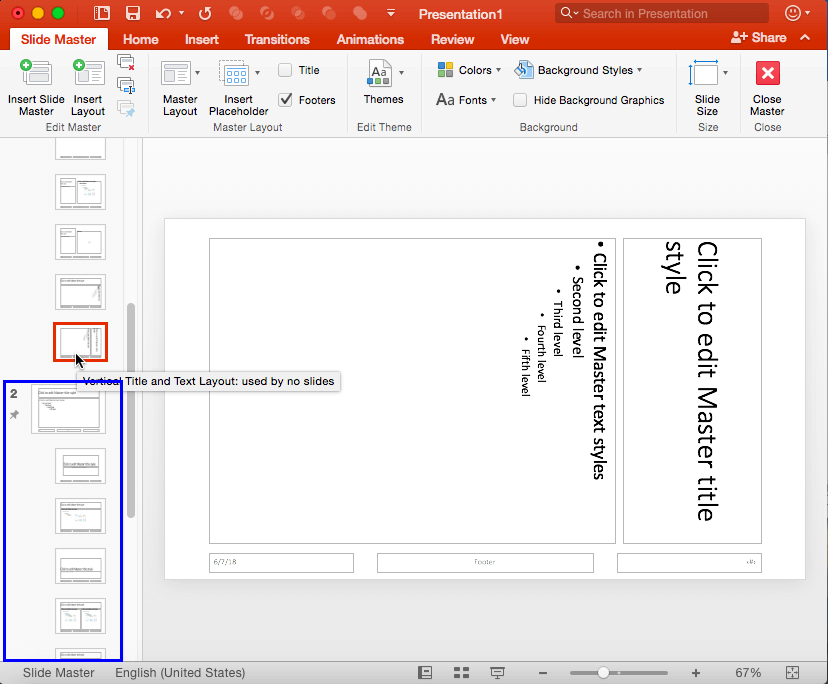
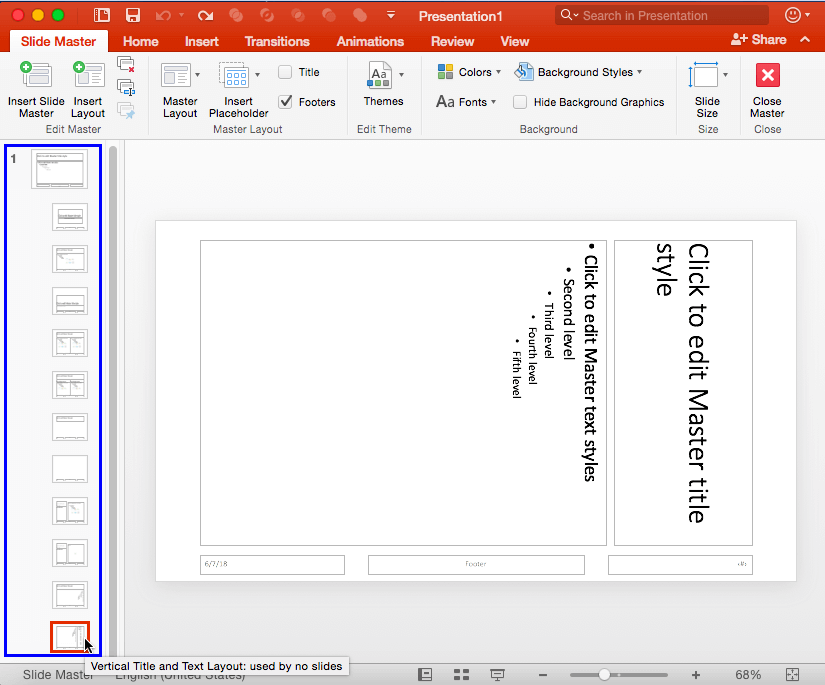
  1. Launch PowerPoint 2016 for Mac and open the presentation that needs a new Slide Master. Next, access the View tab of the Ribbon, and click the Slide Master button. This opens the Slide Master View, as shown in Figure 2. Here, within the pane on the left, you'll find the default Slide Master with associated layouts (highlighted in blue within Figure 2).
  2. Default Slide Master
    Figure 2: Default Slide Master
  3. To add a new Slide Master, click the Insert Slide Master button, as shown highlighted in blue within Figure 3.
  4. Insert Slide Master button
    Figure 3: Insert Slide Master button
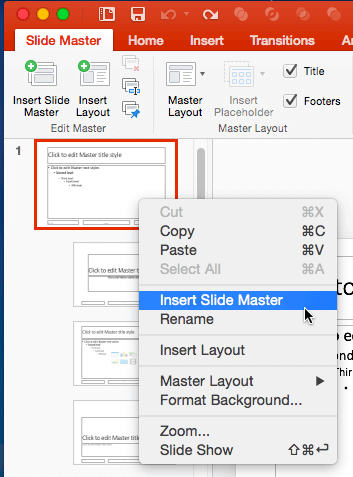
  5. Alternatively, right-click (or Ctrl+click) the existing Slide Master, and choose the Insert Slide Master option from the contextual menu that appears, as shown in Figure 4, below.
  6. Insert Slide Master option within the right-click contextual menu
    Figure 4: Insert Slide Master option within the right-click contextual menu
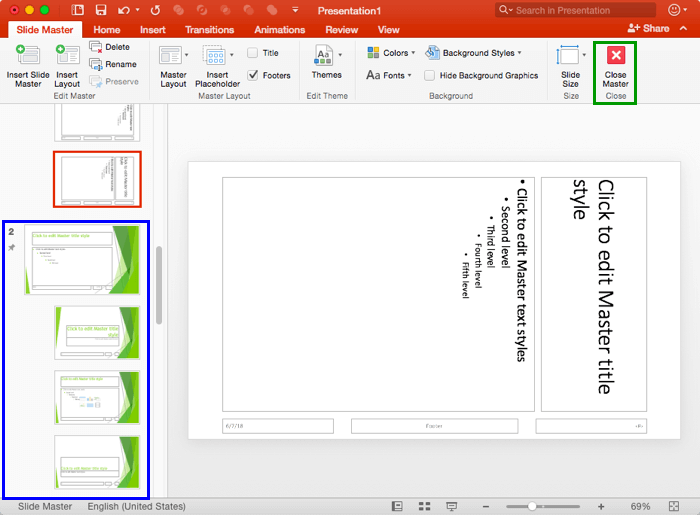
  7. Either of these options will add a new Slide Master, as shown highlighted in blue within Figure 5. Notice that this new Slide Master is numbered 2, since this is the second Slide Master of your presentation.
  8. New Slide Master inserted
    Figure 5: New Slide Master inserted

Adding a Slide Master Applied with a Theme

You can also add a Slide Master from any of existing Themes within PowerPoint. This can be helpful if you want the new Slide Master to be based on a Theme that's not part of the current presentation. To learn how you can do so, follow these steps:
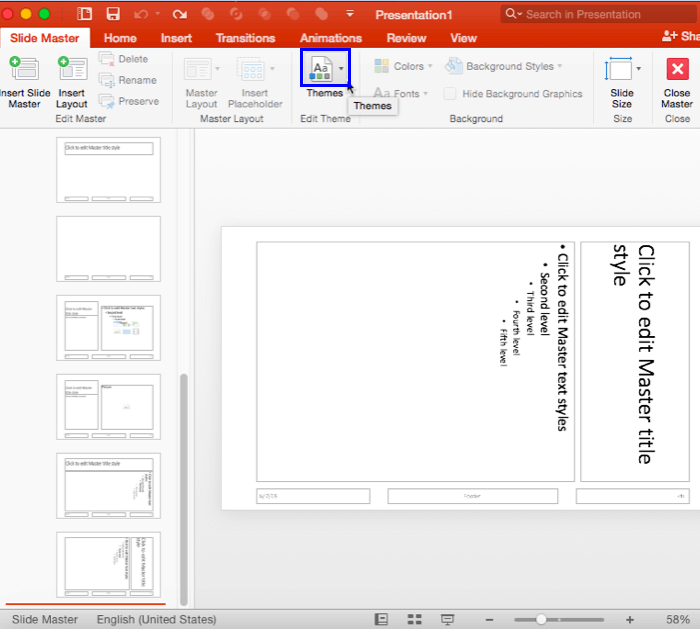
  1. Access the Slide Master view as explained in Step 1 in the preceding section. Thereafter, click at the end of your existing Slide Master (below the last Slide Layout thumbnail) to place an insertion cursor, as shown in Figure 6. Now click the Themes button, as shown highlighted in blue within Figure 6.
  2. Themes button
    Figure 6: Themes button
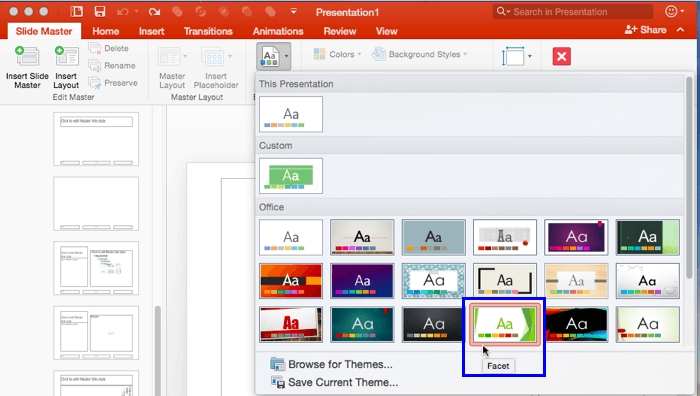
  3. This brings up the Themes drop-down gallery, as shown in Figure 7. Click on a Theme of your choice. We selected the Theme named Facet, as you can see highlighted in blue within Figure 7.
  4. Themes drop-down gallery
    Figure 7: Themes drop-down gallery
  5. This will add a new Slide Master with the selected Theme applied, as shown highlighted in blue within Figure 8. Notice that this new Slide Master is numbered 2, since this is the second Slide Master of your presentation.
  6. New Slide Master gets added along with the selected Theme applied
    Figure 8: New Slide Master gets added along with the selected Theme applied
  7. Once you have added the new Slide Master following any of the ways explained above, you can make changes to the newly added Slide Master as required.

Renaming the Slide Master

To rename the Slide Master follow these steps:
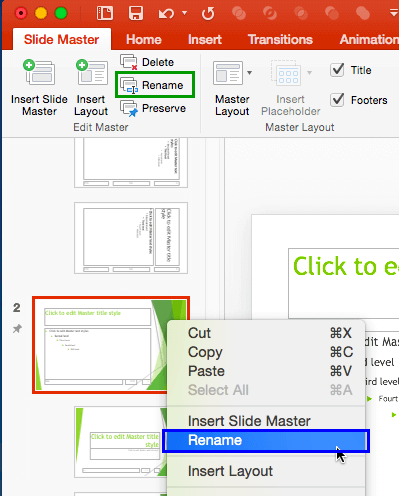
  1. Select and right-click (or Ctrl+click) the Slide Master and select the Rename Master option (highlighted in blue within Figure 9) from the contextual menu that appears. Alternatively, you can select the Slide Master and click the Rename button on the Ribbon (highlighted in green within Figure 9).
  2. Rename the new Slide Master
    Figure 9: Rename the new Slide Master
  3. This will bring up the Rename Layout window, as shown in Figure 10. Just type in the name you like and click the Rename button, as shown in Figure 10.
  4. Rename the new Slide Master
    Figure 10: Rename the new Slide Master

After adding and renaming the new Slide Master, click the Close Master View button (highlighted in green within Figure 8). This will get you back to Normal View. Now access the Home tab of the Ribbon and click the Layout button to bring up the Layout drop-down gallery you see in Figure 10, below. Notice that now there are two Slide Masters within the Layout drop-down gallery (names highlighted in blue within Figure 11, below). Compare Figures 11 and 1.
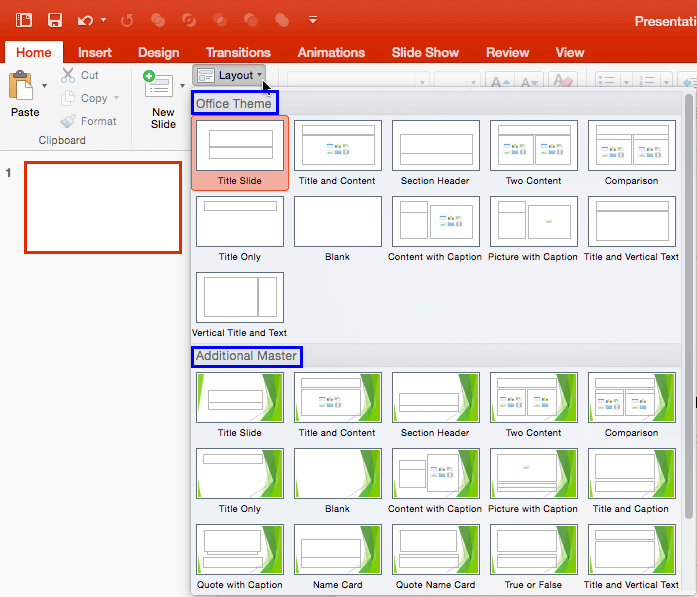
New Slide Master added within the Layout gallery
Figure 11: New Slide Master added within the Layout gallery


See Also:

Slide Master and Slide Layouts: Add and Rename Slide Masters in PowerPoint (Index Page)

Add and Rename Slide Masters in PowerPoint 2016 for Windows
Add and Rename Slide Masters in PowerPoint 2013 for Windows
Add and Rename Slide Masters in PowerPoint 2011 for Mac
Add and Rename Slide Masters in PowerPoint 2010 for Windows

You May Also Like: 6 Reasons Why Your PowerPoint Presentations (Still) Look Boring | Beetroot PowerPoint Templates


Popular Posts

Ten Easy Topics for Pecha Kucha
But what are simple topics, that excite you, and are interesting to your audiences? Of course, if you already have a topic, you need not read further, but if you are still looking for ideas, here are ten easy topics that you can use for your Pecha Kucha presentations.

Drawing Arcs in PowerPoint
Explore how you can draw an Arc shape in PowerPoint.

Set Minimum and Maximum Values on Value Axis in PowerPoint 2013 for Windows
Learn how to set the Minimum and Maximum values on Value Axis of Charts in PowerPoint 2013 for Windows.

Crop Pictures (Mask to Shape) in PowerPoint 2011 for Mac
Learn how to crop pictures using Mask to Shape option in PowerPoint 2011 for Mac.


Handmade Slides: Pushpins for PowerPoint

These “pushpin” graphics are already placed in PowerPoint slides. Just copy them and paste within your slides to create a look that makes a picture, shape, or anything else appear as if it has been pushed onto a surface, board, or wall with a pin! These ready-made pushpins are already within PowerPoint slides, and have been provided in five colors. Just copy them and paste them on your slides.

Download these Pushpins for just $19.99


Microsoft and the Office logo are trademarks or registered trademarks of Microsoft Corporation in the United States and/or other countries.

Home | PowerPoint | Photoshop | PowerPoint Templates | PowerPoint Tutorials | Blog | Notes | Ezine | Media Kit | Feedback | Site Map | About Us | Contact Us

Link to Us | Privacy | Testimonials

PowerPoint Backgrounds | Christian PowerPoint Backgrounds | Business PowerPoint Presentation Templates

Plagiarism will be detected by Copyscape

©2000-2023, . All rights reserved.