After you insert a table in PowerPoint, you will certainly fill it with some content. Even after your table is populated, it may require more additions or deletions later. Like anything else in life, tables need to grow and accommodate more content, or they may even need to shed some of it. Adding or removing content within a table usually entails adding and removing table rows and columns, as required. Follow these steps to learn more in PowerPoint 2013 for Windows:
- Open your presentation and navigate to a slide containing the table you need to edit. Select the table, as shown in Figure 1. Then, select the Table Tools Layout tab of the Ribbon (highlighted in red within Figure 1).
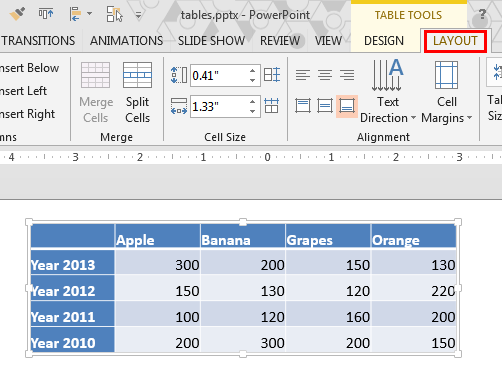
Figure 1: Table Tools Layout tab of the Ribbon
Note: The
Table Tools Layout tab is a
Contextual tab. Contextual tabs are special tabs in the
Ribbon that are not visible all the time. They only make an appearance when you are working with a particular slide object which can be edited using these options.
- Within the Table Tools Layout tab, locate the Rows & Columns group as shown in Figure 2. This group includes four buttons named Insert Above, Insert Below, Insert Left, and Insert Right (highlighted in red within Figure 2). These buttons will help you add and remove table rows and columns.

Figure 2: Rows & Columns group within the Table Tools Layout tab - Now, follow these guidelines to add or remove rows/columns within the table:
Add Table Rows and Columns
- To add a row above a particular row, select that row first. Then click the Insert Above button (highlighted in red within Figure 3).
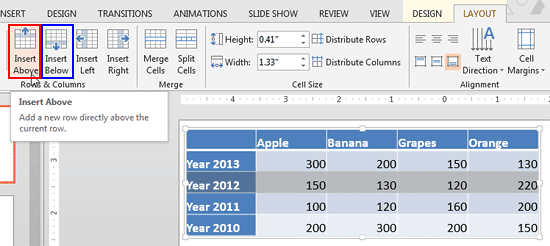
Figure 3: Table row selected - This will add a new row above the selected row as shown in Figure 4.
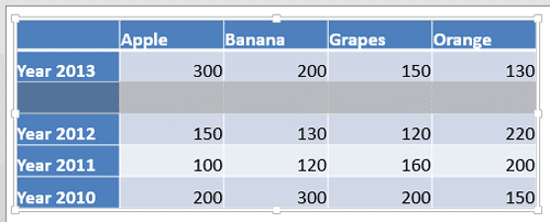
Figure 4: New row inserted above the selected row - Similarly, clicking the Insert Below button (highlighted in blue within Figure 3) with a row selected, will add a new row below the selected row as shown in Figure 5.
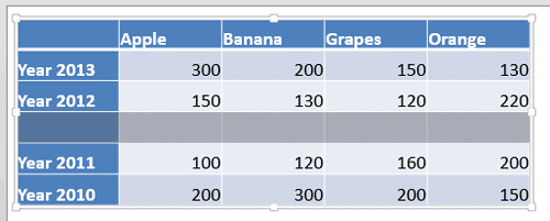
Figure 5: New row inserted below the selected row - To add a column before a particular column, select that column first. Then click the Insert Left button (highlighted in red within Figure 6.
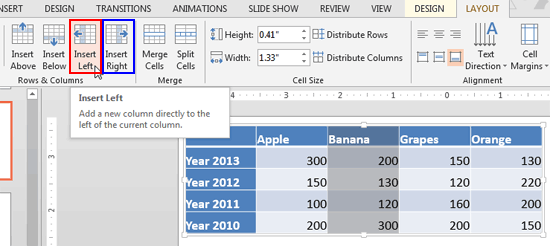
Figure 6: Table column selected - This will add a new column before the selected column, as shown in Figure 7.
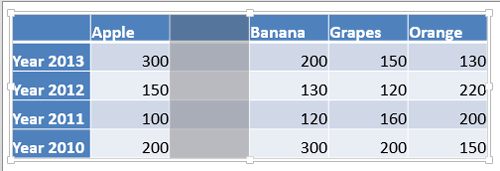
Figure 7: New column added before the selected column - Similarly, clicking the Insert Right button (highlighted in blue within Figure 6) with a column selected, will add a new column next to the selected column as shown in Figure 8.
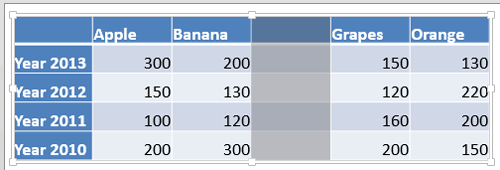
Figure 8: New column added after the selected column
Delete Table Rows and Columns
- Follow these steps to delete a row or a column:
- To delete a particular row(s) select the corresponding row(s) and click the Delete button, as shown highlighted in red within Figure 9. From the resultant drop-down gallery, select the Delete Rows option (refer to Figure 9 again).
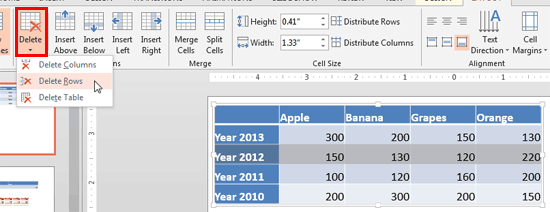
Figure 9: Delete a row within a table - To delete a particular column(s) select the corresponding column(s) and click the Delete button, as shown highlighted in red within Figure 10. From the resultant drop-down gallery, select the Delete Columns option (refer to Figure 10 again).
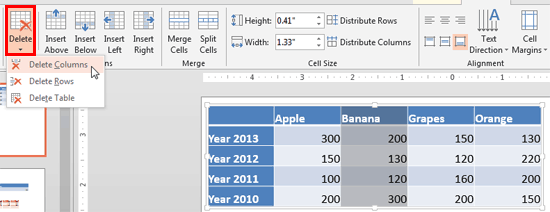
Figure 10: Delete a column within a table
Note: If you select the Delete Table option which is the last option within the Delete drop-down gallery, you'll end up deleting the entire table.
- Add or remove table rows and columns as required.
- Save your presentation often.


