Indezine Logo


Getting Started with Motion Path Animations in PowerPoint 2011 for Mac

Learn to apply Motion Path animations to slide objects in PowerPoint 2011 for Mac. We explore how you can identify the animation’s start and end points.


Author:

Product/Version: PowerPoint 2011 for Mac

OS: Mac OS X


Learn PowerPoint

Learn how you can zoom objects in PowerPoint.


The main difference between Motion Path animations and other animations in PowerPoint (Entrance, Emphasis, and Exit animations) is that Motion Path animations allow you to cause any slide object to move along a path you choose. PowerPoint provides dozens of preset motion paths, and you can also create your own paths as required.

Follow these steps to add Motion Path animations to any object in PowerPoint 2011 for Mac:
  1. Select the object that you want to animate, preferably a text object or a shape. We created and selected a shape.
  2. Alternatively, if you just want to follow this tutorial step-by-step, launch PowerPoint. You will see the Presentation Gallery which allows you to set all attributes of your new presentation, such as a preset Theme or template. Make selections or just click Cancel in this gallery to open a blank presentation with a new slide. PowerPoint 2011 Mac users can change the slide layout of this slide to Blank by selecting Layout | Blank within the Home tab of the Ribbon. Then, insert a shape and select it.
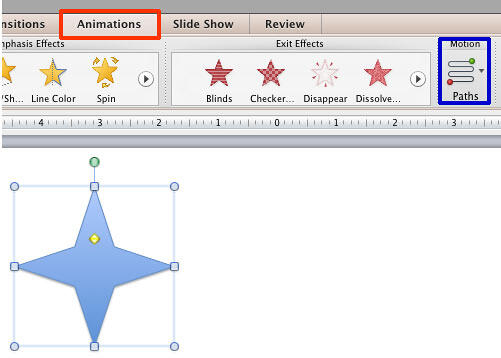
  3. Make sure your shape is still selected. You can see the Four-pointed Star shape selected in Figure 1, below. Now, click the Animations tab of the Ribbon, as shown highlighted in red, within Figure 1. Within this tab, click the Motion Paths button, as shown highlighted in blue, within Figure 1.
  4. Motion Paths button within the Animations tab of the Ribbon
    Figure 1: Motion Paths button within the Animations tab of the Ribbon
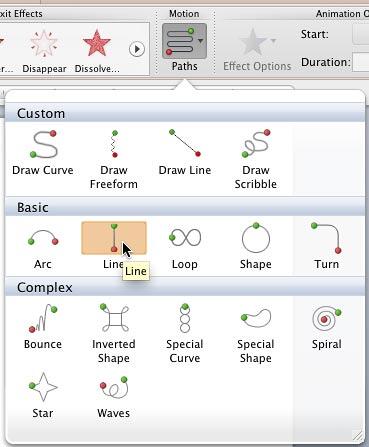
  5. Doing so opens the Motion Paths drop-down gallery, divided into three categories: Custom, Basic, and Complex as shown in Figure 2, below. In Figure 2, you can also see that our cursor is placed over the Line motion path. To apply this motion path to your selected slide object, just click on it. You can also select any other motion path from within the Basic or Complex categories, based on your requirement.
  6. Line Motion Path selected within the Motion Paths drop-down gallery
    Figure 2: Line Motion Path selected within the Motion Paths drop-down gallery
  7. Create Custom Motion Paths

  8. Want to know more about the Custom, Basic, and Complex categories? Explore our Motion Path Animations in PowerPoint 2011 for Mac tutorial. To learn more about how to draw Custom motion paths, explore our Drawing Custom Motion Path in PowerPoint 2011 tutorial.
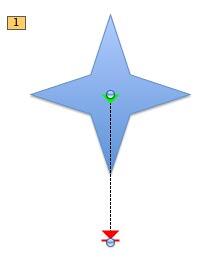
  9. In Figure 3, below, you can see that the Line Motion Path has been applied to the selected shape. The dotted line with two arrowheads that you can see is the path on which the slide object moves while animating. The green arrowhead indicates the motion path's start point and the red arrowhead indicates the end point of the path.
  10. Line Motion Path applied to the slide object
    Figure 3: Line Motion Path applied to the slide object
  11. Once you have applied the Motion Path animation to the slide object, you can view the animation by clicking the Play button within the Preview group of Animations tab, as shown in Figure 4, below.
  12. Play button used to preview the animation
    Figure 4: Play button to preview the animation
  13. Save your presentation often.

See Also:

13 02 02 - Motion Path Animations: Getting Started with Motion Path Animations in PowerPoint (Glossary Page)

Getting Started with Motion Path Animations in PowerPoint 2007, 2003, and 2002 for Windows
Getting Started with Motion Path Animations in PowerPoint 2010 for Windows
Getting Started with Motion Path Animations in PowerPoint 2013 for Windows
Getting Started with Motion Path Animations in PowerPoint 2016 for Windows

You May Also Like: Stand Out with a Direct and Dramatic Opening | Pumps PowerPoint Templates


Popular Posts

Apply Bevel Effects to Shapes in PowerPoint 2016 for Windows
Learn how to apply bevel effects to shapes in PowerPoint 2016 for Windows.

Creating Curved Shapes in PowerPoint 2010 for Windows
Learn how to create curved shapes in PowerPoint 2010.s

Shapes
Shapes
Learn how you can create and manipulate shapes in PowerPoint -- knowledge of working with shapes is significant because they are the building blocks of creativity in PowerPoint.

Insert Picture from the Office ClipArt Collection in PowerPoint 2013
Learn how to insert picture using Office ClipArt in PowerPoint 2013.


Organic Shapes with Brush Edges

You get 8 shape types plus lines as part of this Organic Shapes collection. Each of these 8 shape types have 10 variants. So you end up with 80 hand-drawn shape options! Again each of these 80 shapes have 12 brush stroke styles! Plus you get the lines and arrows in 12 brush stroke styles too. Combine all variations to end up with more than 3000 possibilities.

Buy and Download for $99+ (83 MB)


Microsoft and the Office logo are trademarks or registered trademarks of Microsoft Corporation in the United States and/or other countries.

Home | PowerPoint | Photoshop | PowerPoint Templates | PowerPoint Tutorials | Blog | Notes | Ezine | Media Kit | Feedback | Site Map | About Us | Contact Us

Link to Us | Privacy | Testimonials

PowerPoint Backgrounds | Christian PowerPoint Backgrounds | Business PowerPoint Presentation Templates

Plagiarism will be detected by Copyscape

©2000-2023, . All rights reserved.