Motion Path animations in PowerPoint enable you to make any slide object move within or outside the slide on a particular path. PowerPoint provides dozens of Motion Path presets, in every shape that you can imagine.
Follow these steps to add a Motion Path animation to any object in PowerPoint 2013 for Windows:
- Select the object that you want to animate. You can select any object on your slide. We created and selected a shape.
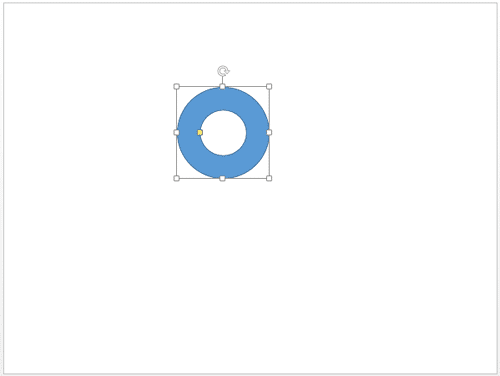
- Alternatively, if you just want to follow this tutorial step-by-step, launch PowerPoint 2013 for Windows. Within the Presentation Gallery, select the Blank Presentation option. PowerPoint will open a new presentation with a Title slide. PowerPoint 2013 users can optionally change the slide layout to Blank by selecting the Home tab | Layout | Blank option. Then, insert a shape and select it as shown in Figure 1, below.

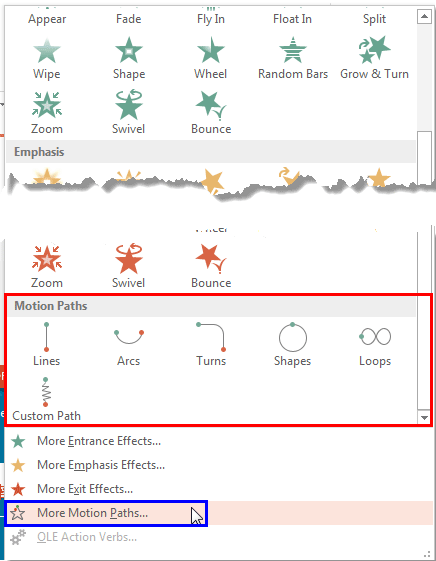
Figure 1: Shape inserted on the slide - With the shape still selected, access the Animations tab of the Ribbon. Within the Advanced Animation group, click the Add Animation button to bring up the Add Animation drop-down gallery, as shown in Figure 2, below. Make sure you scroll down to the bottom of the Add Animation gallery to see the Motion Paths section, as shown highlighted in red within Figure 2.

Figure 2: Motion Path animations within Add Animation drop-down gallery - Select any Motion Paths within this section, as shown highlighted in red within Figure 2, above, by clicking on it. Doing so applies the Motion Path animation to the selected slide object. Otherwise, if you want to explore more Motion Paths, click the More Motion Paths option within the Add Animation gallery, as shown highlighted in blue within Figure 2. Doing so brings up the Add Motion Path dialog box, as shown in Figure 3, below.

Figure 3: Add Motion Path dialog box Create Custom Motion Paths
- Among the Motion Path animations that you see within the Add Animation drop-down gallery, the Custom Path type is used to create new Motion Paths. Look at our Drawing Custom Motion Path in PowerPoint 2013 tutorial to learn more.
- Within the Add Motion Effect dialog box, you can see that Motion Path Effects available are divided into three categories. Scroll down to explore all of them. Click on any Motion Path to apply it to the selected slide object. In Figure 3, above, you can see the Bounce Right effect has been selected.
- Your slide object will show a Live Preview of the applied Motion Path animation. Try applying different Motion Path animations, and when you find the one you are looking for, click the OK button to get back to the slide.
View Live Preview
- To view a Live Preview of the animation effect, the Preview Effect check-box in the bottom right corner of the Add Motion Path dialog box should be selected, as shown highlighted in red within Figure 3, above. If the Add Motion Path dialog box overlaps the slide object, you can't see the effect of the selected animation. Thus, it is a good idea to place the dialog box in a position that is a little offset from the animated slide object on the slide.
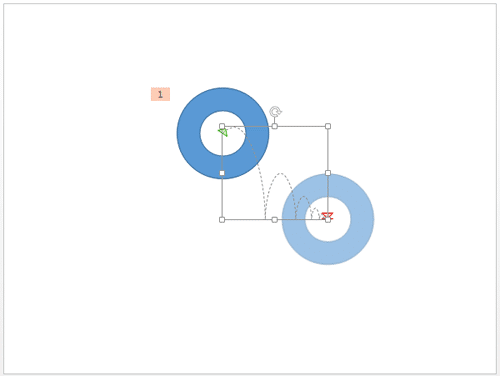
- Now you can see the Motion Path applied to your slide object. In Figure 4, below, you can see that the Bounce Right Motion Path has been applied to the selected shape. The dotted line with two arrowheads that you can see is the path on which the slide object moves while animating. The green arrowhead indicates the motion path's start point and the red arrowhead indicates the end point of the path. Also notice that PowerPoint 2013 shows a faded preview of the animated slide object's end position. This is a new feature introduced within this version.

Figure 4: Bounce Right Motion Path applied to the selected shape - Save your presentation often.


