When you are collaborating on a presentation, or even if someone else is designing slides for you, you will want to give feedback without editing the slides themselves. Comments are great for such scenarios. A comment is a note that you can attach to any slide object or to a whole slide.
The ability to add comments into your PowerPoint presentation enables you to write important notes for particular slide objects, or for the slide and it is a great way to provide feedback to others about their presentation. Once you add a comment, you can edit the comment and even get replies for the comment.
Follow these steps to add, edit, or delete comments in PowerPoint 2013 for Windows:
- Open a presentation and navigate to the slide where you want to add a comment, as shown in Figure 1, below.

Figure 1: Slide with picture selected- Access the Review tab of the Ribbon, and click the New Comment button, as shown highlighted in red within Figure 2, below.

Figure 2: New Comment button- Doing so adds a comment icon on the slide, as shown highlighted in blue within Figure 3, below. Also, this action may open the Comments Task Pane, as shown highlighted in red within Figure 3.
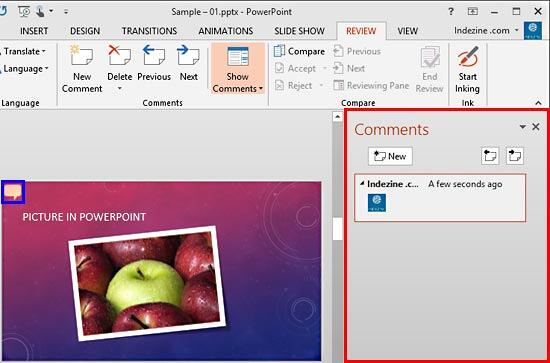
Figure 3: Comment icon and Task Pane- Now, within the Comments Task Pane, just type in your comment within the box, as shown highlighted in red within Figure 4, below. Once done, press Enter or click outside the comment box.
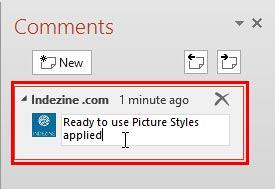
Figure 4: Type in the comments- You can easily change the placement of the comment icon by dragging the icon. In Figure 5, below you can see the comments icon is repositioned. Compare the comments icon placement, as shown highlighted in blue within Figure 3, above.
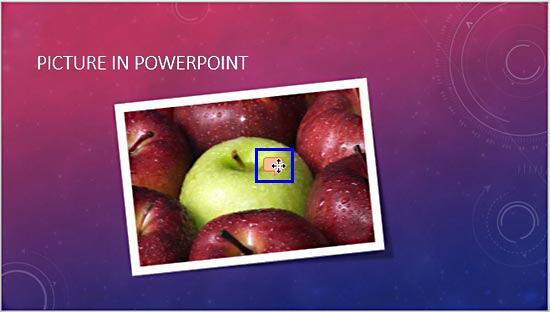
Figure 5: Comment icon repositioned- To edit, reply, or delete the comment, click the comment icon to bring up the Comments Task pane, as shown in Figure 6, below. To edit the comment, click within the comment box, as shown highlighted in red within Figure 6, and make the changes you want. Then, click outside the comment box to complete the changes. You can also reply to a comment by clicking the Reply box, as shown highlighted in blue within Figure 6. Then type in your reply in the text entry box, then press the Enter key to finish.
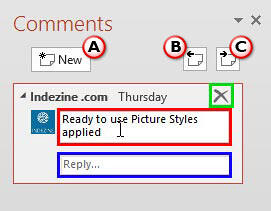
Figure 6: Editing and replying a comment- To delete the comment, select the Review tab of the Ribbon. Then, click the top half of Delete button, as shown highlighted in red within Figure 7, below. To be provided with more options, click the lower half of the Delete button, as shown highlighted in blue within Figure 7. Doing so opens a drop-down menu, as shown in Figure 7.
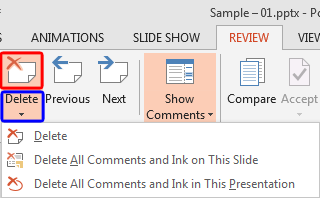
Figure 7: Delete drop-down menu- There are three options within the Delete button drop-down menu which are explained below:
Delete
- Deletes the selected comment.
Delete All Comments and Ink on This Slide
- Deletes all the comments on the current slide.
Delete All Comments and Ink in This Presentation
- Deletes all the comments within the open presentation.
- Alternatively, click the Delete icon within the Comments Task Pane, as shown highlighted in green within Figure 6, shown previously on this page. Or right-click the comments icon on the slide itself and from the resultant context menu, select the Delete Comment option, as shown in Figure 8, below.
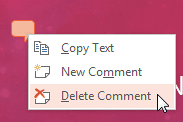
Figure 8: Delete Comment option
Cannot Add Comments?
- Can't see the Comment icon on the slide? Select the Review tab of the Ribbon and click the lower half of the Show Comments button. From the resultant drop-down menu, select the Show Markup option, as shown highlighted in red within Figure 9, below. This is a toggle option to hide/show the Comments icon. To hide/show the Comments Task Pane, click the upper half of the Show Comments button or select/deselect the Comments Pane option, as shown highlighted in blue within Figure 9.
- Also note that when both the Comments icon and the Comments Task Pane are visible. Then, if you click the Show Markup option, both the Comments icon and the Comments Task Pane will disappear. Thereafter, clicking the same Show Markup option again will bring back only the Comments icon.
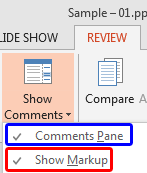
Figure 9: Show Comments button
- There are more three buttons within the Comments Task Pane which are explained below, as marked in Figure 6, shown previously on this page:
A. New (Insert Comment)
- This button enables you to add new comment(s).
B. Previous
- Use this button to go to previous comment(s). The Previous button can also be found within the Review tab. Refer to Figure 7, shown earlier on this page.
C. Next
- Use this button to go to next comment(s). The Next button can also be found within the Review tab. Refer to Figure 7, shown earlier on this page.
- Make sure to save your presentation so that all comments are saved.


