You have already explored what a digital signature is, and how a digital signature can be important for use in PowerPoint presentations. To digitally sign a presentation, you need a digital certificate. If you try to digitally sign any presentation without a digital certificate in PowerPoint 2010, you are prompted to acquire or create a digital signature.
Follow these steps to acquire or create digital signatures in PowerPoint 2010 for Windows:
- Launch PowerPoint, and open any existing presentation that you want to add a digital signature to. If you made any changes to your slides, do save your presentation before you proceed further.
- Access the File menu, and choose the Info option to get to Backstage view, as shown in Figure 1, below. Thereafter, select the Protect Presentation option to bring up a small drop-down menu, as shown in Figure 1. From the drop-down menu, select the Add a Digital Signature option, as shown highlighted in red within Figure 1.
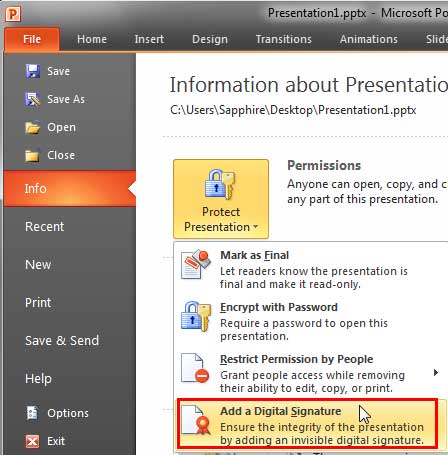
Figure 1: Add a Digital Signature option selected within the Protect Presentation drop-down menu- If you see a message window that introduces you to digital signatures (we covered this in our Getting Started with Digital Signatures tutorial). Click the OK button. If you do not see this message window, continue to the next step.
- You will see the Get a Digital ID dialog box, as shown in Figure 2, below.
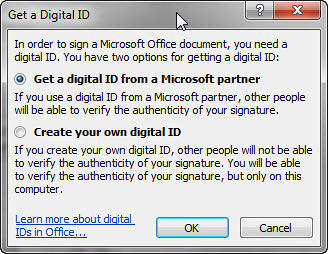
Figure 2: Get a Digital ID dialog box- Within this Get a Digital ID dialog box, you'll find two options: Get a digital ID from a Microsoft partner, and Create your own digital ID.
- These options are explained below:
1. Get a digital signature from a Microsoft partner
- Select this radio button and click the OK button. Doing so opens a web page from where you can buy a Digital ID as shown in Figure 3, below. Here you can find services that issue digital IDs for your use, or services that complement the 2007/2010 Microsoft Office system and use digital IDs. You can check out the services listed on this web page, and choose any service based on your requirement and budget.
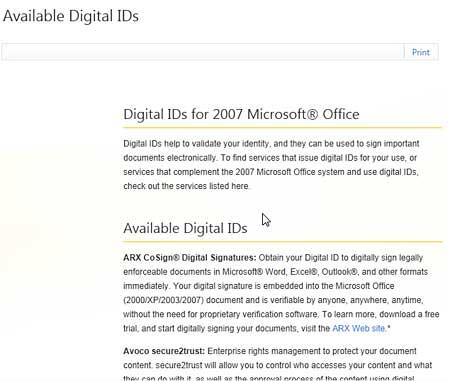
Figure 3: Web page showing a list of services for digital IDs
-
Office 2020 or 2007?
Although the web page lists the services that complement the 2007 Microsoft Office system, the same list works for Microsoft Office 2010 as well.
2. Create your own digital signature
- Select this radio button and click the OK button within the Get a Digital ID dialog box. Doing so opens the Create a Digital ID dialog box, as shown in Figure 4, below.
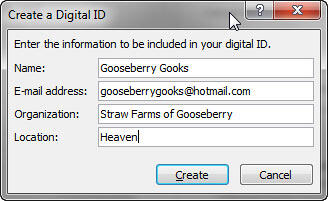
Figure 4: Create a Digital ID dialog box- Type the required information to include within your digital signature. The fields you need to populate are Name, E-mail, Organization, and Location. Thereafter, click the Create button.
- Doing so brings up the Sign dialog box, as shown in Figure 5, below.

Figure 5: Sign dialog box- Type in the purpose for signing this document within the Purpose for signing this document text box, as shown highlighted in red within Figure 5, above. Once done, click the Sign button, as shown highlighted in blue within Figure 5.
- This opens a Signature Confirmation window, as shown in Figure 6, below. Click the OK button to proceed.
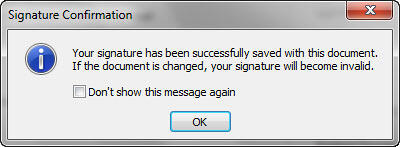
Figure 6: Sign dialog box- Once the presentation has been signed, you can see a red Signatures icon on the Status Bar, as shown highlighted in red within Figure 7, below.

Figure 7: Signature icon displayed on the Status Bar- Cannot see the Signature icon on the Status Bar after signing your document? The option might have been turned off. To enable it, you can right-click on an empty area of the Status Bar and make sure that the Signatures option is checked, as shown in Figure 8, below.
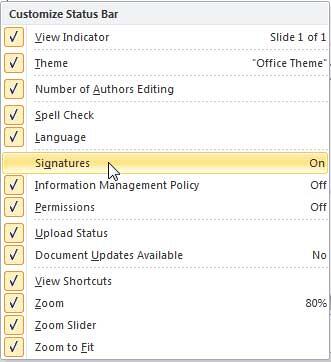
Figure 8: Signatures option to be selected- In the preceding steps, you created your own digital signature, the same signature is saved locally and will be available to digitally sign in any new documents hereafter. Save your presentation often.


